R
RansacktheElder
- 275
- 0
I ran across this online and thought it might be useful to some of us. I'm going to scrog my nest one's and sog once I find the right mom's. Anyway, enjoy!
ADVANCED INDOOR SOIL-BASED GROW ETHODS
NEW, ADVANCED WAYS OF IMPROVING YOUR CANNABIS plants' yield have emerged over the past several years and some methods have become quite popular. The three most common types of advanced indoor growing are SOG, ScrOG and cabinet growing. SOG and ScrOG are ways of growing serious numbers of cannabis top colas. Cabinet growing is a method of stealthily growing several plants in the corner of any room without drawing too much attention to your grow. Although these methods don't have to be soil-based (you can adapt a hydroponics setup to use these methods as well) soil is the most widely used medium in these setups, and so will be the focus of this chapter.
The idea behind these advanced indoor grow methods is that, in most cases, the cola is going to produce the most bud so why not try to get that part of the plant to grow really big by creating an environment that concentrates on the top part of the plant? After all, the bottom branches of indoor cannabis plants don't catch much of the light cast from your HIDs. Enter SOG, which stands for Sea of Green and the two other advanced indoor grow methods we will discuss in this chapter.
PREPARING THE SPECIAL CLONE MOTHER1
Before we discuss these popular advanced grow methods we will touch on cloning because this is an important part of advanced cultivation. Before you select that ^special' plant that you wish to replicate numerous times via cloning you must first of all grow out a test crop from seed. During the third and forth week of vegetative growth you take cuttings from all the test plants and label each one.
You must not flower any of these cuttings. If any of cuttings get too big to manage then reproduce them by taking further cuttings from each one and labeling them. Continue to grow the test plants and flower them by manipulating the pho-toperiod. At this point you can remove the males and the corresponding male clones because we are only looking for a special female. At the end of the test plants' flowering period you should be able to identify the 'special' mother plant that has done better than all the others. The corresponding cutting that was taken from this 'special' plant is then allowed to grow to its full size. The other cuttings are simply discarded because you will not be using them. In order to ensure that you find a good 'special clone mother' you should try and grow more than twenty plants. Good breeders will test grow as many as 100 or even 1000 plants to find a truly exceptional specimen.
The reason for taking the cuttings before flowering is so that you will not have a bunch of flowering cuttings, which need to be reverted to vegetative growth.* That would be too time-consuming.** If the clone has flowers on it then it can be flowered right away by manipulating the photoperiod. The result is much like a piece of bud on a small stick. Clones carry the same age as the parent plant they where taken from. Not only that but they are sexually mature enough to flower if taken from a flowering plant. If they only had a week to go before flowering then you will have to wait a week before you can flower them. You can flower two-inch clones if they were taken from a plant during the flowering cycle. They will finish when their flowering time is over but the quantity is reduced because the clone was not allowed to grow more node regions during vegetative growth. In short, clones are best if taken from the mother before flowering begins.
A cutting that is taken in the vegetative state allows the grower more control over the plant. That is why you should take lots of cuttings from different plants during the vegetative stage of growth and then later select the clone(s) that came from the 'special clone mother1. You might want to allow the 'special clone mother' to fully flower at the end of the test grow to confirm the plant's potency. The corresponding clone(s), on the other hand, will not have flowered yet because you will have kept the clone(s) in a constant state of vegetative growth under a 24-hour light cycle. It is your job, as the grower, to then take multiple cuttings and grow these multiple clones into a room full of highly potent,’ special females'!
You should also keep at least one cutting from this original clone mother elsewhere and in the vegetative growth stage so that you can continue to take cuttings. This clone that is put aside becomes the new 'clone mother' and is the source for all our future clones of this special plant.
The disadvantages of selecting for that special clone is that it takes time to grow the test crop and you need two grow spaces to house your plants. Once you have finished harvesting, you must grow the special clone for three weeks before you take multiple cuttings from her. How many cuttings you take depends on how many clones you want to grow to full maturity next time around. Sometimes you might have to go another round in order to generate enough clones. Clones also share the exact same problems — be it pest resistance, nutrient requirements or genetic disorders. If a problem affects one clone then it will generally affect all the rest just as quickly. The advantage of using clones is that you can have a room full of identical copies of that special plant you really liked. You will not need to prune the plants to keep them in formation. It is possible to produce twice the harvest size of the test grow based on the selection of a clone that yielded more than others did.
For clarity we will list each process step by step.
1. Grow a large test crop.
2. Take cuttings from each plant and label everything.
3. Do not flower the cuttings.
4. Continue to grow the test crop.
5. Remove the males during flowering and their corresponding clones.
6. Select the best female at the end of flowering and her corresponding clone.
7. Grow the new clone mother but do not flower her.
8. Take multiple cuttings from the new clone mother when she has developed lots of branches. You can use pruning techniques to increase branch numbers.
9. Use these clones as your next source of genetics for your following grow.
10. Keep at least one clone aside and do not flower it. It will be. The next clone mother.
Growers like to sometimes swap or buy clones because it prevents them for having to grow a test crop and select a special female. Although this method is certainly less time-consuming it means that you will have to communicate with other growers and this is a security risk. Sometimes medical cannabis clubs offer clones for sale to medical users.
Although any of the advanced growing methods can be done from seed you will not get all the benefits unless you use clones.
SOG
A SOG setup can be any size but must maintain the same basic shape and follow certain SOG rules. In SOG grows you're looking at one plant per square foot or even one plant per 0.1 square feet. Very short Indica plants can be grown in as little space as 0.1 square feet. Most Indica varieties can be grown in less that 1.0 square feet but in general most growers end up using 0.5 square feet per plant. Pure Sativa strains generally do not need to go much more than 1.5 square feet in SOG. This should give you a good idea of how many clones you will need for your grow area.
Next, you need to select pots for the setup. SOG calls for tube-shaped pots or pots of greater depth than width. You can make these yourself or buy these pots in a store. The objective here is to pack as many pots full of plants as you can into the SOG grow area so that it becomes a big cluster of pots with clones. This is the basic rule of any SOG grow. Pack everything in as densely as you can. The clones are planted all at once, after which time no new plants are introduced into the SOG grow room. When they have reached the desired height (keep it small), they should be flowered. It usually takes about one to two weeks of vegetative growth before the clones are ready to be flowered.* Because the clones have been taken from a mother plant, they are effectively adult plants carrying the age of the mother plant with them and don't need to spend much time in the vegetative growth stage of the life cycle. Since you took them from a plant that was nearly flowering they'll start to flower shortly after you introduce the 12/12 light cycle.
The end result will be a full, dense canopy of bud, hence the name Sea Of Green. Because you're using clones, you only have to grow them for the remainder of their flowering times. You can expect to turn out a large quantity of bud every couple of months (a short period of vegetative growth with a full period of flowering).
SOG essentially uses clone plantlets to increase the rate of bud production in a growing operation. It is especially useful where grow height is a problem because the plantlets will never reach their optimal size. SOG plants are always much shorter than plants grown from seedlings and they are flowered as quickly as possible in the SOG environment. You can not do this with seedlings because young cannabis plants are not sexually mature enough to be flowered like this. In fact sexual orientation is not even genetically determined until the third of fourth week of vegetative growth. This same rule applies to feminized seeds that can become males under certain conditions.
SCROG
ScrOG is like a SOG grow except that fewer plants are used in conjunction with a screen to fill the grow area with heavy top colas — hence its name, ScrOG or Screen of Green.
The screen is simply a large wire mesh placed between your light and the plants. Again, clones from a female plant are used, but we allow at least one square foot per flowering plant in the ScrOG method. The plants aren't flowered until they have covered the entire mesh with green. As the plants grow up through the wire mesh they're trained and worked around the netting to form a very even canopy. The top colas and side branches are all trained under the screen.
There are many variations of the above two methods, yet they all utilize the same principles. SOGs and ScrOGs were originally developed to get the most out of poor quality fluorescent lights. The grower would line the roof of the shelf or box with fluorescent tubes to try and get the most out of their grow. Today's growers, using good HID bulbs, have taken these setups to a new level: pushing their buds to the limit. Some people even grow top colas that are the size of large corncobs or soda bottles!
ScrOG Growing by Real High
Real High is a ScrOG lover and has been growing ScrOG style for some years. He has added a bit to the ScrOG method through his experience with the process. This should help you understand more about the ScrOG method and what people have learned with this new technique.
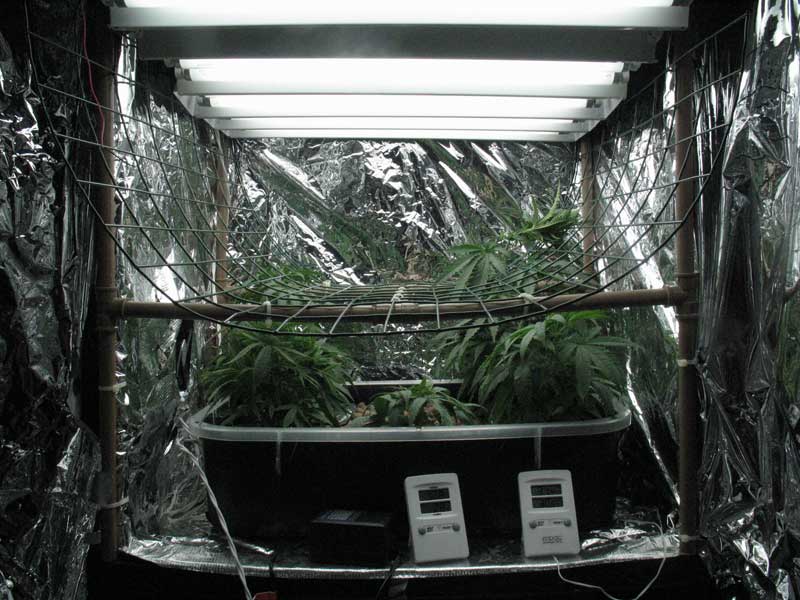
My setup is like a SOG growing, but a screen is used to train the plant to grow horizontally, creating a canopy of buds beneath the light. The screen is simply made from chicken wire or nylon poultry fencing, or you can use hooks and 20 Ib. fishing line to make the net.
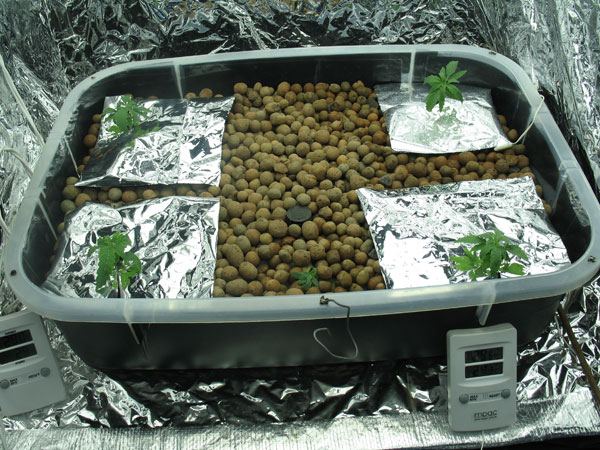
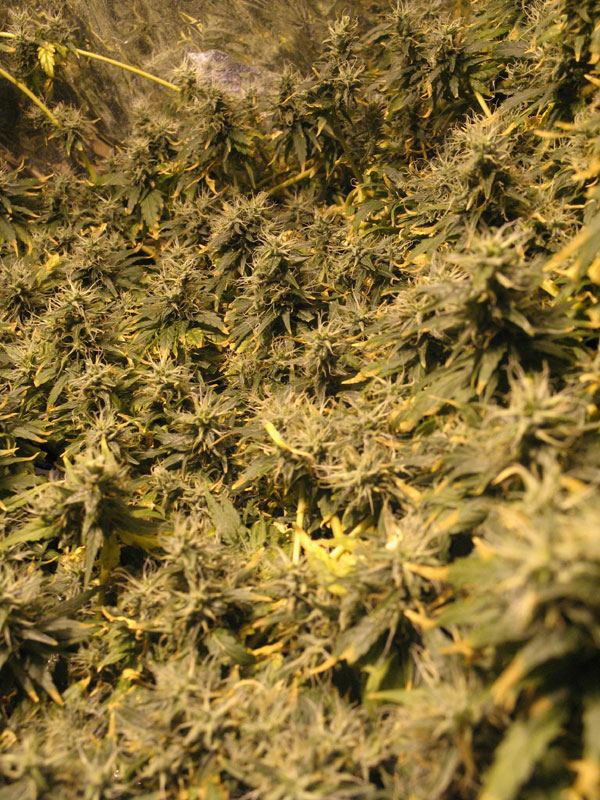
This picture shows a ScrOG variation. II
Is a small SerOG setup for a cabinet growing. Tins picture also contains a homemade octagonal vented hood for a 250-watl HPS light. Picture by foi.
The screen is installed at a fixed height above the plant medium. For Indica varieties the screen does not need to be much more than 8 inches above the pots. Indica Saliva hybrids need about 12 inches white Sativa plants tend to have longer internodes so you may have to use a screen that is about 18 inches above the pots. If your strain is a pure Sativa variety, like Haze or Thai, you may have to raise your screen to around 24 inches. This space allows the base of the plant a certain amount of vertical growth before branching occurs on the clone. The clone should start to branch just under the screen but if it does not do not worry because you are going to be training them anyway. The light should be suspended by adjustable chains so that it can be raised if necessary.
ScrOG growing doesn't require as many plants as SOG (allow at least one square foot per flowering plant), but takes anywhere from one to three weeks longer per grow because we will be in the vegetative growth stage longer than a SOG grow to allow the plants to fill out.
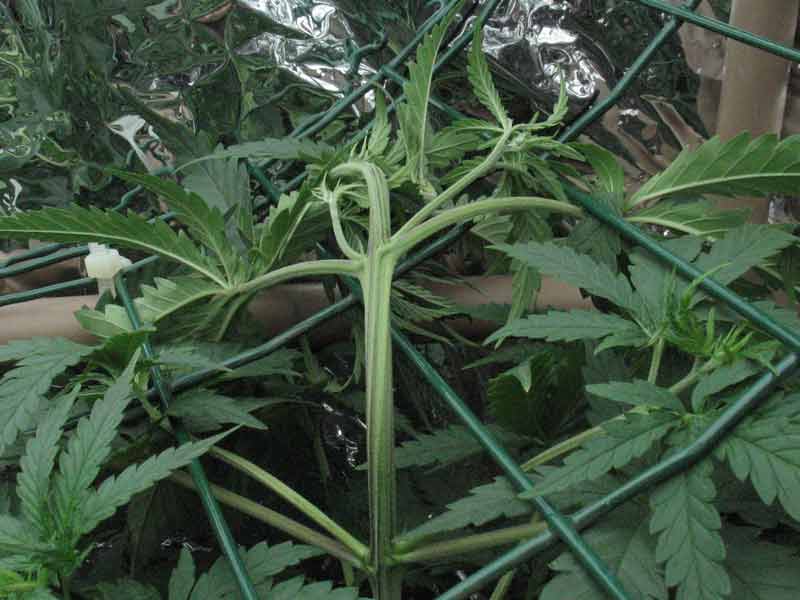
The plants are trained to grow horizontally under the screen until they're two weeks into the flowering cycle, at which point you let the tops grow vertically through the screen. You should always train the main growing tops from the outside of the screen moving inwards so that the colas are focused as closely as possible on the light dispersed from the bulb. You will not be able to get all of them centered under the light, but you should aim for this shape. As the tops grow vertically, push the large fan leaves down under the screen, allowing the light to get to all the developing bud sites.
If leaf growth is excessive, you can first cut fan leaves in half making a shorter leaf and allowing light to get to the bud site. Leaving half the leaf on the plant still allows it to make energy for the plant to grow. Taking a whole fan leaf away in one go can stunt growth. In about a week, you can take off the rest of the leaf. Some people don't remove the leaf at all, but I do it to help with air movement, reduce the chance of mold or fungus and to allow more light to penetrate the bud sites. Just remember to remove a little at a time if you do remove leaf mass.
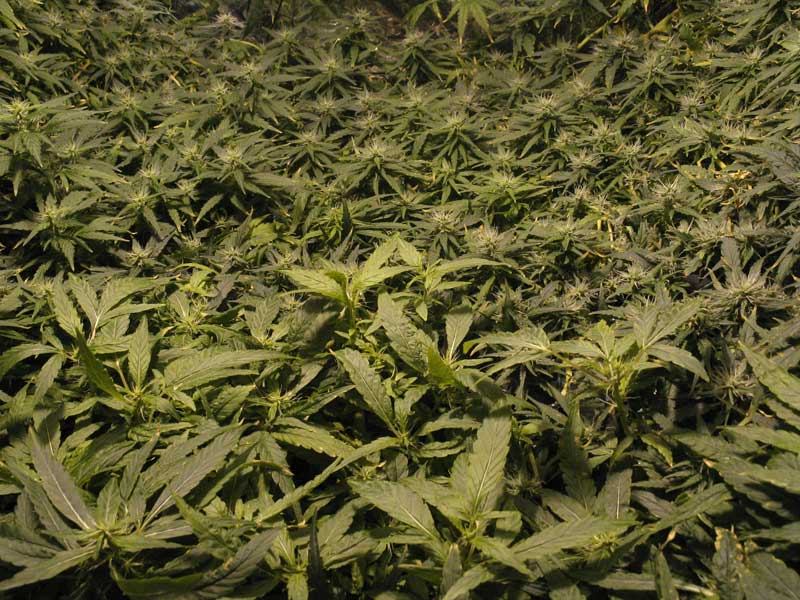
At this point flowers are forming and growing vertically, creating a carpet of bud above the screen. Now we go below the screen and remove all the lateral branches and stray bud sites. The canopy has thickened enough that light is blocked from reaching this lower growth. It's only diverting your plants' energy away from the buds. You can remove all branches that haven't made it to the screen and the stray bud sites but you may experience stunting. Although you want the plant to concentrate all of it’s grow energy on the developing flowers above the canopy, removing too much leaf mass and branching can prevent additional flowering.
The three main differences between a SOG and ScrOG grow are the number of plants grown, the use of a screen and the slightly longer grow cycle of the ScrOG. Both methods can be done under the same light and in soil or with hydroponics. There are many variations of the ScrOG grow — including V-ScrOG, Stadium ScrOG, Flat ScrOG and Cylinder ScrOG — but they are all based on the same principles. They work essentially the same way but use different shapes.
One of the best strains available for your ScrOG garden is C99. You will find that a pure Indica or Indica dominant cross will produce the best in a ScrOG grow. A good ScrOG grow will average two ounces of bud per square foot of screen, but you can't expect this the first few grows, because it takes proper timing and the correct strain to accomplish this.
ScrOG was originally designed for grow areas limited in height and lit by fluo-rescents. Today's growers are using HID lights for growing ScrOG. They've taken it to the next level with these lights and are generating far greater results. Today's grower is always trying something new to improve the production of their favorite plant.
So there we have Real High explaining how he has worked with the ScrOG system. As you can see, he's added more to the basic ScrOG grow. With experience, practice and experimentation, you too can create your own customized grow.
++ Some Notes on SOG and ScrOG Growing
Even though M H and H PS lights can be used in conjunction with ScrOG and SOG grows, most ScrOG and SOG growers will use HPS because of the short vegetative period before flowering. Sometimes growers use smaller wattage HPS lights like the 250W and 400W series to keep the cost of electricity down and bud production within an acceptable range. In fact, ScrOG grows are so dense that smaller lights are sometimes more cost-effective than lights in the 600 to 1000W range, but again this depends on your strain and level of experience. If you get it right you can effectively direct 95% of available light onto your bud. The end result is like a canopy of pure bud with the light belting down on top of it all for 12 hours a day.
Some ScrOG growers like to tie the center of the screen down to avoid it being pushed up by the center of the bud production, which should be the most vigorous since it is directly under the light. If the plants were to push the screen up it would affect the overall results because the light would not be able to reach all the bud areas. The pushing effect could also cause stems and branches to break.
You should not leave your plants growing in vegetative growth for too long because this causes more leaf matter to develop than bud which will make our SOG or ScrOG grow less effective. Also watch out that you do not crush or pinch the stems as this will cause branches to develop at those areas or close to them. Branch development means that plant energy is being used in leaf and branch promotion rather than bud production.
You can experiment with different shapes of ScrOG to see how it affects your overall yield. Some ScrOG growers even advocate a dome shaped screen to match the curvature of light dispersal patterns — however it must also be said that the differences between shapes in the final yields is not always significant and the overall effect is more exciting looking than anything else.
CABINET GROWING
Although cabinet growing is not truly an advanced method of cannabis cultivation it certainly is a very popular one because of its ease of use, containment, stealth and harvest results. A cabinet can be anything from a small closet, an old refrigerator, a box or a simple cupboard. The grow area is usually small and can accommodate one to twelve plants at a time. The idea behind a cabinet grow is to keep a cycle of plants growing at all times. There are three things a cabinet grower needs to get started. They are:
1. Cabinet
2. Lighting
3. Air vent with fan
Most people simply set up their lights so they are adjustable by using versatile chains or a spring-type cord. A large hole is made in the cabinet to allow air to enter while another hole is made to allow air to escape. A fan is placed in one of the holes to extract the hot air being generated by the heat from the bulb. This vent and fan would be near the top of the cabinet close to the light. Hot air rises and should be extracted from the top of the cabinet. The intake hole is on the opposite side of the grow area and can have a fan inside. This fan is generally moving quicker than the extractor fan to allow a fresh supply of air to circulate before leaving the grow room.
Your cabinet can be air-cooled in a few ways. The most common way is to mount a 4-inch dryer flange on the hood and link from the hood flange to the exhaust fan flange with a 4-inch dryer hose. A fan can be mounted on the hood also.
The walls are painted flat white or Mylar is hung for reflective purposes. The plants are usually placed in separate pots and spend their entire life cycle within the cabinet environment. Clones are taken and placed on a shelf in the cabinet. Some people have made small compartments in their cabinets for clones and germination. Such a compartment can be any size, but is usually kept small enough to just keep the clones alive. This small compartment will probably have one or two fluorescent lights for the clones. It would be best to keep the compartment at the top of the grow chamber near the exhaust fan. You don't need an intake fan for these clones unless it is a big setup. A simple hole in the side will allow the plants to breathe.
After harvest, the clones are put into the grow cabinet and the process is repeated in a perpetual grow cycle; the legal term is a marijuana factory. In this kind of setup, you can harvest bud every 30 days with the right strains.
--There was no reference for this article--
ADVANCED INDOOR SOIL-BASED GROW ETHODS
NEW, ADVANCED WAYS OF IMPROVING YOUR CANNABIS plants' yield have emerged over the past several years and some methods have become quite popular. The three most common types of advanced indoor growing are SOG, ScrOG and cabinet growing. SOG and ScrOG are ways of growing serious numbers of cannabis top colas. Cabinet growing is a method of stealthily growing several plants in the corner of any room without drawing too much attention to your grow. Although these methods don't have to be soil-based (you can adapt a hydroponics setup to use these methods as well) soil is the most widely used medium in these setups, and so will be the focus of this chapter.
The idea behind these advanced indoor grow methods is that, in most cases, the cola is going to produce the most bud so why not try to get that part of the plant to grow really big by creating an environment that concentrates on the top part of the plant? After all, the bottom branches of indoor cannabis plants don't catch much of the light cast from your HIDs. Enter SOG, which stands for Sea of Green and the two other advanced indoor grow methods we will discuss in this chapter.
PREPARING THE SPECIAL CLONE MOTHER1
Before we discuss these popular advanced grow methods we will touch on cloning because this is an important part of advanced cultivation. Before you select that ^special' plant that you wish to replicate numerous times via cloning you must first of all grow out a test crop from seed. During the third and forth week of vegetative growth you take cuttings from all the test plants and label each one.
You must not flower any of these cuttings. If any of cuttings get too big to manage then reproduce them by taking further cuttings from each one and labeling them. Continue to grow the test plants and flower them by manipulating the pho-toperiod. At this point you can remove the males and the corresponding male clones because we are only looking for a special female. At the end of the test plants' flowering period you should be able to identify the 'special' mother plant that has done better than all the others. The corresponding cutting that was taken from this 'special' plant is then allowed to grow to its full size. The other cuttings are simply discarded because you will not be using them. In order to ensure that you find a good 'special clone mother' you should try and grow more than twenty plants. Good breeders will test grow as many as 100 or even 1000 plants to find a truly exceptional specimen.
The reason for taking the cuttings before flowering is so that you will not have a bunch of flowering cuttings, which need to be reverted to vegetative growth.* That would be too time-consuming.** If the clone has flowers on it then it can be flowered right away by manipulating the photoperiod. The result is much like a piece of bud on a small stick. Clones carry the same age as the parent plant they where taken from. Not only that but they are sexually mature enough to flower if taken from a flowering plant. If they only had a week to go before flowering then you will have to wait a week before you can flower them. You can flower two-inch clones if they were taken from a plant during the flowering cycle. They will finish when their flowering time is over but the quantity is reduced because the clone was not allowed to grow more node regions during vegetative growth. In short, clones are best if taken from the mother before flowering begins.
A cutting that is taken in the vegetative state allows the grower more control over the plant. That is why you should take lots of cuttings from different plants during the vegetative stage of growth and then later select the clone(s) that came from the 'special clone mother1. You might want to allow the 'special clone mother' to fully flower at the end of the test grow to confirm the plant's potency. The corresponding clone(s), on the other hand, will not have flowered yet because you will have kept the clone(s) in a constant state of vegetative growth under a 24-hour light cycle. It is your job, as the grower, to then take multiple cuttings and grow these multiple clones into a room full of highly potent,’ special females'!
You should also keep at least one cutting from this original clone mother elsewhere and in the vegetative growth stage so that you can continue to take cuttings. This clone that is put aside becomes the new 'clone mother' and is the source for all our future clones of this special plant.
The disadvantages of selecting for that special clone is that it takes time to grow the test crop and you need two grow spaces to house your plants. Once you have finished harvesting, you must grow the special clone for three weeks before you take multiple cuttings from her. How many cuttings you take depends on how many clones you want to grow to full maturity next time around. Sometimes you might have to go another round in order to generate enough clones. Clones also share the exact same problems — be it pest resistance, nutrient requirements or genetic disorders. If a problem affects one clone then it will generally affect all the rest just as quickly. The advantage of using clones is that you can have a room full of identical copies of that special plant you really liked. You will not need to prune the plants to keep them in formation. It is possible to produce twice the harvest size of the test grow based on the selection of a clone that yielded more than others did.
For clarity we will list each process step by step.
1. Grow a large test crop.
2. Take cuttings from each plant and label everything.
3. Do not flower the cuttings.
4. Continue to grow the test crop.
5. Remove the males during flowering and their corresponding clones.
6. Select the best female at the end of flowering and her corresponding clone.
7. Grow the new clone mother but do not flower her.
8. Take multiple cuttings from the new clone mother when she has developed lots of branches. You can use pruning techniques to increase branch numbers.
9. Use these clones as your next source of genetics for your following grow.
10. Keep at least one clone aside and do not flower it. It will be. The next clone mother.
Growers like to sometimes swap or buy clones because it prevents them for having to grow a test crop and select a special female. Although this method is certainly less time-consuming it means that you will have to communicate with other growers and this is a security risk. Sometimes medical cannabis clubs offer clones for sale to medical users.
Although any of the advanced growing methods can be done from seed you will not get all the benefits unless you use clones.
SOG
A SOG setup can be any size but must maintain the same basic shape and follow certain SOG rules. In SOG grows you're looking at one plant per square foot or even one plant per 0.1 square feet. Very short Indica plants can be grown in as little space as 0.1 square feet. Most Indica varieties can be grown in less that 1.0 square feet but in general most growers end up using 0.5 square feet per plant. Pure Sativa strains generally do not need to go much more than 1.5 square feet in SOG. This should give you a good idea of how many clones you will need for your grow area.
Next, you need to select pots for the setup. SOG calls for tube-shaped pots or pots of greater depth than width. You can make these yourself or buy these pots in a store. The objective here is to pack as many pots full of plants as you can into the SOG grow area so that it becomes a big cluster of pots with clones. This is the basic rule of any SOG grow. Pack everything in as densely as you can. The clones are planted all at once, after which time no new plants are introduced into the SOG grow room. When they have reached the desired height (keep it small), they should be flowered. It usually takes about one to two weeks of vegetative growth before the clones are ready to be flowered.* Because the clones have been taken from a mother plant, they are effectively adult plants carrying the age of the mother plant with them and don't need to spend much time in the vegetative growth stage of the life cycle. Since you took them from a plant that was nearly flowering they'll start to flower shortly after you introduce the 12/12 light cycle.
The end result will be a full, dense canopy of bud, hence the name Sea Of Green. Because you're using clones, you only have to grow them for the remainder of their flowering times. You can expect to turn out a large quantity of bud every couple of months (a short period of vegetative growth with a full period of flowering).
SOG essentially uses clone plantlets to increase the rate of bud production in a growing operation. It is especially useful where grow height is a problem because the plantlets will never reach their optimal size. SOG plants are always much shorter than plants grown from seedlings and they are flowered as quickly as possible in the SOG environment. You can not do this with seedlings because young cannabis plants are not sexually mature enough to be flowered like this. In fact sexual orientation is not even genetically determined until the third of fourth week of vegetative growth. This same rule applies to feminized seeds that can become males under certain conditions.
SCROG
ScrOG is like a SOG grow except that fewer plants are used in conjunction with a screen to fill the grow area with heavy top colas — hence its name, ScrOG or Screen of Green.
The screen is simply a large wire mesh placed between your light and the plants. Again, clones from a female plant are used, but we allow at least one square foot per flowering plant in the ScrOG method. The plants aren't flowered until they have covered the entire mesh with green. As the plants grow up through the wire mesh they're trained and worked around the netting to form a very even canopy. The top colas and side branches are all trained under the screen.
There are many variations of the above two methods, yet they all utilize the same principles. SOGs and ScrOGs were originally developed to get the most out of poor quality fluorescent lights. The grower would line the roof of the shelf or box with fluorescent tubes to try and get the most out of their grow. Today's growers, using good HID bulbs, have taken these setups to a new level: pushing their buds to the limit. Some people even grow top colas that are the size of large corncobs or soda bottles!
ScrOG Growing by Real High
Real High is a ScrOG lover and has been growing ScrOG style for some years. He has added a bit to the ScrOG method through his experience with the process. This should help you understand more about the ScrOG method and what people have learned with this new technique.
My setup is like a SOG growing, but a screen is used to train the plant to grow horizontally, creating a canopy of buds beneath the light. The screen is simply made from chicken wire or nylon poultry fencing, or you can use hooks and 20 Ib. fishing line to make the net.
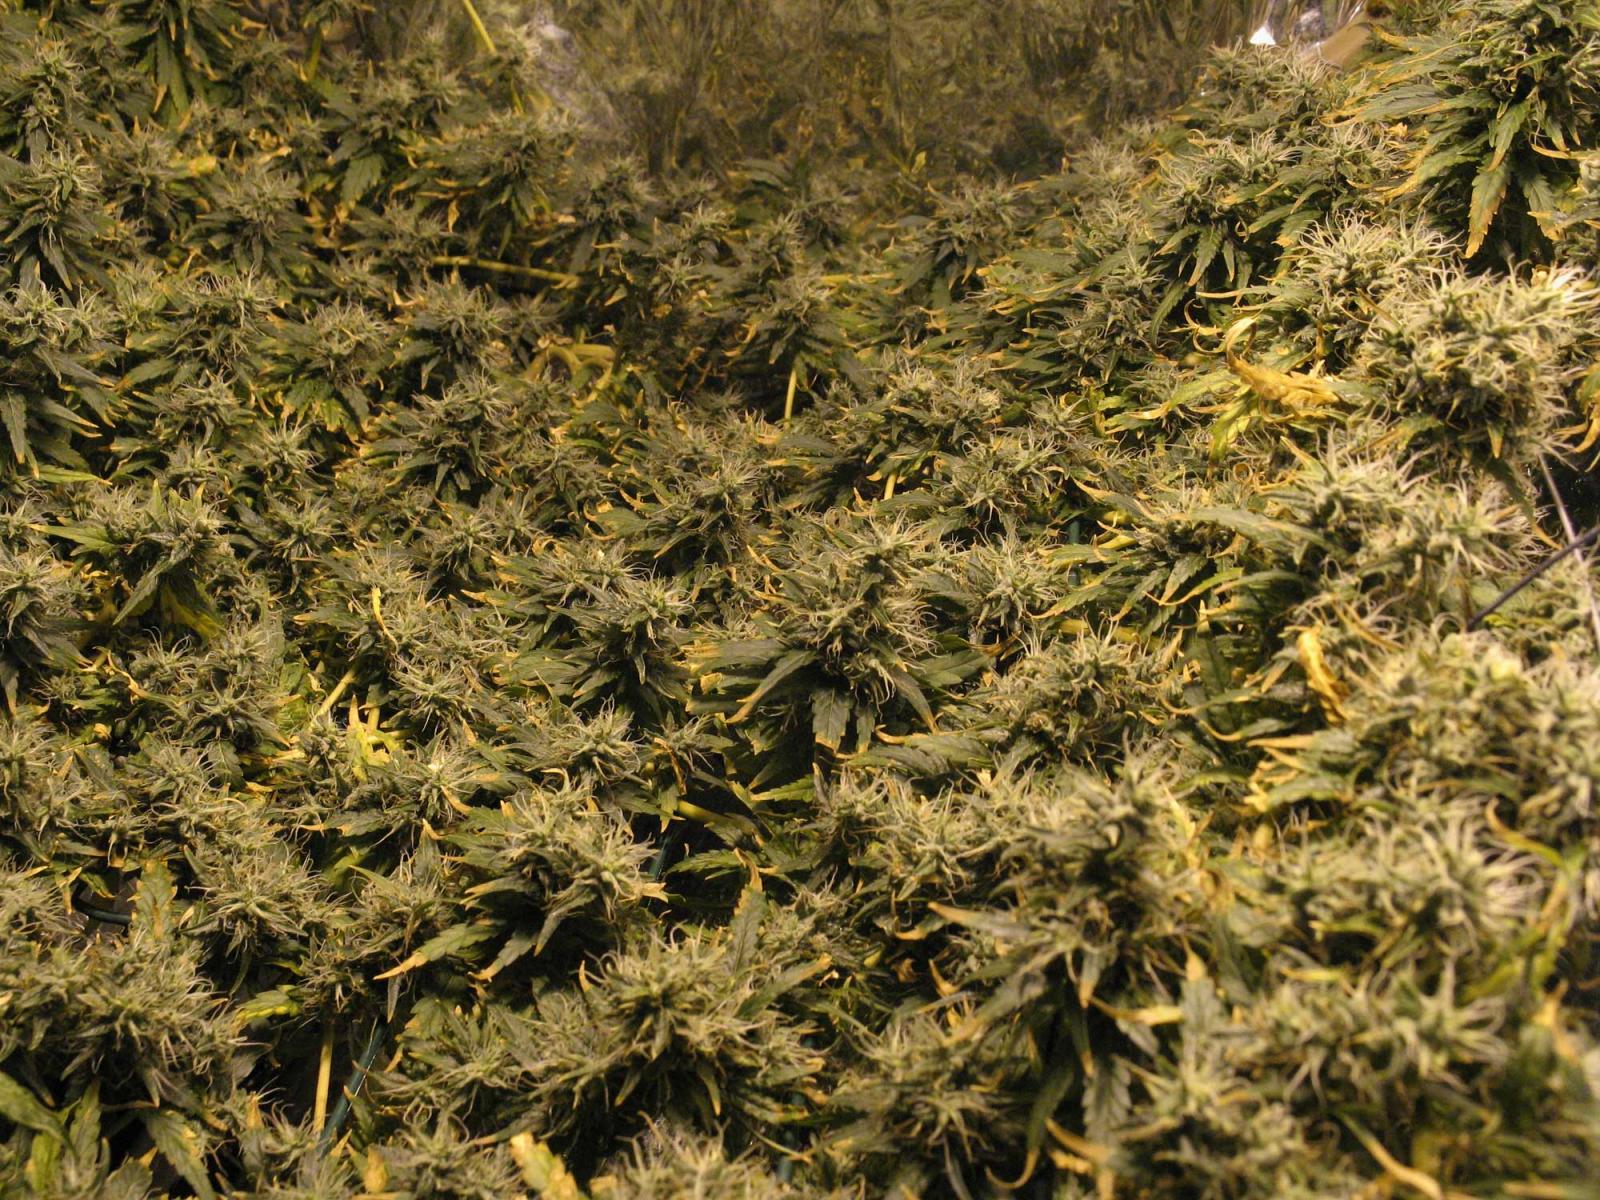
This picture shows a ScrOG variation. II
Is a small SerOG setup for a cabinet growing. Tins picture also contains a homemade octagonal vented hood for a 250-watl HPS light. Picture by foi.
The screen is installed at a fixed height above the plant medium. For Indica varieties the screen does not need to be much more than 8 inches above the pots. Indica Saliva hybrids need about 12 inches white Sativa plants tend to have longer internodes so you may have to use a screen that is about 18 inches above the pots. If your strain is a pure Sativa variety, like Haze or Thai, you may have to raise your screen to around 24 inches. This space allows the base of the plant a certain amount of vertical growth before branching occurs on the clone. The clone should start to branch just under the screen but if it does not do not worry because you are going to be training them anyway. The light should be suspended by adjustable chains so that it can be raised if necessary.
ScrOG growing doesn't require as many plants as SOG (allow at least one square foot per flowering plant), but takes anywhere from one to three weeks longer per grow because we will be in the vegetative growth stage longer than a SOG grow to allow the plants to fill out.
The plants are trained to grow horizontally under the screen until they're two weeks into the flowering cycle, at which point you let the tops grow vertically through the screen. You should always train the main growing tops from the outside of the screen moving inwards so that the colas are focused as closely as possible on the light dispersed from the bulb. You will not be able to get all of them centered under the light, but you should aim for this shape. As the tops grow vertically, push the large fan leaves down under the screen, allowing the light to get to all the developing bud sites.
If leaf growth is excessive, you can first cut fan leaves in half making a shorter leaf and allowing light to get to the bud site. Leaving half the leaf on the plant still allows it to make energy for the plant to grow. Taking a whole fan leaf away in one go can stunt growth. In about a week, you can take off the rest of the leaf. Some people don't remove the leaf at all, but I do it to help with air movement, reduce the chance of mold or fungus and to allow more light to penetrate the bud sites. Just remember to remove a little at a time if you do remove leaf mass.
At this point flowers are forming and growing vertically, creating a carpet of bud above the screen. Now we go below the screen and remove all the lateral branches and stray bud sites. The canopy has thickened enough that light is blocked from reaching this lower growth. It's only diverting your plants' energy away from the buds. You can remove all branches that haven't made it to the screen and the stray bud sites but you may experience stunting. Although you want the plant to concentrate all of it’s grow energy on the developing flowers above the canopy, removing too much leaf mass and branching can prevent additional flowering.
The three main differences between a SOG and ScrOG grow are the number of plants grown, the use of a screen and the slightly longer grow cycle of the ScrOG. Both methods can be done under the same light and in soil or with hydroponics. There are many variations of the ScrOG grow — including V-ScrOG, Stadium ScrOG, Flat ScrOG and Cylinder ScrOG — but they are all based on the same principles. They work essentially the same way but use different shapes.
One of the best strains available for your ScrOG garden is C99. You will find that a pure Indica or Indica dominant cross will produce the best in a ScrOG grow. A good ScrOG grow will average two ounces of bud per square foot of screen, but you can't expect this the first few grows, because it takes proper timing and the correct strain to accomplish this.
ScrOG was originally designed for grow areas limited in height and lit by fluo-rescents. Today's growers are using HID lights for growing ScrOG. They've taken it to the next level with these lights and are generating far greater results. Today's grower is always trying something new to improve the production of their favorite plant.
So there we have Real High explaining how he has worked with the ScrOG system. As you can see, he's added more to the basic ScrOG grow. With experience, practice and experimentation, you too can create your own customized grow.
++ Some Notes on SOG and ScrOG Growing
Even though M H and H PS lights can be used in conjunction with ScrOG and SOG grows, most ScrOG and SOG growers will use HPS because of the short vegetative period before flowering. Sometimes growers use smaller wattage HPS lights like the 250W and 400W series to keep the cost of electricity down and bud production within an acceptable range. In fact, ScrOG grows are so dense that smaller lights are sometimes more cost-effective than lights in the 600 to 1000W range, but again this depends on your strain and level of experience. If you get it right you can effectively direct 95% of available light onto your bud. The end result is like a canopy of pure bud with the light belting down on top of it all for 12 hours a day.
Some ScrOG growers like to tie the center of the screen down to avoid it being pushed up by the center of the bud production, which should be the most vigorous since it is directly under the light. If the plants were to push the screen up it would affect the overall results because the light would not be able to reach all the bud areas. The pushing effect could also cause stems and branches to break.
You should not leave your plants growing in vegetative growth for too long because this causes more leaf matter to develop than bud which will make our SOG or ScrOG grow less effective. Also watch out that you do not crush or pinch the stems as this will cause branches to develop at those areas or close to them. Branch development means that plant energy is being used in leaf and branch promotion rather than bud production.
You can experiment with different shapes of ScrOG to see how it affects your overall yield. Some ScrOG growers even advocate a dome shaped screen to match the curvature of light dispersal patterns — however it must also be said that the differences between shapes in the final yields is not always significant and the overall effect is more exciting looking than anything else.
CABINET GROWING
Although cabinet growing is not truly an advanced method of cannabis cultivation it certainly is a very popular one because of its ease of use, containment, stealth and harvest results. A cabinet can be anything from a small closet, an old refrigerator, a box or a simple cupboard. The grow area is usually small and can accommodate one to twelve plants at a time. The idea behind a cabinet grow is to keep a cycle of plants growing at all times. There are three things a cabinet grower needs to get started. They are:
1. Cabinet
2. Lighting
3. Air vent with fan
Most people simply set up their lights so they are adjustable by using versatile chains or a spring-type cord. A large hole is made in the cabinet to allow air to enter while another hole is made to allow air to escape. A fan is placed in one of the holes to extract the hot air being generated by the heat from the bulb. This vent and fan would be near the top of the cabinet close to the light. Hot air rises and should be extracted from the top of the cabinet. The intake hole is on the opposite side of the grow area and can have a fan inside. This fan is generally moving quicker than the extractor fan to allow a fresh supply of air to circulate before leaving the grow room.
Your cabinet can be air-cooled in a few ways. The most common way is to mount a 4-inch dryer flange on the hood and link from the hood flange to the exhaust fan flange with a 4-inch dryer hose. A fan can be mounted on the hood also.
The walls are painted flat white or Mylar is hung for reflective purposes. The plants are usually placed in separate pots and spend their entire life cycle within the cabinet environment. Clones are taken and placed on a shelf in the cabinet. Some people have made small compartments in their cabinets for clones and germination. Such a compartment can be any size, but is usually kept small enough to just keep the clones alive. This small compartment will probably have one or two fluorescent lights for the clones. It would be best to keep the compartment at the top of the grow chamber near the exhaust fan. You don't need an intake fan for these clones unless it is a big setup. A simple hole in the side will allow the plants to breathe.
After harvest, the clones are put into the grow cabinet and the process is repeated in a perpetual grow cycle; the legal term is a marijuana factory. In this kind of setup, you can harvest bud every 30 days with the right strains.
--There was no reference for this article--