GoldenDragondnw
Supporter
- Posts
- 6,692
- Reactions
- 19,252
- Joined
- Apr 21, 2023
- Points
- 313
Ummm...I think I somehow got the capt Playlist.

 wtf is this? The visuals tho I kinda like it.
121,144 growers, practical cultivation threads, real grow diaries, and community advice.
Create account → Already a member? Log inFollow along with the video below to see how to install our site as a web app on your home screen.
Note: This feature may not be available in some browsers.
wtf is this? The visuals tho I kinda like it. @Captspaulding looks like all the spores are out of stock at Mush Love. Any other suggestions? Thanks
I always wondered if you could use a chicken egg incubator to fruit and incubate in because you can preset heat and humidity levels.Alight, so mushies.
First a list of supplies needed.
I suggest for starters that you use
The mono tub method
1 3lb bag of sterilized grain spawn w/ injection port
1 5lb bag of sterilized bulk substrate
1 spore syringe of your strain
Packing tape
Medical tape 2inch wide
Contractors plastic to make a liner for your tub. This is necessary it keeps your cake from side pinning, helps stave off possible contamination.
Gloves
2 spray bottles one for iso one for ro water
1 64 quart sterilite container with clamps and gasket lid
1st take some hole saws and a drill,
Grab the sterilite container and drill 6 holes in it. View attachment 2082102
Then cut out a liner in the contractors plastic to make it fit like this View attachment 2082103
Now take your spray bottle of iso and get to sterilizing the liner and your tub. I have filter disks here, but you will use packing tape instead to cover your holes at the start. We need a tight container with no air exchange to start. Once we have the tub handled and made, set that aside….
Now we take out our iso alcohol and our sterile grain spawn, remember everything in the steps requires an over cautious approach with iso, always spraying our hands and sterile spawn bag down. Un tape the bag and clean off the injection port with iso and use 5ml of the 10ml syringe (you can get 2 grows out of 1 syringe) insert in the injection port and inoculate the grain now we wait for the mycelium to colonize the grain. Healthy mycelium is white, any blues reds or greens its contaminated. This colony of mycelium will take anywhere from 2 weeks to 4 weeks depending on the strain of cubensis you are growing View attachment 2082104
once the grain turns into a a white colonized substrate
This is when we go back to the monotub
With our 5lb bag of bulk sterilized substrate
And 3lb bag of colonized grain
Sterilize everything the bags the tub and the liner. Always spraying.
Now we cut open the grain bag and dump it into the liner. With gloves on break up the white cake of mycelium as much as possible.
Now take your sterile substrate, roughly 3 lbs and add it to the busted up mycelium and mix it together really well. Spread it all even to the edges of the liner. View attachment 2082105
Then take the last of the sterile bulk substrate and cover the whole mixture with a nice 2 inch layer lightly packed on top.
Close your monotub up, and keep it in a cool dark area roughly 65 to 75 degrees somewhere in the house to allow the mycelium to completely Colonize your cake. Over the next 2-3 weeks it will turn all white.
Do not open your tub during this time. All holes on the box should be sealed with packing tape. Zero air exchange during this dark period. View attachment 2082108
this is an almost complete cake. 2 days out from being ready to fruit. You will notice the white spots, these are hyphal knots that will eventually turn into primordia, the beginning of a baby mushroom. View attachment 2082109
This box is 100% colonized with all the little bumps have changed from hyphal knots to primordia. Now we are ready to fruit.
This step is about air exchange. We remove the tape from our holes one at a time replacing the packing tape with breathable medi tape. This allows for the air to move freely between the box but stays sterile.
After we have covered our holes, we spray everything down and crack the lid, flap gently for 30 seconds to get rid of the co2 and replace that with fresh air. This is how we fruit the primordia. Now we repeat this air exchange process 1 time every 13 hours.
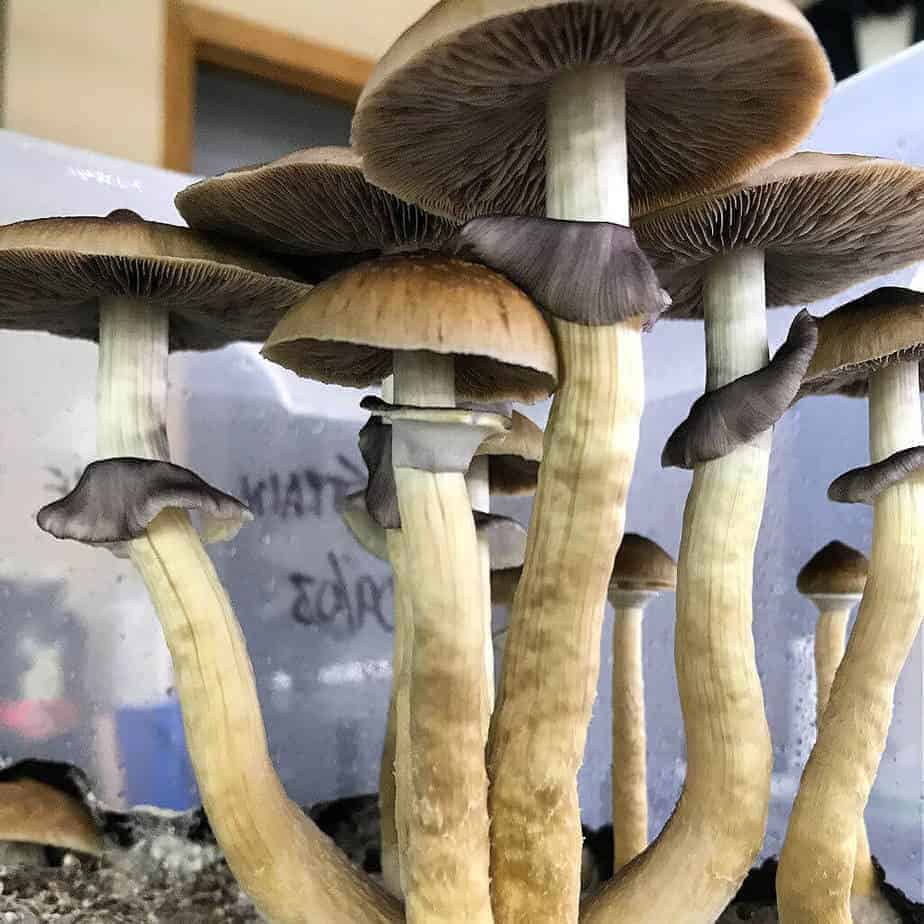
In roughly 1 week you will have pins. Then they grow fast as fuck. Only 3-4 days for monster fruit View attachment 2082110
As well as starting air exchange this is when we introduce a light cycle. I’ve always just used a 12/12 cycle with lighting. It can be totally ambient light, or even something as simple as a clip lamp with regular bulb pointed towards the box. Nothing fancy needed here.
Now we monitor the box, the bulk substrate should keep everything plenty moist for your grow, but if there isn’t condensation on the walls of your box, this is what the spray bottle of to water is for. Misting the sides and the mycelium. Repeating this process until a few days later.View attachment 2082113
Then we get some fruit…. @awesomeblossom @sourorangedieselkush
There is always the option of heat mats, like for seedlings and reptiles. As long as you could create a sterile air tight environment I don’t see why not.I always wondered if you could use a chicken egg incubator to fruit and incubate in because you can preset heat and humidity levels.
In case people who wanted to see this missed it…..Alight, so mushies.
First a list of supplies needed.
I suggest for starters that you use
The mono tub method
1 3lb bag of sterilized grain spawn w/ injection port
1 5lb bag of sterilized bulk substrate
1 spore syringe of your strain
Packing tape
Medical tape 2inch wide
Contractors plastic to make a liner for your tub. This is necessary it keeps your cake from side pinning, helps stave off possible contamination.
Gloves
2 spray bottles one for iso one for ro water
1 64 quart sterilite container with clamps and gasket lid
1st take some hole saws and a drill,
Grab the sterilite container and drill 6 holes in it. View attachment 2082102
Then cut out a liner in the contractors plastic to make it fit like this View attachment 2082103
Now take your spray bottle of iso and get to sterilizing the liner and your tub. I have filter disks here, but you will use packing tape instead to cover your holes at the start. We need a tight container with no air exchange to start. Once we have the tub handled and made, set that aside….
Now we take out our iso alcohol and our sterile grain spawn, remember everything in the steps requires an over cautious approach with iso, always spraying our hands and sterile spawn bag down. Un tape the bag and clean off the injection port with iso and use 5ml of the 10ml syringe (you can get 2 grows out of 1 syringe) insert in the injection port and inoculate the grain now we wait for the mycelium to colonize the grain. Healthy mycelium is white, any blues reds or greens its contaminated. This colony of mycelium will take anywhere from 2 weeks to 4 weeks depending on the strain of cubensis you are growing View attachment 2082104
once the grain turns into a a white colonized substrate
This is when we go back to the monotub
With our 5lb bag of bulk sterilized substrate
And 3lb bag of colonized grain
Sterilize everything the bags the tub and the liner. Always spraying.
Now we cut open the grain bag and dump it into the liner. With gloves on break up the white cake of mycelium as much as possible.
Now take your sterile substrate, roughly 3 lbs and add it to the busted up mycelium and mix it together really well. Spread it all even to the edges of the liner. View attachment 2082105
Then take the last of the sterile bulk substrate and cover the whole mixture with a nice 2 inch layer lightly packed on top.
Close your monotub up, and keep it in a cool dark area roughly 65 to 75 degrees somewhere in the house to allow the mycelium to completely Colonize your cake. Over the next 2-3 weeks it will turn all white.
Do not open your tub during this time. All holes on the box should be sealed with packing tape. Zero air exchange during this dark period. View attachment 2082108
this is an almost complete cake. 2 days out from being ready to fruit. You will notice the white spots, these are hyphal knots that will eventually turn into primordia, the beginning of a baby mushroom. View attachment 2082109
This box is 100% colonized with all the little bumps have changed from hyphal knots to primordia. Now we are ready to fruit.
This step is about air exchange. We remove the tape from our holes one at a time replacing the packing tape with breathable medi tape. This allows for the air to move freely between the box but stays sterile.
After we have covered our holes, we spray everything down and crack the lid, flap gently for 30 seconds to get rid of the co2 and replace that with fresh air. This is how we fruit the primordia. Now we repeat this air exchange process 1 time every 13 hours.
In roughly 1 week you will have pins. Then they grow fast as fuck. Only 3-4 days for monster fruit View attachment 2082110
As well as starting air exchange this is when we introduce a light cycle. I’ve always just used a 12/12 cycle with lighting. It can be totally ambient light, or even something as simple as a clip lamp with regular bulb pointed towards the box. Nothing fancy needed here.
Now we monitor the box, the bulk substrate should keep everything plenty moist for your grow, but if there isn’t condensation on the walls of your box, this is what the spray bottle of to water is for. Misting the sides and the mycelium. Repeating this process until a few days later.View attachment 2082113
Then we get some fruit…. @awesomeblossom @sourorangedieselkush
For the humidity you don’t want droplets forming on your cakes though, that’s why you put a slanted drip guard at the top.There is always the option of heat mats, like for seedlings and reptiles. As long as you could create a sterile air tight environment I don’t see why not.
I was thinking if I didn't scrog I could raise one pot if needed. But it wouldn't be as spread out as I want.While I prefer to run a single strain mainly for the reason you stated above, height differences,
Personally I run singles in a scrog if from seed (even the same strain)
If I switch to clones then I’ll put more than one in a single net
Was just setting these single pot trellis’s up last night to see which I like better since I’m running 2 different strains and all 4 plants are from seed (2 of each)
There small nets but I expect them to bush out past the sides the. I can tie them back to the net,
This is for a pheno hunt for the next set of clones I’ll run in a single scrog, but after seeing these test buckets I have another idea,
Goal of this is so I can remove each plant individually to rearrange or to work on them outside of the cramped tent but still have full support for them


After I discovered those stem trainer clips I wondered why you would even need a Scrog screen.I was thinking if I didn't scrog I could raise one pot if needed. But it wouldn't be as spread out as I want.
I have some LST clips and wire for mainlining so I'll just play it by ear and see how they develop.
Is it worth the trouble using trellis net? I tried one time, took me about 4 hrs to make the net by hand. But I had a lot of troubles w it. Ended up cutting it out. But I also bleeped up and tried putting it on them after stretch...I was thinking if I didn't scrog I could raise one pot if needed. But it wouldn't be as spread out as I want.
I have some LST clips and wire for mainlining so I'll just play it by ear and see how they develop.
They sell old military surplus cargo netting, not sure if it is any cheaper then buying trellis netting.Is it worth the trouble using trellis net? I tried one time, took me about 4 hrs to make the net by hand. But I had a lot of troubles w it. Ended up cutting it out. But I also bleeped up and tried putting it on them after stretch...
I saw in post you were using that fertilome soil.The weeds be bumping
Biker lemon og
Black domina
Cobalt hulk
Khalifa kush
Tw x t1000
Okie x cman
Pbb x cman
HolIn case people who wanted to see this missed it…..
Ummm...I think I somehow got the capt Playlist.
It has been for the last 4-5 yearsI saw in post you were using that fertilome soil.
Is that your go to for all your grows?
I’m trying to do things cheaper without sacrificing things.
I get so confused when pricing out soil like quarts vs. sq feet vs. lbs.
They look AMAZING!!The weeds be bumping
Biker lemon og
Black domina
Cobalt hulk
Khalifa kush
Tw x t1000
Okie x cman
Pbb x cman
I got a Vivosun pack that's 5'x30' 3.5" mesh for less than $8. That's enough to make 10 trellises in my tent.Is it worth the trouble using trellis net? I tried one time, took me about 4 hrs to make the net by hand. But I had a lot of troubles w it. Ended up cutting it out. But I also bleeped up and tried putting it on them after stretch...
Looks like things are about to take off, lolWhile I prefer to run a single strain mainly for the reason you stated above, height differences,
Personally I run singles in a scrog if from seed (even the same strain)
If I switch to clones then I’ll put more than one in a single net
Was just setting these single pot trellis’s up last night to see which I like better since I’m running 2 different strains and all 4 plants are from seed (2 of each)
There small nets but I expect them to bush out past the sides the. I can tie them back to the net,
This is for a pheno hunt for the next set of clones I’ll run in a single scrog, but after seeing these test buckets I have another idea,
Goal of this is so I can remove each plant individually to rearrange or to work on them outside of the cramped tent but still have full support for them


