Log In Register

Stressed autos. Started flowering 3 weeks after germination, HELP, please!

  • Thread starter Thread starter Ganja_mama93
  • Start date Start date
  • Tagged users Tagged users None

Stressed autos. Started flowering 3 weeks after germination, HELP, please!

Ganja_mama93 9 Replies 911 Views
Page 1 of 1 · Replies 1–10 of 10
1
Ganja_mama93

Ganja_mama93

Posts
56
Reactions
46
Joined
Apr 27, 2024
Points
18
Hi, guys. I need a huge help! This is my second growth. The first one was a success, this one is getting on my nerves….
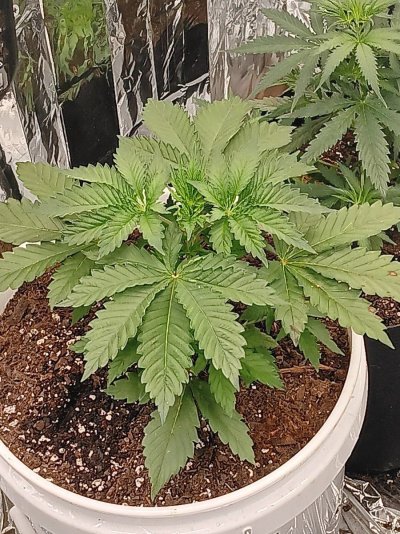
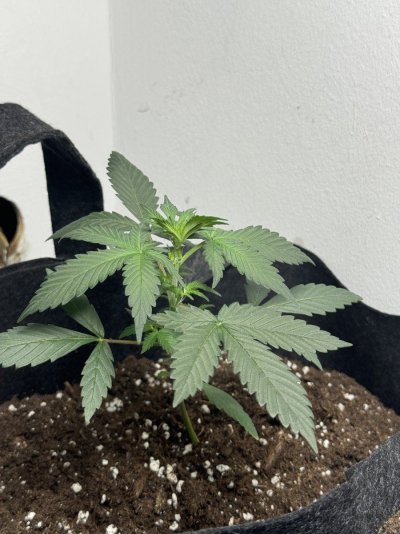
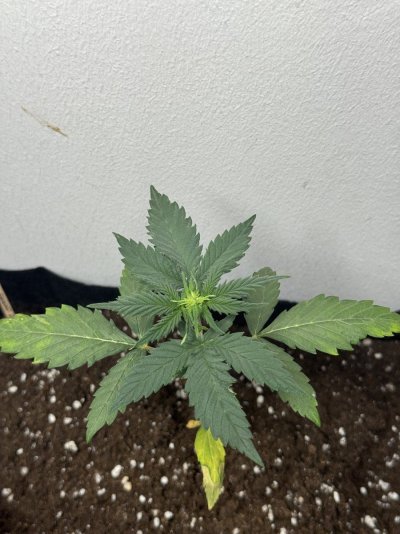
In 4 days the plants will be 1 month old and they are not as big as they should be for a - month old plants. They are autos. Living soil Biobizz Allmix organics. I realised the soil will be too hot for them in the begining, thats why they were not growing at all the first 1 week.. then started growing out of a sudden so i thought they probably adapted already, but probably not. Temperature is between 21-26, humidity between 49-62. Im not overwatering them, i water them once every 3-5 days. The 2 bigger ones have been planted straight into the big pots, the 2 smaller ones have been into a smaller pots and recently I transplanted them in the bigger ones as they were dying as you can see. On the top of everything they started getting their pistils at week 3 after germination. Today i noticed the bigger plants started getting pistils as well….
I checked the water Ph last time and it was a little bit high, so i adjusted it to 6.5, but still see very little progress everyday, not what it has to be. Is there a miracle recipe to save them or its mission impossible as they are autos and they do whatever they want whenever they want…
Im posting the roots of the small sick ones a few days ago when i transplanted them.
 

Attachments

  • stressed-autos-started-flowering-3-weeks-after-germination-help-please.jpeg
    stressed-autos-started-flowering-3-weeks-after-germination-help-please.jpeg
    152.9 KB · Views: 3
  • stressed-autos-started-flowering-3-weeks-after-germination-help-please-2.jpeg
    stressed-autos-started-flowering-3-weeks-after-germination-help-please-2.jpeg
    170.4 KB · Views: 3
  • stressed-autos-started-flowering-3-weeks-after-germination-help-please-3.jpeg
    stressed-autos-started-flowering-3-weeks-after-germination-help-please-3.jpeg
    179.5 KB · Views: 4
  • stressed-autos-started-flowering-3-weeks-after-germination-help-please-4.jpeg
    stressed-autos-started-flowering-3-weeks-after-germination-help-please-4.jpeg
    175 KB · Views: 5
  • stressed-autos-started-flowering-3-weeks-after-germination-help-please-5.jpeg
    stressed-autos-started-flowering-3-weeks-after-germination-help-please-5.jpeg
    181.7 KB · Views: 4
  • stressed-autos-started-flowering-3-weeks-after-germination-help-please-6.jpeg
    stressed-autos-started-flowering-3-weeks-after-germination-help-please-6.jpeg
    88.5 KB · Views: 3
Showing pistils is just a sign of maturity, they will still veg a bit. As most will say, just give them 2 more weeks. The 2nd to last pic does alrdy show first stage flowering. I would just let it ride. It wont be big but it will be experience nonetheless.

Transplating when a plant isn't doing too well will 100% stunt growth for a few days, nothing you can do about it besides the usual routine of feeding.

A change in light can also very well make it so they grow less or more vigourously. Get a PPFD app for your phone and see if they get what they need. Around 250 is a minimum. This is actually a lot more important than most people realize.
Hi. I don’t really understand what is PPFD, i downloaded one app but i don’t underatand anything. Light meter is 2000
 

Attachments

  • IMG_7182.png
    IMG_7182.png
    80.1 KB · Views: 3
Hi. I don’t really understand what is PPFD, i downloaded one app but i don’t underatand anything. Light meter is 2000
Ppfd is a measurement of the energy provided to the plants. Like any tool ppfd has been miss used and miss trained on countless grows.
ppfd should be used as a guidepost not a value that you set your plants at. There are countless websites that can give you the guardrails to keep your grow safe but no app is going to tell you where to put the light energy, the plants will do that.
Photos
Seedling 200-300 ppfd
Veg 350-600 ppfd
Flower 850-1100 ppfd
The reason the ppfd in flower is so high on a photo is that you reduced the light on time. To get the same energy in 12 hours the light level goes up. In autos with an 18-6 schedule you do not increase highly like a photo as you will damage the plants with to much light.
Once you are at node 3 increase the light energy by turning it up or moving it closer. No more than 5% a day and watch the plants reaction. And not just in the begining it is important to see how the plant is doing after 14-18 hours also. Damage from 2 high a light energy comes from 2 main sources.
1. cannabis light saturation. This is the most light that a cannabis plant can take. Pushing past this damages plants quickly.
2. Exceeding Daily Light Integral.
Light damage builds up. Most cannabis plants can take about 30-36 DLI. That means no damage shows up until late in the day. Mine stated right about 6-7 pm after 13 hours they looked tired and at 15 they was curling a bit. Backing down the light fixed it.
To move lights up 5% a day until you hit a max where the plant takes it but does not show problems is the way to run the show. If you write down the values you now are building a database that tells you for this strain and these nutes at this temp I can run x amount of ppfd for 12 hours.
Or 16 hours for autos.
Good luck.
Thank you fir the thorough explanation but it sounds too complicated for me. Can it be more simple 😁. So the meters show different measurements for each plant.. so the light will be good for some and bad for the others. When they were still seedlings they were stretching a looot, thats why i increased the light intensity and they started growing. Now the app is telling me that i need to lower the intensity… I’m really confused. I think the biggest mistake i made was the “hot” soil that i put them in straight away, they couldn’t handle the stress probably
 
The app is just set up wrong do not sweat it. It is still on default.
If you look at the app screen you posted the source you are using is outside light. That's fine if it is outside light but if not you need to select the correct light source. For pinpoint I would need the make model and such for light but honestly if it is a panel light just use 3500 k it will be ok as a benchmark.
Next the limit is not set. When you look at the app it is set for 650ppfd as the limit which for a seedling is too high. You will change this as the plant progresses.
The last thing is that DLI warning is set at 24 hours. It says it right on the screen. Navigate to the part of the menu that sets this and change it. I do not have your app you will need to hit buttons and scroll screens till you figure it out. As most of these apps are set up with a menu about as difficult as a frogger game this should not be that hard.
And if you want simple do this. Write down what power and what distance your light is on your plants. Now decrease distance or increase power and look at the plant. Does it crinkle the leaves. Does it curl up the tops. If not do the same thing tomorrow. Check often until you see a warning sign.
1 plant bunches up. New growth right behind old growth- ok this is great. Now just decrease energy a little bit to allow some node spacing. Write down setting and observe.
2. Curl and crink. the power is too high. Reduce quickly.
3 leaf tip painted.
As you grow you will hear terms that almost always means the grow is spot on. Uplifted leafs is one as are flat leafs straight out. Painted nails where the very tips are glowing ABSENT any stress markers like curling or fading leafs is a grow at max progress. Took me 3 grows to be able to get the look.
Next chapter will be using your light app to balance your canopy.
 
Even if you do not use the light app for your plants power output you can still use this helpful tool.
Let's say just by moving and changing settings on your lights and the hight you got it nailed down. For now.
If you have an LED light it has a pattern to it. Normally this is highest in the middle and lower the farther you move from center. You can use the tester to find out how high the light is at the highest top of the plant. Write down or remember this number.
Now look at your plant. This is not for seedlings stuff this is for deep veg and flower. Look at the plant. See where the pattern fades off the farther out and down. So now let's move the plant around and see what we can do.
Take the plant and move it towards the outside of the light. You will see the numbers go down but the numbers for the other parts of the plant may come up. That's because you have a stronger part of your light hitting the plants down low and a weaker part of the light hitting a part of the plant that's tall. You are now using the light meter to find the best pattern for your plant and your light.
Now when you find a place for the plant where most of the plant is a good measurement now comes the fun part. Now you move your light energy back up to the maximum for that tall part of the plant. When the meter reads maximum check other parts of the plant. Look for parts that are too high and adjust or move the plant around.
By doing this you trick the plant. It gets a good amount of light on the whole plant. by adjusting in this manner it is the same as training your plants to have level canopy on a bar type light that is very consistent through the tops of the grow.
Hope this helps. Low tech visual approach and higher tech tool approach.
Thank you so much! I don’t know if anyone else could have explained it better. Thank you for taking of your time to write this long message! Really appreciate it!
 
I had trouble with this Runtz variant as well
 

Attachments

  • 20250518_191216.jpg
    20250518_191216.jpg
    303.8 KB · Views: 4
Page 1 of 1 · Replies 1–10 of 10
1
Back
Top Bottom