Log In Register

Lucky Llamas first grow journal

Moving over from the welcome thread as I'll be updating regularly and don't want to keep pinning my stuff there. Re posting progress from the beginning to keep it all in one place. This is my first run with 4x4 tents from AC Infinity. Equipment: EVO...
Home Forums Medical Cannabis Cultivation Grow Diaries Lucky Llamas first grow journal
Grow diary eligible · Medical Cannabis Cultivation

Lucky Llamas first grow journal

by LuckyLlama · Started
1d
Running
0
Updates
93
Replies
14
Images
Discussion below · 93 replies
Page 1 of 5 · Replies 1–20 of 94
LuckyLlama

LuckyLlama

Posts
105
Reactions
102
Joined
Dec 18, 2024
Points
28
Moving over from the welcome thread as I'll be updating regularly and don't want to keep pinning my stuff there.
Re posting progress from the beginning to keep it all in one place.
This is my first run with 4x4 tents from AC Infinity.

Equipment:
EVO 6's
ACI heaters
ACI humidifiers
ACI 6" filter/ exhaust
2 clip on fans per tent

Nutes/soil:
-FoxFarm happy frog and ocean forest
-GH flora trio on hand for supplemental needs
-Cal/mag
-PowerSi

Strain: Blue Dream Auto from Growadder

on this first run my plan is to:
- dial in my settings and environment the best I can.
- get a better understanding and first hand experience of identifying problems that may occur
- figuring out what I might need or want during the process that I don't yet have
- use colloidal silver to herm one of these plants to pollenate the other and produce more feminized blue dream auto seeds.

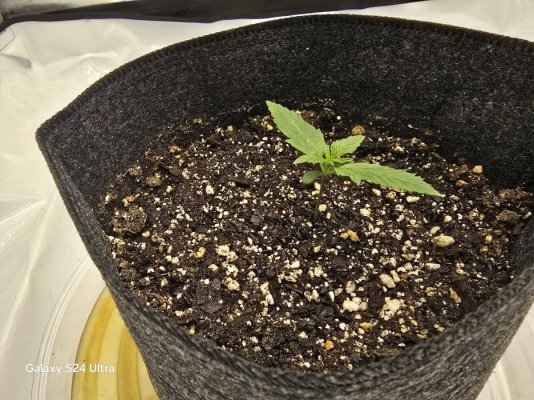
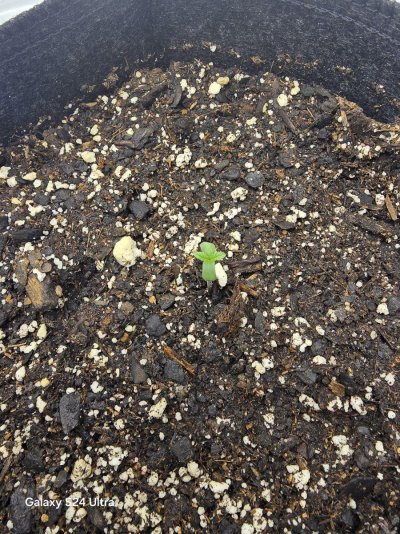
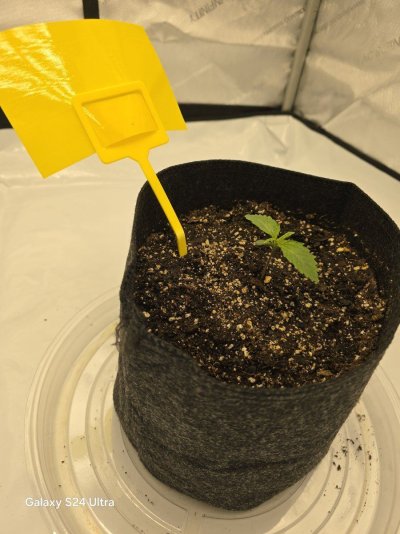
The taller seedling popped through yesterday. The shorter one popped through today. Monitoring soil humidity. Seems moist enough for now.. gave a very light feeding of RO water both days.

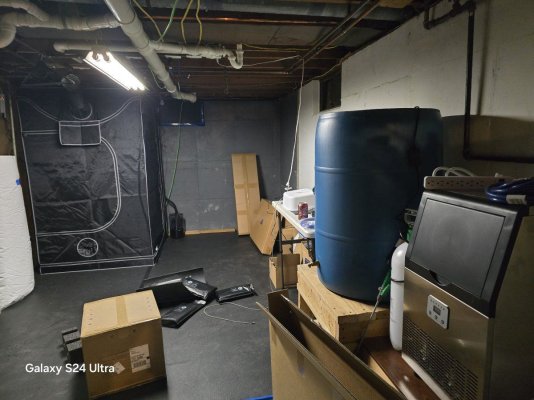
I'm running a 20/4 light cycle. The temp in the lung room is around 60 with a rh of 30-35%. When my light shuts off the temperature battles to stay up at 75-80ยฐ it drops to around 73ยฐ. The RH struggles to stay between 75-80% and drops to 53%. I've changed my parameters today for the heater and humidifiers to allow them to run on the highest setting (10) whereas before they were set to run at a max of 7 or 70%.
We shall see of this helps. I'm also running two very short intake tubes as seen in the video. If the problem persists after tonight. I will run longer intake vets and make them stretch to the ceiling and hang back down to try and trap the humidity inside the tent better.
 

Attachments

  • lucky-llamas-first-grow-journal-9.jpg
    lucky-llamas-first-grow-journal-9.jpg
    312.9 KB · Views: 4
  • lucky-llamas-first-grow-journal.jpg
    lucky-llamas-first-grow-journal.jpg
    147.1 KB · Views: 3
  • lucky-llamas-first-grow-journal-13.jpg
    lucky-llamas-first-grow-journal-13.jpg
    99.5 KB · Views: 4
  • lucky-llamas-first-grow-journal-12.jpg
    lucky-llamas-first-grow-journal-12.jpg
    418 KB · Views: 4
  • lucky-llamas-first-grow-journal-11.jpg
    lucky-llamas-first-grow-journal-11.jpg
    475.6 KB · Views: 3
  • lucky-llamas-first-grow-journal-10.jpg
    lucky-llamas-first-grow-journal-10.jpg
    212.6 KB · Views: 4
  • 20250106_201825.mp4
    85.7 MB
  • lucky-llamas-first-grow-journal-8.jpg
    lucky-llamas-first-grow-journal-8.jpg
    116.6 KB · Views: 3
  • lucky-llamas-first-grow-journal-7.jpg
    lucky-llamas-first-grow-journal-7.jpg
    140.6 KB · Views: 4
  • lucky-llamas-first-grow-journal-6.jpg
    lucky-llamas-first-grow-journal-6.jpg
    150.7 KB · Views: 3
  • lucky-llamas-first-grow-journal-5.jpg
    lucky-llamas-first-grow-journal-5.jpg
    151 KB · Views: 2
  • lucky-llamas-first-grow-journal-4.jpg
    lucky-llamas-first-grow-journal-4.jpg
    151 KB · Views: 1
  • lucky-llamas-first-grow-journal-3.jpg
    lucky-llamas-first-grow-journal-3.jpg
    74.4 KB · Views: 2
  • lucky-llamas-first-grow-journal-2.jpg
    lucky-llamas-first-grow-journal-2.jpg
    182.9 KB · Views: 3
Temps last night were regulated well and held up to 75ยฐf with the heater set to run at a maximum of 10 or 100%. The humidity suffered again dropping as low as 52% with the humidifier set to run at a maximum of 10 or 100%.
I've changed the intake to a much longer intake vent stretching to the ceiling and hanging back down in hopes that the humid more dense air will not make its way all the way up the vent and back down to escape the tent environment. The lung room as of right now is 59โ€ขf and 29%rh on one of the coldest nights of the year. If these humidity problems persist. I will have to heat the basement some, which will be fairly simple. I'll just have to cut in a register on one of the heating ducts closely.
The seedlings look healthy, and seem to be relatively unaffected by the drastic 20%+ drops when the lights turn off between 2am and 6am. The soil seems moist enough to skip any feeding today. The outer edges of the pot surface soil is dry but the center of the pot is darker and moist. The soil seems moist under the surface when I stuck my finger in around the edge also. I know the most common problem with beginners is over watering. I will check back in the morning at 6:15-6:30 and may give a small feeding of RO water before work.
 

Attachments

  • 20250108_225340.jpg
    20250108_225340.jpg
    185.6 KB · Views: 3
  • 20250108_225356.jpg
    20250108_225356.jpg
    136.6 KB · Views: 3
  • 20250108_230257.jpg
    20250108_230257.jpg
    369.3 KB · Views: 3
  • 20250108_230305.jpg
    20250108_230305.jpg
    394.6 KB · Views: 2
Very nice! That 52% should be ok if thats all you can get.
 
Very nice! That 52% should be ok if thats all you can get.
Yeah won't be too much of an issue once I get the veg and flower stages(lower RH). But at this point, I'm trying to keep things regulated as much as possible and let the exhaust Fan take care of dumping heat and humidity while bringing in fresh air. Right now, I don't think the exhaust Fan has run once.. the lights go out at 2am til 6am and during those times of darkness I think the humidity was just flowing right out the shorter style intakes because the temp difference was so different between inside the tent and outside.
 

Attachments

  • Screenshot_20250108_235632_AC Infinity.jpg
    Screenshot_20250108_235632_AC Infinity.jpg
    62 KB · Views: 3
Humidity levels during the dark phase overnight have improved since changing to the longer intake that stretches to the ceiling and hangs back down to about 16" off the ground. The humidity during this time averaged around 60% rh. This is an increase of 10% from the previous levels with the shorter intake vent. I'm ok with these levels, as they seem to be a fairly safe level. The seedlings don't seem too pissed off about the 15-18% drop in humidity during the 4 hours of darkness.

On another note. I dropped 4 more blue dream seeds in a jar of RO water. They took the plunge at 6:20 today. I'll move them to the napkin method when I get home from work tomorrow. These will go into the other 4x4 tent, I'm confident I've dialed in the VPD in the first test run tent well enough for these to prosper into flower and hopefully a juicy harvest. My only concern at this point is pollen somehow getting out of the 4x4 in which I'll be reversing one of the plants to produce pollen in order to pollenate the other which will produce me a bunch of feminized auto blue dream seeds.
The worst that can happen is having 5 plants all get pollenated by a reversed female plant which would leave me probably over a thousand seeds. I prefer to just harvest one plant for seeds. But if it did happen by mistake.. I couldn't be too upset with the results.

I've taken a photo of my IonFrame EVO6 and noticed some anomalies. I'll be investigating this further in the coming days as I don't have the energy tonight. Plus meatloaf is calling my name. โœŒ๏ธ later
 

Attachments

  • Screenshot_20250109_183115_AC Infinity.jpg
    Screenshot_20250109_183115_AC Infinity.jpg
    69.4 KB · Views: 2
  • 20250109_180336.jpg
    20250109_180336.jpg
    368.7 KB · Views: 3
  • 20250109_180341.jpg
    20250109_180341.jpg
    357.3 KB · Views: 4
  • 20250109_180358.jpg
    20250109_180358.jpg
    200.7 KB · Views: 8
  • 20250109_180403.jpg
    20250109_180403.jpg
    187.9 KB · Views: 7
The 4 blue dream beans I dropped in a jar of RO water last night were moved into a zip lock and paper towel soaked in RO water at 6:20 pm. Exactly 24 hrs from when they splashed๐Ÿ˜…. The ziplock is hanging out on a heat mat set at 78ยฐf . A couple of them barely cracked open, the other two have not, yet. Humidity levels during the dark phase last night improved yet again to an average of about 65%. I took the time tonight to study the anomolies I seen on the light via photos yesterday. I fired up my other tent to check and see if they had the same anomolies. I was relieved to see both lights have the same patterns of anomalies. This has got to be normal. I sent an email to ac infinity to get some information as to what this is, as my brain must have answers!! Lol
I checked the two seedlings and seen that most of the surface soil was dry and it felt fairly dry when I dug my finger down in the soil a little. They started to show a little more growth today and both look healthy. I feel like I probably didn't soak the soil down enough when I first planted the seeds because I was using a pump sprayer and it seemed like I watered more than I actually did with the fan sprayer. One thing was for sure. There was no drainage from the bottom of the cloth pots when I prepared them. So, today I decided to feed 500ml of RO water to each pot. It would've been better to do this closer to "lights out" time.. but I'm not going to make it til 2am. This made me realize the next time around, I need to switch the lighting to turn off at 10:30 and back on at 2:30. This way I can comfortably get my work done in the tents and also be able to feed right before lights out. I also installed a UV light to run for 3 hrs a day in my RO reservoir tonight, just as a secondary precaution that nothing nasty happens to my water. There should be no reason RO water can grow bacteria or algae. But there is also no reason to take any chances of that happening if I can prevent it for a mere $35 light. Looking forward to chilling out this weekend and getting the other 4 blue dream seeds potted. ๐Ÿ˜
 

Attachments

  • 20250110_214907.jpg
    20250110_214907.jpg
    164.7 KB · Views: 5
  • 20250110_214938.jpg
    20250110_214938.jpg
    176.5 KB · Views: 3
  • 20250110_220403.jpg
    20250110_220403.jpg
    357.9 KB · Views: 4
  • 20250110_220406.jpg
    20250110_220406.jpg
    384 KB · Views: 4
  • Screenshot_20250110_223508_AC Infinity.jpg
    Screenshot_20250110_223508_AC Infinity.jpg
    64.8 KB · Views: 4
It's day 7 in soil for the first two and they're looking great, the 500ml of RO water is fed them Friday evening has kept the soil moist through Sunday morning. The other 4 beans germinating in the paper towel/ziplock all popped open. One taproot was almost 2cm while one of them was just starting to show a taproot. The other two has taproots around 8mm in length. I decided to plant them in their 2gal starter fabric pots. Last time I felt like I didn't prepare the pots with enough water before planting. This time I prepared all the pots with 1000ml or 1L. There was very little runoff, just enough to tell me the pots were well prepared. I'm looking forward to watching these 4 sprout over the next couple days as these babies will be harvested for flower.
 

Attachments

  • 20250112_082317.jpg
    20250112_082317.jpg
    170.2 KB · Views: 3
  • 20250112_082352.jpg
    20250112_082352.jpg
    172.6 KB · Views: 4
  • 20250112_082356.jpg
    20250112_082356.jpg
    203.6 KB · Views: 3
I just made it through your thread. Youโ€™ve been putting in some work. Good job ๐Ÿ‘ Donโ€™t stress the humidity levels too tightly. There is the ideal range and whatโ€™s realistic but youโ€™ve got this.
 
I haven't changed much since the last update except for gaining trust in the epoxy seal job I did on the hose bib of my 50 gal RO water reservoir. So I let her fill up almost full, there is atleast 40 gallons in there heated to 70ยฐf and sterilized with a uv light.
The grow is coming alot great. The 4 newly planted blue dream plants i'll be harvesting for buds all sprouted. So far i've got a 100% germination and sprout rate ๐Ÿ˜
I've been trying to decide what I want to cross first and this journey has led me to more of an obsession to create some new strains and crosses more than harvesting bud. I've made a list of what seeds I've acquired and how many of each I have left. After this run, if everything goes well I should have a a ton of blue dream feminized pollen left over and a ton of seeds. I don't ever want to run out of a strain of seeds once I aquire the strain. It might be wierd.. but "I want my cake and I want to eat it too" ๐Ÿ˜†
The only strain I could care less about duping (duplicating seeds) is the blue amnesia. It was a freebie seed I got from the reservation when I bought some pineapple express seeds. I'm going to have to buy more strains from blimburn because I got the "gelato x girl scout cookies seed as a freebie and I'd really like to get another one to dupe those.
I started a watering/transplanting log so I can look back later and make changes if need be. I'm really looking forward to the next couple weeks. Especially because I'm finishing a drug court stint this Thursday due to a DUI back in 23' and I haven't been able to smoke anything in over 16 months.
I'm currently boiling all my dusty bowls and bubblers to clean them tonight as they've collected some dust and baby powder on the bathroom counter ๐Ÿคฃ.
Happy Growing ladies and gents โœŒ๏ธ
 

Attachments

  • 20250114_194211.jpg
    20250114_194211.jpg
    146.3 KB · Views: 4
  • 20250114_180821.jpg
    20250114_180821.jpg
    142.5 KB · Views: 7
  • 20250114_175053.jpg
    20250114_175053.jpg
    187.8 KB · Views: 7
  • 20250114_175035.jpg
    20250114_175035.jpg
    398.7 KB · Views: 3
  • 20250114_175038.jpg
    20250114_175038.jpg
    349.7 KB · Views: 5
  • 20250114_175030.jpg
    20250114_175030.jpg
    346.1 KB · Views: 4
  • 20250114_175032.jpg
    20250114_175032.jpg
    289.2 KB · Views: 4
Last edited:
Day 12 for the main tent. Everything is going really well. I have been feeding very irregularly and willy nilly with the amounts. Just kind of feeling out how much is good.. I've been trying to let the soil dry out a bit in between waterings but sometimes the outer ring of the fabric pots seems so dang dry while the center still has a bit of moisture. So at these times I've decreased the feeding amount and watered mostly around the edge to try and promote more root growth outwards from the center of the pot..
Day 7 for the seedlings. They're all looking like they like their environment. For some reason this tent seems to heat up just a tad quicker and the exhaust Fan runs more often (not such a bad thing) as I was worried about the other tent getting enough exchange of fresh air.. I snapped the picture of the seedlings just as lights went out and it was right after feeding so hopefully they just thought the flash was lightning ๐ŸŒฉ ๐Ÿ˜…
 

Attachments

  • 20250117_220344.jpg
    20250117_220344.jpg
    157.1 KB · Views: 5
  • 20250117_220405.jpg
    20250117_220405.jpg
    192.6 KB · Views: 3
  • 20250117_220410.jpg
    20250117_220410.jpg
    125.2 KB · Views: 5
  • 20250117_220428.jpg
    20250117_220428.jpg
    238.6 KB · Views: 4
  • 20250117_220430.jpg
    20250117_220430.jpg
    176.8 KB · Views: 3
  • 20250117_220736.jpg
    20250117_220736.jpg
    119.5 KB · Views: 3
You stated this is your first run with AC Infinity tents but it looks like you've done this before. I've used R-Tech for wall insulation with really good results.

6 plant LST pre flower


Some info that helped fill in a lot of questions I had that were never fully explained. I am not the author.

This will be a long read based on my personal knowledge, opinions, research and others work to consolidate information for our members. I'm not presenting my opinions as facts so take from this what you like. I will be putting it in subsection format for easy reference.

First, I want to make an important point to take into consideration before reading. The tap root will grow directly downwards to the bottom of the container before spreading out.

PERCHED WATER TABLE

What is it?

The perched water table is basically the height of the saturation zone where capillary action and gravity cancel eachother out. This area will be saturated with water and will be responsible most growers' issues with watering practices especially in soil grows.

WHAT IS CAPILLARY ACTION

CAPILLARY action is the combination of the cohesive and adhesive properties of water.

In short adhesion is water clinging to the media (think of it like wicking or soaking up)

Cohesion is where the water clings to itself.

So, as the water is wicked up (adhesion) it pulls more water with it through Cohesion and at the point gravity and these properties cancel eachother out is the perched water table.

This perched water table will always remain the SAME HEIGHT and will always stay saturated unless taken up by the plants or evaporates when the pot dries out. No matter the container height, depth or volume of media. So, if a tall skinny container had a perched water table of 1" then a short wide one of the same media will also have a perched water table of 1". Which means the ratio of water to air in a wide pot will be higher than a tall skinny pot which will have a higher air to water ratio... keep this in mind as we get further.

Different media's have different perched water tables. A more absorbent media will have a higher perched water table than a less absorbent media... REMEMBER THIS as it makes a big difference on pot selection for your media.

DIFFERENT MEDIA

Water holding capacity is directly related to the height of the perched water table so soils with more clay or silt and less sand will have a higher perched water table than those with more sand because sand is a larger particle.

The larger the overall particles of the media the lower the perched water table and better the drainage.

By adding things like perlite or vermiculite (while vermiculite is good at absorbing water it also improves drainage so its helpful in keeping a more even level of moisture throughout the media while increasing drainage due to its size) we can lower the perched water table by reducing the wicking (adhesion) ability and creating more space between particles overall reducing the cohesion effect and in turn the height of the perched water table.

Media like peat based or coco have a much higher drainage and lower perched water table than soil and are therefore less susceptible to over watering but will require more frequent watering due to the lower water holding capacity.

Adding things like perlite or hydroton to the bottom of the pots will NOT reduce the water table but instead raise it. This is because as I said the height of the water table will not change for a given media. So, if you add things like that to the bottom you are essentially just moving the water table up.

Basically, the larger the particles IN the media the better drainage and lower the water table.

If you want to see the height of your perched water table, use a clear cup with drain holes fill with media and saturate it. Wait a few hrs for drainage and then come back and look. You can see the difference in the varying media's if you want to experiment.

If you feel you have over watered or your perched water table height is too high you can simply tilt your pot on a 45 degree angle and release more water from the media as runoff. To help visualize think of it this way if you have a perched water table of 2โ€. You can draw an imaginary horizontal line at that height, when you tilt the pot you have less media below that line and therefore you will have less water in the pot after tilting it.

POT SIZE

I have already covered this a bit but my opinion is if you are using a media with a higher water table you will benefit from taller narrower pots and if using a media with a lower perched water table the shorter wider ones may benefit you depending on your watering practices.

I prefer the taller over wider no matter the media as I choose to water often and have a higher air holding capacity and lower water table but that can work against you if you can't water as frequently and as plants grow it can greatly increase the frequency required as the roots will be pulling the water out of that saturation zone quickly. So, you may want to use taller pots for small plants and transplant into a wider one as they grow.

You also don't want a pot that's too tall and the top portion of the media is drying out to fast while the bottom is wet.

Let's use seedlings as an example take a solo cup or a large container... the water table will be the same height in either. I see sooo often ppl trying to water a tiny bit in circles or mist the surface and for lack of other words IT DRIVES ME NUTS! Why? Because the roots are so shallow they are not at risk of being over watered. Remember though tap roots grow straight down so we to be mindful as they grow depending on the gas exchange of the media that the majority of roots are not sitting in the saturated zone with poor gas exchange because this will cause lack of oxygen that we incorrectly refer to as overwatering which is actually the cause not the symptom.

It's important to fill containers to the top to give us a good amount of space above the perched water table that high in o2. If you fill a solo cup halfway with soil it's likely to be sitting in the saturation zone and will not do well.


Also going to make the point that plants will be most susceptible to overwatering when the roots first hit the bottom and spread out until they fill the bottom and start moving back up out of the saturation zone. So, again, it may be more beneficial to use a taller narrow pot for the early stages of growth (2-4 weeks depending on growth) and transplant into a wider pot as you go. After the transplant almost all of the roots will be above the saturation zone and it becomes much harder to over water. New roots will again work their way down into the saturation zone but you will have plenty above so it's less likely to over water and why up potting as you go I see as a benefit instead of starting in a large wide container.

POT MATERIAL

Some prefer plastic others fabric, air pots etc.

This can affect the perched water table by evaporation as the lager the exposed surface area the more evaporation that occurs from the media in say fabric pots. This imo has a few benefits.... slightly reducing the perched water table but more so the exposure for gas exchange that's happening and that's a good thing for o2 levels in the root zone that I feel are directly related to growth rates and I'll explain why going a bit off topic for a second.

It's no coincidence that the fastest growing media's have the highest amounts of o2 and gas exchange.... for eg aeroponics have unlimited to rich o2 and water. Hydro similar with slightly less o2, soilless media's such as coco and I would possibly include peat and last soil. If you notice they are in order of growth rates and its not hard to see the difference in their air holding capacity in that order. And the fact that larger particles also have a better gas exchange rate. This is important because the plants take in oxygen and expel co2 in the rootzone as do the microbes on top of that so good gas exchange is important for both.

Just a note... air pruning has nothing to do with the benefits of fabric pots all it does is signal the roots to grow in a different direction.

But let's get back on topic of watering and how it's affected.

TEMPERATURE AND HUMIDITY

The warmer the temps the more evaporation occurs.

The lower your humidity the more evaporation occurs

The more surface area exposed to air movement (wind) the more evaporation.

Think those don't need an explanation. But the difference in pot material coupled with these environmental factors will have an impact on your watering needs.

The temperature of the media not only affects evaporation but also directly affect the temperature of the plant and leaf temps. This has a large impact on nutrient uptake and transportation.

First let me say that this next part is opinion and I will give my reasoning for my opinions. With the exception of hydro (leaving this part out as this post is about watering not hydro) roots like to be about the same temperature as the leaves contrary to what's talked about from many prominent growers in the industry but not all like Dr. Bruce Bugbee. IMO ideal root temps are the same as ideal leaf temps and overall plant temps especially since the root temps have a large impact on the plant and leaf temps. What are ideal temps imo and many studies show that leaf temps (NOT AIR TEMPS) of around 77f are most efficient. So how does a cool rootzone impact the plants negatively? Well it's 2 fold because of the cool temps the viscosity (measument of flow rate) of the sap will decrease so its harder for the plant to move the nutrients through the plant. The other is absorption and one fact is that in a cooler rootzone the concentration of nutrients is higher (but aqua you just said it slows absorption) well it does as the nutrients build up in the roots it can absorb less and this has a direct impact negatively on the plant. It may appear to be overwatered because the plant is now struggling to take up and use oxygen. Add that to the slowed transpiration rates and you have the same symtom many refer to overwatering which againnos lack of o2. Now take a cold rootzone where the plants slow water uptake and then add the saturation zone to it and you can see the road to correction and recover is a long one and can have huge impact on growth and yields.

So, get your pots up off the floor ๐Ÿ˜

WET AND DRY CYCLES

in soil and peat with higher water tables or with wider pots or combination of wet and dry cycles are important. This is to allow the dry back (including the uptake of water from the saturation zone) to prevent symptoms of over watering and help with o2 levels. Remember the majority of roots will end up in the saturation zone with these media's or with wider pots. Which can become depleted of o2 quickly as gas exchange is lower in water and media made up of smaller particles. This is where pot size and shape are important for the size of plant. You have a small plant in large container and there is no way it can take up enough of the water in the saturation zone fast enough to get air exposure in a media that has low gas exchange and majority of the roots. So, it's important to choose a pot size that will allow for this. It's also why using the finger method to gage watering is poor and lifting the pots is much better... when they are light you know they have taken up a good portion of the saturation zone and are ready to be watered again.

This is much less of an issue when using soilless like coco or peat/perlite.
 
You stated this is your first run with AC Infinity tents but it looks like you've done this before. I've used R-Tech for wall insulation with really good results.

View attachment 2359920

Some info that helped fill in a lot of questions I had that were never fully explained. I am not the author.

This will be a long read based on my personal knowledge, opinions, research and others work to consolidate information for our members. I'm not presenting my opinions as facts so take from this what you like. I will be putting it in subsection format for easy reference.

First, I want to make an important point to take into consideration before reading. The tap root will grow directly downwards to the bottom of the container before spreading out.

PERCHED WATER TABLE

What is it?

The perched water table is basically the height of the saturation zone where capillary action and gravity cancel eachother out. This area will be saturated with water and will be responsible most growers' issues with watering practices especially in soil grows.

WHAT IS CAPILLARY ACTION

CAPILLARY action is the combination of the cohesive and adhesive properties of water.

In short adhesion is water clinging to the media (think of it like wicking or soaking up)

Cohesion is where the water clings to itself.

So, as the water is wicked up (adhesion) it pulls more water with it through Cohesion and at the point gravity and these properties cancel eachother out is the perched water table.

This perched water table will always remain the SAME HEIGHT and will always stay saturated unless taken up by the plants or evaporates when the pot dries out. No matter the container height, depth or volume of media. So, if a tall skinny container had a perched water table of 1" then a short wide one of the same media will also have a perched water table of 1". Which means the ratio of water to air in a wide pot will be higher than a tall skinny pot which will have a higher air to water ratio... keep this in mind as we get further.

Different media's have different perched water tables. A more absorbent media will have a higher perched water table than a less absorbent media... REMEMBER THIS as it makes a big difference on pot selection for your media.

DIFFERENT MEDIA

Water holding capacity is directly related to the height of the perched water table so soils with more clay or silt and less sand will have a higher perched water table than those with more sand because sand is a larger particle.

The larger the overall particles of the media the lower the perched water table and better the drainage.

By adding things like perlite or vermiculite (while vermiculite is good at absorbing water it also improves drainage so its helpful in keeping a more even level of moisture throughout the media while increasing drainage due to its size) we can lower the perched water table by reducing the wicking (adhesion) ability and creating more space between particles overall reducing the cohesion effect and in turn the height of the perched water table.

Media like peat based or coco have a much higher drainage and lower perched water table than soil and are therefore less susceptible to over watering but will require more frequent watering due to the lower water holding capacity.

Adding things like perlite or hydroton to the bottom of the pots will NOT reduce the water table but instead raise it. This is because as I said the height of the water table will not change for a given media. So, if you add things like that to the bottom you are essentially just moving the water table up.

Basically, the larger the particles IN the media the better drainage and lower the water table.

If you want to see the height of your perched water table, use a clear cup with drain holes fill with media and saturate it. Wait a few hrs for drainage and then come back and look. You can see the difference in the varying media's if you want to experiment.

If you feel you have over watered or your perched water table height is too high you can simply tilt your pot on a 45 degree angle and release more water from the media as runoff. To help visualize think of it this way if you have a perched water table of 2โ€. You can draw an imaginary horizontal line at that height, when you tilt the pot you have less media below that line and therefore you will have less water in the pot after tilting it.

POT SIZE

I have already covered this a bit but my opinion is if you are using a media with a higher water table you will benefit from taller narrower pots and if using a media with a lower perched water table the shorter wider ones may benefit you depending on your watering practices.

I prefer the taller over wider no matter the media as I choose to water often and have a higher air holding capacity and lower water table but that can work against you if you can't water as frequently and as plants grow it can greatly increase the frequency required as the roots will be pulling the water out of that saturation zone quickly. So, you may want to use taller pots for small plants and transplant into a wider one as they grow.

You also don't want a pot that's too tall and the top portion of the media is drying out to fast while the bottom is wet.

Let's use seedlings as an example take a solo cup or a large container... the water table will be the same height in either. I see sooo often ppl trying to water a tiny bit in circles or mist the surface and for lack of other words IT DRIVES ME NUTS! Why? Because the roots are so shallow they are not at risk of being over watered. Remember though tap roots grow straight down so we to be mindful as they grow depending on the gas exchange of the media that the majority of roots are not sitting in the saturated zone with poor gas exchange because this will cause lack of oxygen that we incorrectly refer to as overwatering which is actually the cause not the symptom.

It's important to fill containers to the top to give us a good amount of space above the perched water table that high in o2. If you fill a solo cup halfway with soil it's likely to be sitting in the saturation zone and will not do well.


Also going to make the point that plants will be most susceptible to overwatering when the roots first hit the bottom and spread out until they fill the bottom and start moving back up out of the saturation zone. So, again, it may be more beneficial to use a taller narrow pot for the early stages of growth (2-4 weeks depending on growth) and transplant into a wider pot as you go. After the transplant almost all of the roots will be above the saturation zone and it becomes much harder to over water. New roots will again work their way down into the saturation zone but you will have plenty above so it's less likely to over water and why up potting as you go I see as a benefit instead of starting in a large wide container.

POT MATERIAL

Some prefer plastic others fabric, air pots etc.

This can affect the perched water table by evaporation as the lager the exposed surface area the more evaporation that occurs from the media in say fabric pots. This imo has a few benefits.... slightly reducing the perched water table but more so the exposure for gas exchange that's happening and that's a good thing for o2 levels in the root zone that I feel are directly related to growth rates and I'll explain why going a bit off topic for a second.

It's no coincidence that the fastest growing media's have the highest amounts of o2 and gas exchange.... for eg aeroponics have unlimited to rich o2 and water. Hydro similar with slightly less o2, soilless media's such as coco and I would possibly include peat and last soil. If you notice they are in order of growth rates and its not hard to see the difference in their air holding capacity in that order. And the fact that larger particles also have a better gas exchange rate. This is important because the plants take in oxygen and expel co2 in the rootzone as do the microbes on top of that so good gas exchange is important for both.

Just a note... air pruning has nothing to do with the benefits of fabric pots all it does is signal the roots to grow in a different direction.

But let's get back on topic of watering and how it's affected.

TEMPERATURE AND HUMIDITY

The warmer the temps the more evaporation occurs.

The lower your humidity the more evaporation occurs

The more surface area exposed to air movement (wind) the more evaporation.

Think those don't need an explanation. But the difference in pot material coupled with these environmental factors will have an impact on your watering needs.

The temperature of the media not only affects evaporation but also directly affect the temperature of the plant and leaf temps. This has a large impact on nutrient uptake and transportation.

First let me say that this next part is opinion and I will give my reasoning for my opinions. With the exception of hydro (leaving this part out as this post is about watering not hydro) roots like to be about the same temperature as the leaves contrary to what's talked about from many prominent growers in the industry but not all like Dr. Bruce Bugbee. IMO ideal root temps are the same as ideal leaf temps and overall plant temps especially since the root temps have a large impact on the plant and leaf temps. What are ideal temps imo and many studies show that leaf temps (NOT AIR TEMPS) of around 77f are most efficient. So how does a cool rootzone impact the plants negatively? Well it's 2 fold because of the cool temps the viscosity (measument of flow rate) of the sap will decrease so its harder for the plant to move the nutrients through the plant. The other is absorption and one fact is that in a cooler rootzone the concentration of nutrients is higher (but aqua you just said it slows absorption) well it does as the nutrients build up in the roots it can absorb less and this has a direct impact negatively on the plant. It may appear to be overwatered because the plant is now struggling to take up and use oxygen. Add that to the slowed transpiration rates and you have the same symtom many refer to overwatering which againnos lack of o2. Now take a cold rootzone where the plants slow water uptake and then add the saturation zone to it and you can see the road to correction and recover is a long one and can have huge impact on growth and yields.

So, get your pots up off the floor ๐Ÿ˜

WET AND DRY CYCLES

in soil and peat with higher water tables or with wider pots or combination of wet and dry cycles are important. This is to allow the dry back (including the uptake of water from the saturation zone) to prevent symptoms of over watering and help with o2 levels. Remember the majority of roots will end up in the saturation zone with these media's or with wider pots. Which can become depleted of o2 quickly as gas exchange is lower in water and media made up of smaller particles. This is where pot size and shape are important for the size of plant. You have a small plant in large container and there is no way it can take up enough of the water in the saturation zone fast enough to get air exposure in a media that has low gas exchange and majority of the roots. So, it's important to choose a pot size that will allow for this. It's also why using the finger method to gage watering is poor and lifting the pots is much better... when they are light you know they have taken up a good portion of the saturation zone and are ready to be watered again.

This is much less of an issue when using soilless like coco or peat/perlite.
Thanks man. I've never read about the perched water table until now. Good stuff! It makes sense..

Yes, this is my first ever grow. I've read alot in the past and much more recently the few months before I started preparing the room. I used to browse the forums years ago before I had the means (space) to do anything worth doing. Back when people were doing stealth grows inside PC cases and things. It's quite comical looking back..
 
You stated this is your first run with AC Infinity tents but it looks like you've done this before. I've used R-Tech for wall insulation with really good results.

View attachment 2359920

Some info that helped fill in a lot of questions I had that were never fully explained. I am not the author.

This will be a long read based on my personal knowledge, opinions, research and others work to consolidate information for our members. I'm not presenting my opinions as facts so take from this what you like. I will be putting it in subsection format for easy reference.

First, I want to make an important point to take into consideration before reading. The tap root will grow directly downwards to the bottom of the container before spreading out.

PERCHED WATER TABLE

What is it?

The perched water table is basically the height of the saturation zone where capillary action and gravity cancel eachother out. This area will be saturated with water and will be responsible most growers' issues with watering practices especially in soil grows.

WHAT IS CAPILLARY ACTION

CAPILLARY action is the combination of the cohesive and adhesive properties of water.

In short adhesion is water clinging to the media (think of it like wicking or soaking up)

Cohesion is where the water clings to itself.

So, as the water is wicked up (adhesion) it pulls more water with it through Cohesion and at the point gravity and these properties cancel eachother out is the perched water table.

This perched water table will always remain the SAME HEIGHT and will always stay saturated unless taken up by the plants or evaporates when the pot dries out. No matter the container height, depth or volume of media. So, if a tall skinny container had a perched water table of 1" then a short wide one of the same media will also have a perched water table of 1". Which means the ratio of water to air in a wide pot will be higher than a tall skinny pot which will have a higher air to water ratio... keep this in mind as we get further.

Different media's have different perched water tables. A more absorbent media will have a higher perched water table than a less absorbent media... REMEMBER THIS as it makes a big difference on pot selection for your media.

DIFFERENT MEDIA

Water holding capacity is directly related to the height of the perched water table so soils with more clay or silt and less sand will have a higher perched water table than those with more sand because sand is a larger particle.

The larger the overall particles of the media the lower the perched water table and better the drainage.

By adding things like perlite or vermiculite (while vermiculite is good at absorbing water it also improves drainage so its helpful in keeping a more even level of moisture throughout the media while increasing drainage due to its size) we can lower the perched water table by reducing the wicking (adhesion) ability and creating more space between particles overall reducing the cohesion effect and in turn the height of the perched water table.

Media like peat based or coco have a much higher drainage and lower perched water table than soil and are therefore less susceptible to over watering but will require more frequent watering due to the lower water holding capacity.

Adding things like perlite or hydroton to the bottom of the pots will NOT reduce the water table but instead raise it. This is because as I said the height of the water table will not change for a given media. So, if you add things like that to the bottom you are essentially just moving the water table up.

Basically, the larger the particles IN the media the better drainage and lower the water table.

If you want to see the height of your perched water table, use a clear cup with drain holes fill with media and saturate it. Wait a few hrs for drainage and then come back and look. You can see the difference in the varying media's if you want to experiment.

If you feel you have over watered or your perched water table height is too high you can simply tilt your pot on a 45 degree angle and release more water from the media as runoff. To help visualize think of it this way if you have a perched water table of 2โ€. You can draw an imaginary horizontal line at that height, when you tilt the pot you have less media below that line and therefore you will have less water in the pot after tilting it.

POT SIZE

I have already covered this a bit but my opinion is if you are using a media with a higher water table you will benefit from taller narrower pots and if using a media with a lower perched water table the shorter wider ones may benefit you depending on your watering practices.

I prefer the taller over wider no matter the media as I choose to water often and have a higher air holding capacity and lower water table but that can work against you if you can't water as frequently and as plants grow it can greatly increase the frequency required as the roots will be pulling the water out of that saturation zone quickly. So, you may want to use taller pots for small plants and transplant into a wider one as they grow.

You also don't want a pot that's too tall and the top portion of the media is drying out to fast while the bottom is wet.

Let's use seedlings as an example take a solo cup or a large container... the water table will be the same height in either. I see sooo often ppl trying to water a tiny bit in circles or mist the surface and for lack of other words IT DRIVES ME NUTS! Why? Because the roots are so shallow they are not at risk of being over watered. Remember though tap roots grow straight down so we to be mindful as they grow depending on the gas exchange of the media that the majority of roots are not sitting in the saturated zone with poor gas exchange because this will cause lack of oxygen that we incorrectly refer to as overwatering which is actually the cause not the symptom.

It's important to fill containers to the top to give us a good amount of space above the perched water table that high in o2. If you fill a solo cup halfway with soil it's likely to be sitting in the saturation zone and will not do well.


Also going to make the point that plants will be most susceptible to overwatering when the roots first hit the bottom and spread out until they fill the bottom and start moving back up out of the saturation zone. So, again, it may be more beneficial to use a taller narrow pot for the early stages of growth (2-4 weeks depending on growth) and transplant into a wider pot as you go. After the transplant almost all of the roots will be above the saturation zone and it becomes much harder to over water. New roots will again work their way down into the saturation zone but you will have plenty above so it's less likely to over water and why up potting as you go I see as a benefit instead of starting in a large wide container.

POT MATERIAL

Some prefer plastic others fabric, air pots etc.

This can affect the perched water table by evaporation as the lager the exposed surface area the more evaporation that occurs from the media in say fabric pots. This imo has a few benefits.... slightly reducing the perched water table but more so the exposure for gas exchange that's happening and that's a good thing for o2 levels in the root zone that I feel are directly related to growth rates and I'll explain why going a bit off topic for a second.

It's no coincidence that the fastest growing media's have the highest amounts of o2 and gas exchange.... for eg aeroponics have unlimited to rich o2 and water. Hydro similar with slightly less o2, soilless media's such as coco and I would possibly include peat and last soil. If you notice they are in order of growth rates and its not hard to see the difference in their air holding capacity in that order. And the fact that larger particles also have a better gas exchange rate. This is important because the plants take in oxygen and expel co2 in the rootzone as do the microbes on top of that so good gas exchange is important for both.

Just a note... air pruning has nothing to do with the benefits of fabric pots all it does is signal the roots to grow in a different direction.

But let's get back on topic of watering and how it's affected.

TEMPERATURE AND HUMIDITY

The warmer the temps the more evaporation occurs.

The lower your humidity the more evaporation occurs

The more surface area exposed to air movement (wind) the more evaporation.

Think those don't need an explanation. But the difference in pot material coupled with these environmental factors will have an impact on your watering needs.

The temperature of the media not only affects evaporation but also directly affect the temperature of the plant and leaf temps. This has a large impact on nutrient uptake and transportation.

First let me say that this next part is opinion and I will give my reasoning for my opinions. With the exception of hydro (leaving this part out as this post is about watering not hydro) roots like to be about the same temperature as the leaves contrary to what's talked about from many prominent growers in the industry but not all like Dr. Bruce Bugbee. IMO ideal root temps are the same as ideal leaf temps and overall plant temps especially since the root temps have a large impact on the plant and leaf temps. What are ideal temps imo and many studies show that leaf temps (NOT AIR TEMPS) of around 77f are most efficient. So how does a cool rootzone impact the plants negatively? Well it's 2 fold because of the cool temps the viscosity (measument of flow rate) of the sap will decrease so its harder for the plant to move the nutrients through the plant. The other is absorption and one fact is that in a cooler rootzone the concentration of nutrients is higher (but aqua you just said it slows absorption) well it does as the nutrients build up in the roots it can absorb less and this has a direct impact negatively on the plant. It may appear to be overwatered because the plant is now struggling to take up and use oxygen. Add that to the slowed transpiration rates and you have the same symtom many refer to overwatering which againnos lack of o2. Now take a cold rootzone where the plants slow water uptake and then add the saturation zone to it and you can see the road to correction and recover is a long one and can have huge impact on growth and yields.

So, get your pots up off the floor ๐Ÿ˜

WET AND DRY CYCLES

in soil and peat with higher water tables or with wider pots or combination of wet and dry cycles are important. This is to allow the dry back (including the uptake of water from the saturation zone) to prevent symptoms of over watering and help with o2 levels. Remember the majority of roots will end up in the saturation zone with these media's or with wider pots. Which can become depleted of o2 quickly as gas exchange is lower in water and media made up of smaller particles. This is where pot size and shape are important for the size of plant. You have a small plant in large container and there is no way it can take up enough of the water in the saturation zone fast enough to get air exposure in a media that has low gas exchange and majority of the roots. So, it's important to choose a pot size that will allow for this. It's also why using the finger method to gage watering is poor and lifting the pots is much better... when they are light you know they have taken up a good portion of the saturation zone and are ready to be watered again.

This is much less of an issue when using soilless like coco or peat/perlite.
This may be an odd question.. but I'm a garage door tech, our eyes gravitate torwards anything door related by nature.. Nice garage conversion btw. But what the heck is in that bottle sitting on top of the genie door opener?
 
This may be an odd question.. but I'm a garage door tech, our eyes gravitate torwards anything door related by nature.. Nice garage conversion btw. But what the heck is in that bottle sitting on top of the genie door opener?
LOL! The garage conversion was for a senior lady whose SS wasn't making ends meet. I also mentored her for her first grow but she liked to cruise the internet and weed forums and....well... you know....

It was a COยฒ bottle she wanted to try because someone said it would up the dry yields! Bless her heart!!๐Ÿ˜‚

Wow! First grow. Going big. I would've told you to start in a 2 x 2 but....too late!๐Ÿ˜‚ Sounds like you've done some extensive research. I used to do lots of build outs so if you have any questions feel free to ask.

This was a design I made for a client that wanted a portable all in one grow chamber. 40 ft sea container.

40ft Container Grow Room
 
1-29-25 day 24 in tent 1 and day 19 in tent 2.
 

Attachments

  • 20250129_180022.jpg
    20250129_180022.jpg
    172 KB · Views: 9
  • 20250129_180546.jpg
    20250129_180546.jpg
    181.9 KB · Views: 5
  • 20250129_180624.jpg
    20250129_180624.jpg
    135 KB · Views: 2
  • 20250129_180636.jpg
    20250129_180636.jpg
    173.3 KB · Views: 4
  • 20250129_180646.jpg
    20250129_180646.jpg
    256.7 KB · Views: 4
  • 20250129_180654.jpg
    20250129_180654.jpg
    213.8 KB · Views: 3
  • 20250129_181204.jpg
    20250129_181204.jpg
    160.2 KB · Views: 4
1-30-25 day 25 in tent 1 and day 20 in tent 2
 

Attachments

  • 20250130_191023.jpg
    20250130_191023.jpg
    178.5 KB · Views: 4
  • 20250130_191040.jpg
    20250130_191040.jpg
    208.2 KB · Views: 2
  • 20250130_191046.jpg
    20250130_191046.jpg
    318.4 KB · Views: 2
2-2-25 day 28 in tent 1 and day 23 in tent 2
 

Attachments

  • 20250202_091343.jpg
    20250202_091343.jpg
    314 KB · Views: 3
  • 20250202_091355.jpg
    20250202_091355.jpg
    182.9 KB · Views: 5
  • 20250202_091405.jpg
    20250202_091405.jpg
    323 KB · Views: 4
  • 20250202_091412.jpg
    20250202_091412.jpg
    222.2 KB · Views: 5
  • 20250202_091421.jpg
    20250202_091421.jpg
    241.9 KB · Views: 3
  • 20250202_091515.jpg
    20250202_091515.jpg
    240.1 KB · Views: 2
  • 20250202_091524.jpg
    20250202_091524.jpg
    191.5 KB · Views: 6
  • 20250202_091528.jpg
    20250202_091528.jpg
    196.4 KB · Views: 4
2-6-25 day 32 in tent 1 and day 27 in tent 2
 

Attachments

  • 20250206_194457.jpg
    20250206_194457.jpg
    196 KB · Views: 3
  • 20250206_194521.jpg
    20250206_194521.jpg
    227.5 KB · Views: 2
2-9-25 day 35 in tent 1 and day 30 in tent 2
 

Attachments

  • 20250209_160542.jpg
    20250209_160542.jpg
    228.6 KB · Views: 4
  • 20250209_160618.jpg
    20250209_160618.jpg
    211.4 KB · Views: 4
  • 20250209_160631.jpg
    20250209_160631.jpg
    234.1 KB · Views: 2
  • 20250209_160653.jpg
    20250209_160653.jpg
    283.2 KB · Views: 4
  • 20250209_160714.jpg
    20250209_160714.jpg
    247.4 KB · Views: 4
  • 20250209_160732.jpg
    20250209_160732.jpg
    206.7 KB · Views: 5
  • 20250209_160806.jpg
    20250209_160806.jpg
    279.1 KB · Views: 4
Page 1 of 5 · Replies 1–20 of 94
Back
Top Bottom