Log In Register

Bokashi Bran: How to make your own

  • Thread starter Thread starter mrbong73
  • Start date Start date
  • Tagged users Tagged users None

Bokashi Bran: How to make your own

mrbong73 13 Replies 11,638 Views
Page 1 of 1 · Replies 1–14 of 14
1
M

mrbong73

Posts
580
Reactions
71
Joined
Jul 30, 2010
Points
28
Hey Farmers,
I just got done mixing up a new batch of Bokashi Bran and wanted to share how I did it in case anyone was interested.
I use the finished bran to do Bokashi composting but it can also be used as a soil amendment.
I made two bucket systems using Homer buckets. (will get to that later)

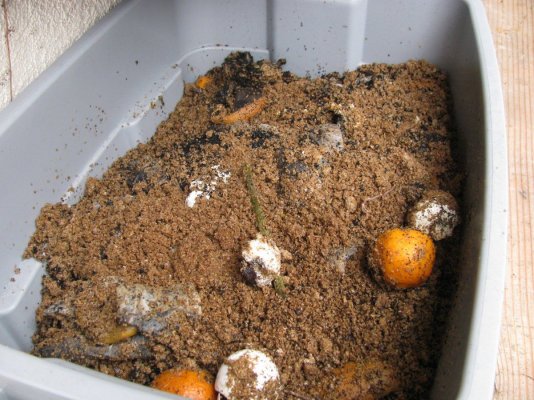
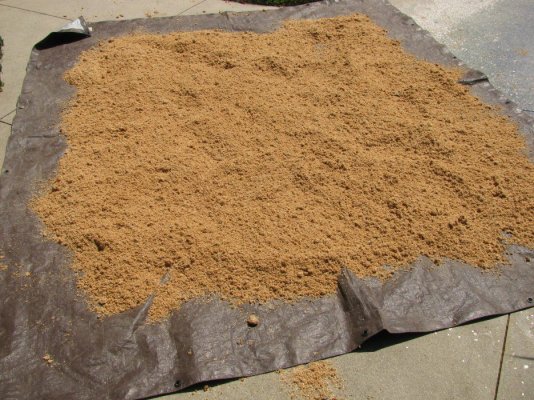
The recipe I used was as follows:
40 lb bag red wheat bran
4 gallons water
3/4 cup activated EM-1
3/4 cup molasses
1 cup fish meal (optional)
1 cup fish bone meal (optional)
1 cup glacial rock dust (optional)
1/2 cup sea salt (optional)

Here are some pics to help tell the story:
I had a helper and some curious on lookers also
 

Attachments

  • bokashi-bran-how-to-make-your-own.jpg
    bokashi-bran-how-to-make-your-own.jpg
    174.7 KB · Views: 1,451
  • bokashi-bran-how-to-make-your-own-2.jpg
    bokashi-bran-how-to-make-your-own-2.jpg
    159.4 KB · Views: 1,289
  • bokashi-bran-how-to-make-your-own-3.jpg
    bokashi-bran-how-to-make-your-own-3.jpg
    203.3 KB · Views: 1,277
  • bokashi-bran-how-to-make-your-own-4.jpg
    bokashi-bran-how-to-make-your-own-4.jpg
    208 KB · Views: 1,265
  • bokashi-bran-how-to-make-your-own-5.jpg
    bokashi-bran-how-to-make-your-own-5.jpg
    267.2 KB · Views: 1,290
  • bokashi-bran-how-to-make-your-own-6.jpg
    bokashi-bran-how-to-make-your-own-6.jpg
    295 KB · Views: 1,259
  • bokashi-bran-how-to-make-your-own-7.jpg
    bokashi-bran-how-to-make-your-own-7.jpg
    228.5 KB · Views: 1,264
  • bokashi-bran-how-to-make-your-own-8.jpg
    bokashi-bran-how-to-make-your-own-8.jpg
    236.2 KB · Views: 1,249
  • bokashi-bran-how-to-make-your-own-9.jpg
    bokashi-bran-how-to-make-your-own-9.jpg
    256.4 KB · Views: 1,319
The final mix needs to be sealed up air tight and left to ferment for around 2 weeks. It will have a sweet pickled smell when done.
It is then spread out on the tarp again in the sun to dry out. Then it's ready to use.

Using the bucket system is very easy. Each system is two 5 gallon buckets. One bucket needs holes for drainage. This one sits inside the other which will collect the liquid.
Food is layered with bran in the buckets and left to ferment.
I fill one bucket. Let it sit and start filling the second system. When the second is full I dump the first in my compost pile but you can also dig a hole and dump it in there.
It will heat up a compost pile very quickly to ensure the material breaks down.
 
Nice thread/post Mrbong73.
I bought my first couple of bags of bran. Since then I have made a similar mix using newspaper in the bran's place. I used a similar wet mix and added it to newspaper in zip lock bags for several weeks, then dried on a line stretched out in my shed. I store the finished newspaper in a garbage bag. When I need a piece I unfold it, wrap the organic waste in it, and place it in the bucket. So far my first batch looks just like the bran batches did.

I also have been gift wrapping organic garbage in this treated newspaper and then place it in a outdoor compost heap. That works slower, but still breaks down the food scraps faster than no newspaper.

Just something to think about. I doubt it would equal or beat the bran nutritionally, but it is cheap and effective.......shredder
 
and green as hell

Good point I use the "shopper" that we get locally weekly wether we want it or not. It really is a waste product. I would not be surprised if other folks using something available to them, in a effective bakashi.

If anyone is wondering why we do all this, this bakashi stuff excells in heating up a compost pile. I compost oak leafs and grass clippings mostly augmented with veggie kitchen scraps like cucumber peels, coffee grounds, egg shells, that sort of things. Anyway the oak leafs are notorious for taking a long time to decompose because of the wood fiber in it. When I mix in bakashi and a "green" (hot--N) ingredient like alfalfa meal, or grass clippings and keep it damp, I can make 90 gallons of thermo (read hot like 150 degrees or more) compost, in a compost sak in weeks. Add in some old nutrients you want to toss anyway, maybe some fish meal, rock dust, or whatever and you have yourself a really nice, designer type compost, that you can taylor to your desires. Yup, it's that good.........shredder

Edit compost sak. http://www.compostsak.com/
 
I've seen the newspaper method online before but haven't tried it yet. I guess I can use all the junk mail that comes.
I'm all for using/reusing what you have available. I've been saving all my yard waste for the compost pile and running the buckets through it also. Just finished a batch and it's really nice compost.
Next thing is the worm bins. Just need some worms to get going.
Here's some pics of my compost pile, worm trays and fermented food.
 

Attachments

  • 001.JPG
    001.JPG
    219.3 KB · Views: 1,077
  • 003.JPG
    003.JPG
    187.5 KB · Views: 1,142
  • 007.JPG
    007.JPG
    224.4 KB · Views: 1,078
Looks great mrbong. I'm weak on the worm thing. I'm just using the bins, and only make enough ewc for teas. Even if I made a decent bin ( like yours, looks great btw) I'd have to store it outside, and we have a harsh winter here.....shredder
 
mrbong73

The compost pile you have going with the cinder blocks is a typical set-up for vermicomposting on a large(r) scale. The pit is loaded with manures, plant material, etc. and 15 - 20 lbs. of worms are added and it's left alone for about 9 months and the worms and vermicompost are separated/harvested and the worms go back into the same pit with new material having been added.

The least expensive way to get a large bin up and running is to buy worm cocoons. Blue Ridge Vermiculture offers them in 1,000 and 2,000 and 3,000 packs. The 3,000 pack is $55.00 (delivered) and you'll end up with about 9,000 worms when they hatch.

9,000 worms when sexually mature (about 45 days) will be about 9 lbs. Worms produce about 1 cocoon per week so you can see how quickly your worm colonies will grow given the right conditions.

If you live in an area where freezing winters are the norm you're still okay. The freezing weather will kill off the worm but cocoons can withstand temps < -35F and when the spring comes they'll hatch and continue processing the material in the bin/bed.

There are 12' heating cables that you build into the wall of the bins and they're controlled by a thermostat and you can maintain optimum temps that way. The cables are only $30.00 and you don't need much of a thermostat - something like what you would buy at Lowes or Home Depot, etc.

Even a 3' x 3' flow-through system, fully charged with worms (about 30 lbs.) will give you in excess of 1.25 c.f. of worm castings each week. Go up to 4' x 4' and you're close to 2.25 c.f. per week.

Neem meal (cake) has been shown to increase worm colonies by as much as 25% and you only need to add 1 tablespoon to 1 s.f. of bedding surface. Add the same amount of kelp meal. 4x that amount of glacial rock dust. Weekly.

HTH

Edit: These folks are pretty cool to hang out with. Good, solid information and searching through their archives is well worth anyone's time.

UP
 
I'm going to have to get pix and schematics of the compost/worm bin my sister has going. In a DAY the worms eat up all the junk mail, leaving nothing but the plastic windows. She throws in EVERYTHING except recyclables (metal, glass and plastic). She described the compost/worm bin to me, so I have a good picture of it in my head, but an actual picture would be worth a thousand words. She says it's impossible to take even the smallest shovelful of the material without pulling up tons of worms.

She's never had to buy worms, never had to do anything other than place in the material.
 
Awesome information. Thank you for taking the time to share your recipe and method. I recently got turned onto Bokashi and I'm liking the results.
 
Update:

The Bokashi Bran sat for around 3 weeks in the plastic bags. I tried not to move them while they were fermenting.
I then spread the bran out on a tarp to dry out.

I had also been saving up some fermented kitchen scraps to put in the compost pile. I think I had about 12-15 gallons or so. When I mixed that with my compost pile the pile heated up nicely. There's also some nice white fungal strands forming on the surface of the pile.
 

Attachments

  • 015.JPG
    015.JPG
    248.3 KB · Views: 1,028
  • 025.JPG
    025.JPG
    304.4 KB · Views: 1,027
  • 002.JPG
    002.JPG
    194.9 KB · Views: 1,061
  • 004.JPG
    004.JPG
    172.1 KB · Views: 1,020
That looks spectacular. When i have the space, i shall mix me a batch.

Or...maybe do one on a smaller scale. How long do you suppose that batch will last?
 
That looks spectacular. When i have the space, i shall mix me a batch.

Or...maybe do one on a smaller scale. How long do you suppose that batch will last?

Thanks, I share the bran with my mom so it lasts us 2-3 months for a 50lb batch.
You can do as small a batch as you want. They usually have the wheat bran at health food stores but as was mentioned you can use paper also.
You just have to buy the em-1 or make your own using BIM (Beneficial Indigenous Microorganisms) or something like that.
 
Page 1 of 1 · Replies 1–14 of 14
1
Back
Top Bottom