How to make good quality bubble hash quickly and easily - a step by step guide

  • Thread starter Blaze
  • Start date
  • Tagged users None
Blaze

Blaze

2,006
263
Hello fellow farmers! I though I'd share a little bit of what I know about the bubble hash process as there seems to be some good discussions going on here about this process as of late. Enjoy!

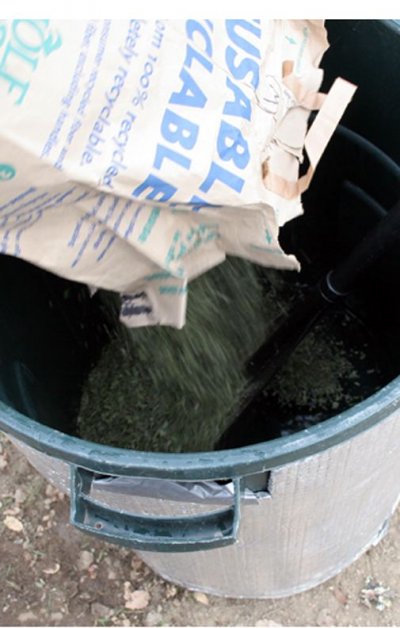
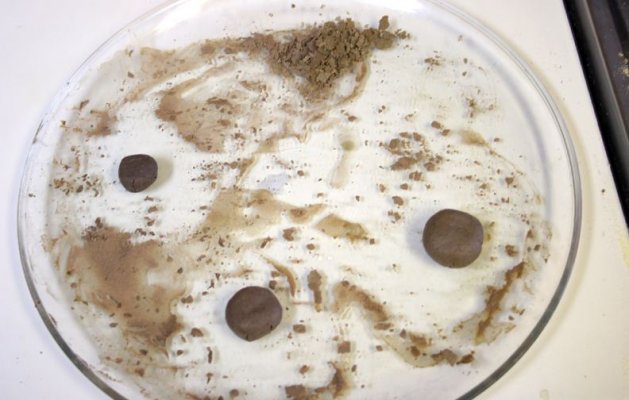
Today we will be making hash using a Bubbleman brand 20 gallon 8 bag set. The size of the 8 screens is 220, 190, 160, 120, 90, 73, 45, and 25. When doing cold water extraction there are a few basic principles to keep in mind.

First, colder is better. The colder you can keep everything through-out the whole process, the better your yield and quality will be. In fact, I have found that it best to do this when it is really, really cold out. Today it was in the high 30’s so it is a perfect hash day. Usually I wait until night time to do this, so the ambient temperature is as cold as possible, but for the sake of the pictures we are going to do it in the late afternoon this time. A warm, water-resistant jacket is definitely recommended for this process.

Second, try to keep everything clean. You do not want any contaminants in your end product. Usually I make it inside a shop or garage because of this, but since that space was not available today we are going to do it outside. Since the whole set-up is mobile you can take it to where ever you need to work. This is not my preferred method; ideally you want to do this in a very clean environment. Even when making it inside, I still go and sweep and dust the area that I am working in and get it as clean as I can.

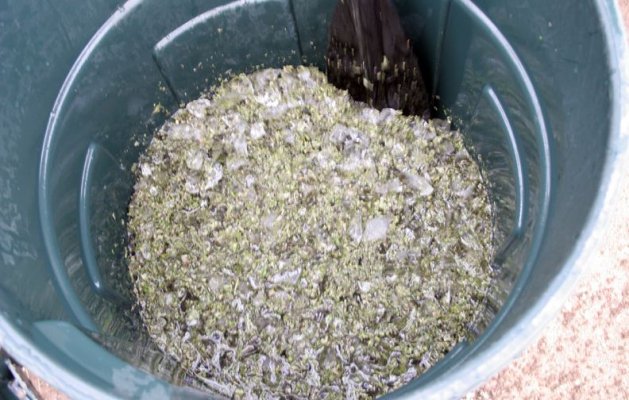
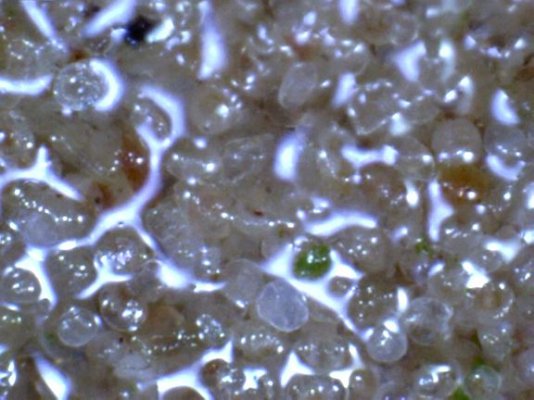
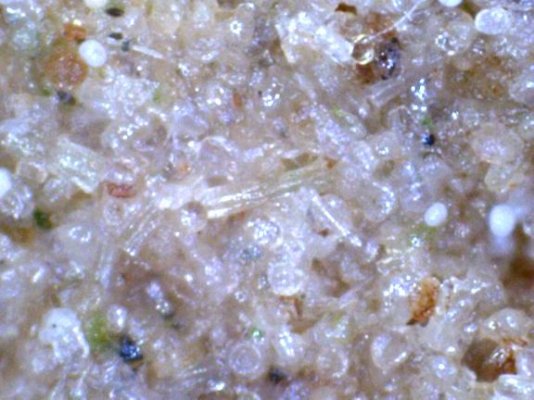
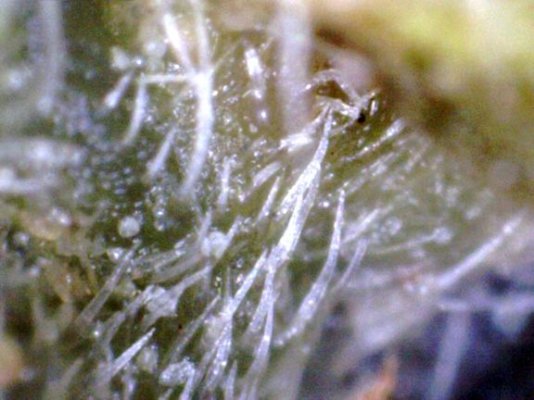
Third – be gentle! You want to preserve the trichrome heads and your bags as much as possible. Never be rough on your material or your equipment.

Fourth – the type and quality of the material will have a big impact on the finished product. To get good hash you have to start with good material.

So long as you keep those four principles in mind, you will always do well when making hash with bubble bags.
 
Blaze

Blaze

2,006
263
The picture below is of the bucket that will hold the bags. It is a 30 gallon trash can that has been modified for this purpose. A 3/4th inch pipe with a ball valve has been installed at the bottom to regulate the amount of water and allow us to empty the bucket without lifting or moving it. The outside has been wrapped in insulation to keep the contents of the bucket nice and cold. One handle has been removed to allow the bags to slip over the top more easily.

Next we have a 20 gallon trash can to store our extra ice in. It has also been insulated, as has the lid. A 20 gallon bucket will hold 60 lbs of crushed ice, enough to do at least two runs.
 
1 bucket1
3 bucket3
Blaze

Blaze

2,006
263
In the next picture we have the mixing bucket. It is also a 30 gallon trash can with insulation wrapped around the outside. As you can see in the picture we have filled it about 1/4th to 1/3rd full and have placed two block of ice in it. This is to get our mixing water nice and cold before we add the crushed ice and material. Off to the right you can see the plastic and aluminum canoe paddle we will be using to stir with. Mixing in a separate bucket will help keep your bags in better shape - NEVER actually mix in your bags, only use them for straining.

The following picture is of the straining bucket again. We have placed a block of ice in the bottom of this as well and added some water. The block of ice at the bottom helps ensure that the hash stays as cold as possible while we are pulling the bags, and also prevents the bags from being sucked into the drain.
 
5 setup
6 setup1
Blaze

Blaze

2,006
263
After we have layered out bags into our straining bucket, we add more water until the screens are covered by a few inches of water. This is to cushion the screens when we dump our slurry into it after we are done mixing. Never pour directly onto dry screens.

Here are all three of our modified buckets in a row. They are set up in a line so we can work from right to left quickly and efficiently. Now we are just waiting for the water in both the straining bucket and the mixing bucket to get cold. Notice that we have lids on all of the buckets when they are not in use. This is to conserve our ice as well as to keep foreign material out.
 
7 setup4
8 setup5
Blaze

Blaze

2,006
263
This is the material we will be using. It is about half a brown bag of bud shake; I estimate it to be a little under one pound. It is a blend of Flo, Blueberry, and Blue Moonshine and has been sitting in the freezer for over a day now. Since well made hash will preserve the nuances of the strain it came from, I usually keep the material from different strains separate, or make blends of similar strains, which is what I did for today. It is very important to make sure that your material is frozen solid before using it. The material needs to be “clean” as well. There are no stems, fan leaves, dead or brown plant matter, or buds in what we are using today. It is just small, fine bits of leaf from the buds. I have found that materials with a greater surface area makes better hash, hence the small bits of leaf are ideal for this.

The type and quality of the material used makes all the difference. If you start out with crap you will end up with crap. Because of this I always make sure that my shake has been properly dried and cured, just like I would with my bud. Do not ever let your material get too dry or it will become brittle and crumbly and you will end up with more contaminants in the end product. If it is over-dried be sure to re-moisten it a bit before using it. If you use material that is too dry, it can get pulverized and come out almost like a dust, which will be fine enough to get through the screens, and will contaminate the end product with plant matter.

Our mixing water is cold now, so it is time to pull our ice blocks out, and toss them back in the storage bucket.
 
9 material
10 mixing1
Blaze

Blaze

2,006
263
Now we add our material to the water. Next, we add 30 lbs of crushed ice.

Then we very gently mix our three ingredients together until they are evenly distributed and well mixed. I must stress the importance of doing this part GENTLY we do not want to dislodge any trichromes yet. At this point more water may be added to get the consistency right. The slurry should have a very slushy consistency almost like an iced drink – if there is too much ice and material it will be very difficult to stir. More ice or material may also be added at this point to achieve the desired consistency and ratio.
 
11 mixing2
12 mixing3
13 mixing4
Blaze

Blaze

2,006
263
It is time to mix! We will only be mixing for 5 minutes - that is all that will be required to dislodge a significant amount of the trichrome heads. I always do between 5 and 10 minutes of mixing. So long as your material is nice and frozen, mixing beyond 10 minutes is usually not needed.

I also think that how you mix can influence how your batch comes out. I always try to stir in a smooth, constant and circular motion. I try not to hit the sides of your bucket or be too rough on the material. You are just trying to agitate it, not beat it. Your stance and how you mix can also be important as well. Try to assume a balanced, centered stance (like a tai chi or martial arts type stance) and use your hips and shoulders rather than only your arms. If you can put your weight behind your movements you will not get tried out so easily.

Around and around we go! Notice how there is a whirl-pool like effect going in the bucket now. Every minute or so we reverse direction to make sure everything is getting agitated evenly.

After the 5 minutes are up, we carefully pour our slurry into the straining bucket. When you pour the slurry in, do it slowly so that you do not dump all the weight of it down on your screens at once. Wash the inside of the bucket out with your hose and dump this into your straining bucket as well. You don’t want to leave any trichromes behind! We will be letting our mix settle for 10 minutes. We have an oversized lid that we now place on top to keep everything cold and clean.
 
14 mixing5
15 mixing6
16 straining
Blaze

Blaze

2,006
263
While we are waiting for our straining bucket to settle, we toss our 2 ice blocks back in the mixing bucket and fill it back up with water again in preparation for the next batch. This way by the time we are done with the current batch, our mixing water has cooled off enough to start a new one.
 
17 straining2
Blaze

Blaze

2,006
263
Ten minutes is up and it is time to pull our bags! We pull the first bag, the 220, out and give in a good rinse with the hose. While we are spraying it we gently shake it. The purpose of this is to make sure that all the dislodged trichrome heads are washed out of the 220 work bag and into the bags below. With every bag we pull from now on we will also be spraying the inside of the bag. Never spray the screen directly with the hose as you do not want to force anything through the screens, only spray the sides.

As we pull our bags we also spray down the outside of the bag to wash any trichromes into the bags below it. I think that spraying the inside and the outside of each bag as you pull it helps increase your yield and ensure that no trichromes are lost. After all the water has drained out of our work bag, we dump the material. I keep a 20 gallon trash can around for this purpose in case I decide I want to reprocess the material. The next two bags, the 190 and the 160 are also trash. As soon as we pull a bag we clean it off with cold water. It is very important to keep your bags clean. They will last longer, and you will end up with less contaminants when you make your batches. Never use hot water as this can fuse some of the trichromes into the screen. Never use alcohol either or anything else that can eat away at the bags. So long as you clean them before they can dry out or warm up cold water is all you will ever need.

This is where having a second person can really speed things up. I pull the bags, harvest, and then hand them off to my buddy who cleans them. This way we can re-layer our bags in preparation for the next batch as soon as we pull and harvest the 25 bag .
 
18 straining3
19 straining
Blaze

Blaze

2,006
263
Here is the first bag we will be keeping – the 120. There is usually not much in this bag which is a good sign – it means we did not over-process our material. There is always very little in the 160 and 190 bags as well. You can see that we have the bag stretched across a 20 gallon trash can to make the harvesting easier.

Next we have the 90 – this is almost always the biggest yielder. The quality is usually second best, but sometimes it comes out even better than the 73.

After the 90 is the 73 bag – this is usually the second largest yielder and the best quality with the strains I grow. Which bag gets the best yield and quality will be influenced by what strains your material comes from. Notice how we are using a hand held spray bottle to pool the hash in the center of the screen. This way you can get it all the little bits in one spot without scraping the screen with a spoon
 
20 harvesting1
21 harvesting2
22 harvesting3
Blaze

Blaze

2,006
263
Here is a close up of the 73. After we harvest this we will pull the 45 and the 25. The 45 is usually third in terms of yield and quality. The 25 is generaly of very poor quality and often just gets mixed in with the 120. The 120 and 25 I usually just save for making food or for other experiments; it is rare that either one comes out good enough for me to want to smoke it. There have however, on occasion, been batches where the 120 or the 25 was in fact the best.
 
23 harvesting4
Blaze

Blaze

2,006
263
Here is what we pulled on our first batch. Not the biggest or the best we’ve ever done, but not bad!. Notice that we are using a large pyrex plate. The hash will be dried on these same plates. Never, ever, EVER dry on cardboard or anything else that can absorb the oils and resins from the hash. Going clockwise from the spoon we have the 120, the 90, the 73, the 45, and finally the 25.

Meanwhile, by buddy has cleaned all the screens and has re-layered them back in the straining bucket. We use our valve to adjust the water to it’s proper level (as the bucket was VERY full from all that rinsing) and place the lid back on to keep everything cold and clean. Since we are not starting with new water in the straining bucket it is already cold and ready to be used. Our mixing bucket has had the ice blocks in it for a good 20 minutes or more now and is probably cold enough to start another batch.

Now that our hash has been harvested it is time to dry it. A grease screen which has had it’s handle bent up is placed over the top of our plate. These can be found at Safeway for about $6. Also, when selecting a pyrex plate to dry on, make sure that your screen sits above it as you do not want it resting directly on the hash. The fine wire mesh prevents any contaminants from getting into the hash while it is drying. I usually dry it in my apartment, and we have pets so this part is REALLY important if you do not want to end up with animal hair in your hash.
 
24 harvesting5
25 harvesting6
Blaze

Blaze

2,006
263
We aren’t done yet though. Drying is also very important. Be sure to never over-dry your hash or it will degrade it quite a bit. You would never let your bud sit out for weeks on end exposed to the open air, so why would you do it with your hash? Oxygen, light and heat all degrade trichromes, it does not matter if they are still on the bud or have been made into hash. Here is what our batch looks like the next morning – it has been drying for about 16 hours now and is coming along nicely. Notice the difference in color from when it was fresh. The plate on the left is from the second batch we did and was made from some Pineapple that my buddy grew. The plate on the right is the DJ Short blend.
 
NEW1
NEW2
Blaze

Blaze

2,006
263
Here are some more up-close shots from the microscope to see what our trichromes are looking like now. The third shot is of the 25 grade - notice how it has more contaminants, and how few of the trichrome heads are still in tact. Smaller is not always better!
 
30 drying2
31 drying3
33 25screen
Blaze

Blaze

2,006
263
Now we use a butter knife to get our hash patties off the pyrex plate and flip them over in order to even out the drying. This is usually your first indicator to what is going to be your best grade. If it does not stick together on its own at this point, it is probably not going to be very good. This is not always the case however. I have on occasion gotten some batches that were very crumbly yet bubbled really well and were quite good.

After about another 8 hours of drying time (24 hours total), the hash is dry enough to be pressed and rolled into a ball. Keep in mind however, that the drying time will vary depending on the temperature and humidity so use your judgement! I do the pressing just using my hands. Excessive pressure will rupture the trichrome heads which in my opinion degrades them; this is why I do not use a mechanical press. This part should be done when the hash is still a little wet. It tends to stick together and press easier if there is a little moisture in it - some water should get squeezed out when you do this. Pressing each grade into a ball slows down the drying process and lets you watch it more closely towards the end. Be sure not to over dry!

Below is a shot of the 45, 73, and 90 pressed together along with some more close-ups from the scope. The 25 and 120 have been mixed together and are at the top of the plate as they were, as usual, of too low quality to stick together.
 
NEW3
NEW4
34 curing1
35 curing3
NEW5
Blaze

Blaze

2,006
263
Once I am satisfied that the hash has dried out enough (usually another 24 hours) I wrap it in parchment paper and it is ready to be stored. At this point, I will place the hash "candies" in a jar, with the lid open, in a dark cool place. Generally the hash is still a little to wet to be sealed up air tight at this point. I do a VERY slow and long cure (usually several months.) Once the hash is dried and cured to where I want it, then I will seal it up in an air tight jar. Also, freezing it is a good storage method, and by doing this, you no longer have to worry about it molding or getting over dried. For beginners, this is usually the method of storage I recommend.

The end product should be very pliable at room temperature and have a little bit of stickiness to it. It should also bubble like crazy, taste good, and get you ripped! This batch actually ended up being a better yielder than I though it would - we got over an ounce just off the 45, 73, and 90. Below is a shot of the 45, 73, and 90 from the DJ Short blend on the scale, along with some more close ups shots of the finished, dried product.
 
NEW6
NEW7
Dried2
Dried3
Dried4
Blaze

Blaze

2,006
263
Last but not least we have a few shots of the 90 being heated. Yummy! The final shot is a close up of some of the hash that is bubbling.

All in all these two batches took only 2 hours to make, which was a little slower than normal since I was taking pictures. We ended up with two ounces of very nice, bubbly hash, and about a quarter ounce of not-so-good food grade product. The total cost for the ice was about $24 which means it took us two minutes of time and 43 cents worth of ice to make each gram of the 45-90 grade hash. Not too bad!
 
Burn1
Burn3
Blaze

Blaze

2,006
263
Here we have a few shots of the material that was used to make this hash. The first two pictures are a "before" shot of some of the shake that I used. The next two are "after" shots of the processed material. As you can see virtually all of the mature, glandular stalked trichromes have been removed. All that remain are the sharp, spike-like cytolith trichromes and a few bulbous trichromes which contain very few resins. This is why a 5-10 minutes mix is all that is needed when making bubble hash, so long as you freeze it before processing it. Anything beyond that and you are just adding contaminants and wasting time.
 
Unprocessed1
Unprocessed2
Processed1
Processed2
Blaze

Blaze

2,006
263
One other thing I should mention is that the outer layer of the hash will oxidize and form sort of a crust. This is perfectly normal. If left to dry for long enough eventually the whole piece will oxidize and darken like this. Personally I think this degrades the quality quite a bit (some people like it this way though). This is why I try to stop mine from oxidizing as much as possible once that outer crust is established by wrapping it in the wax or parchment paper. By doing this the interior trichromes remain preserved. The first two shots are from the exterior of the same pieces of hash that I posted earlier in this thread. They had been exposed to air two additional days when the shots were taken verses the earlier photos . Notice how the trich heads have withered and changed color. The interior, which is shown in the next three shots, still remains relatively unchanged however.
 
73 outside
90 outside
45 inside
73 inside
90 inside

Latest posts

Top Bottom