Not flipped in time - changing grow tent mid-flower

  • Thread starter phxazcraig
  • Start date
  • Tagged users None
phxazcraig

phxazcraig

543
93
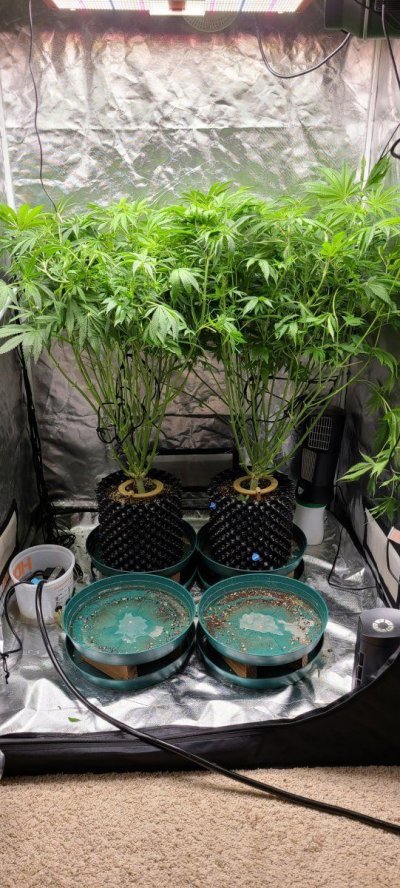
This is just a little story on what I might cost you to veg those plants just a little bit too long. In my case, one week too long. The delay resulted in plants too tall for my tent and light, and in consequence I ended up replacing a 4'x4'x80" tent with one a foot taller. (Gorilla Grow with optional 1 foot extension). I went from having only 19 inches from canopy to light in spite of the fact that I tucked the ends of the shoots back under a trellis net, to a good 27 inches (and dropping) with the branches untucked and set free to grow. I did this about 15 days since I changed from 18/6 to 12/12 on the lighting. Growing in coco coir/perlite mix from Roots Organics in air pots with 5x daily fertigation.

Ultimately I filled the tent edge to edge - but I did that with tall plants instead of short ones. I should have bent branches more aggressively earlier to fill the tents with shorter plants. Here is what happened on Friday:

BEFORE:

Not flipped in time   changing grow tent mid flower 7
Not flipped in time   changing grow tent mid flower 8
Not flipped in time   changing grow tent mid flower 9
Not flipped in time   changing grow tent mid flower 10

In the above shots you can see how the tent has been set since Jan 7. Plenty of room above the tent.

In the image below, you can see that the light is as high as I can raise it.

Not flipped in time   changing grow tent mid flower 11


In the following image you can clearly see that I've cut the lower trellis net. I will remove the upper net without cutting.

Not flipped in time   changing grow tent mid flower 2


Not flipped in time   changing grow tent mid flower 13


Here's a shot of the light mounting. I just hooked the light's hangars together with small carabiners. This light, an HLG-600R, is supposed to have 18 inches of clearance above it, and 2-3 feet below. I figure I can raise it higher with an exhaust fan right there.

Not flipped in time   changing grow tent mid flower 3


A little hard to tell, but the shoots have been tucked under the top net and are growing well.
Not flipped in time   changing grow tent mid flower 4


Here is a shot of the canopy thickness. Note: I started germinating seeds Jan. 7, put them in solo cups Jan 10 and transplanted to coco pots Jan 17 or 18. I posted some shots of the early growth in the thread 'Explosive Growth in Coco Coir'. This is my first coco grow, and they took off so fast I was not ready to deal with the consequences.

Not flipped in time   changing grow tent mid flower 5
Not flipped in time   changing grow tent mid flower 6


To remove the plants from the tent, the first step will be to disconnect and remove the irrigation system.

Not flipped in time   changing grow tent mid flower 12


SWAPPING TENTS

I unhooked a corner of the top net.

Not flipped in time   changing grow tent mid flower 14


Disconnect the halo drippers.
Not flipped in time   changing grow tent mid flower 15


All four halos disconnected and tubing shown on floor.

Not flipped in time   changing grow tent mid flower 17


I tucked the tubing into the closet to keep it out of the way. Although I started the swap 15 minutes after the 2:00pm fertigation and the next watering wasn't schedule until 6pm, I also unplugged the water pump, just in case...
Not flipped in time   changing grow tent mid flower 18


Now I continued with the messy process of removing the top trellis net.

Not flipped in time   changing grow tent mid flower 19


Removing the net wasn't so hard, except I had used a lot of plant ties to tie shoots down, and each had to be found and removed.

Not flipped in time   changing grow tent mid flower 20


Max pic attachment hit (20) - more in reply to post.
 
Not flipped in time   changing grow tent mid flower
Not flipped in time   changing grow tent mid flower 16
phxazcraig

phxazcraig

543
93
SWAPPING TENTS (cont).

After removing the nets, the plants were fairly messy, but the swap could now proceed. I pulled the right front and put it on a towel.
20220303 143312


20220303 143336


One down! It because obvious that the nets had been holding up some weaker branches. Some of those got cut, some tucked into new net later.

20220303 143340


I proceeded with the process until all plants were removed.
20220303 143721


Now for the cleanup!

20220303 143724


20220303 144011


20220303 144258


20220303 144304


Remove the equipment above the floor next.
20220303 144912


20220303 145341


And finally the tent is empty!

20220303 145348


Disassembly:
20220303 145817


Cleanup:
20220303 150554


Rest on next reply.
 
20220303 143418
20220303 143420
20220303 143610
20220303 143614
20220303 144858
20220303 150735
phxazcraig

phxazcraig

543
93
Swapping Tents, continued

INSTALLING NEW TALL TENT:

First, unpack. Not a good idea to unpack right on top of the space you're putting the tent, by the way.

20220303 151005


It was not fun trying to do this in a small space.

20220303 153036


Those poles get really tall with the 1 foot extension kit added on. And Gorilla Grow sells a 2-foot extension, plus you can add the 1- and 2-foot extensions together if you really needed to grow an old-school sativa, and have really tall ceilings.

In my case, I had to turn off the ceiling fan because it would hit the tent.

20220303 153331


So here is not only the top section, but also the 1 foot extension, which is a piece that just zips onto the top piece to extend it. Those zippers were suprisingly difficult to get started, and it took me literally 30 minutes to zip the various tent parts together. Something that should have taken a couple of minutes.

Note also that you need a step stool or ladder to work in the top of the tent now, and getting past the light was trickier when balancing on a ladder.

In the shot below, you may notice some poles going horizontal in the middle of the tent. I had purchased these in a 'High CFM' kit from Gorilla Grow earlier and tried to use them in the previous tent for strengthening. I have moved them here, where they fit better than in the old tent. Definitely recommended, they were designed to keep the tent sides from sucking in so much from the exhaust fan.
20220303 154709


After some struggling, partly due to tight quarters, I finally got the tent zipped on. I also changed to a much much safer stepladder.

20220303 164312


Here I have the light in place, along with the fans, though you can't see them here.
20220303 165518


Time to move the plants back in. Not sure how to deal with trellis net at this point, but I knew it would be needed because several branches were trying to hang low without support.

20220303 171928


Basically I just stuck the plants back in where they came from.

20220303 171950

20220303 172018


Once I got the plants back in the tent, I worked at pulling the tops through the net, something that I'm still redoing 2 days later. I gave up on some of the wimpiest branches and cut them. Pulled out more bits of trellis net too.

Note the top of the tent extending above the top of the closet now. Used to be about even.

20220303 173048


And there it is in all its glory! My plants have survived, and two days later are still stretching, but they have a fair amount of space to use now. I have about 27 inches of space left to the light, and coverage is excellent. I turned the dimmer to give me 800 PAR in the center, and 500 in the corners.

20220303 173056


After this I remembered to hook up the water pump to the timer again .

So - that took me about 4 hours of effort and the $350 for the new tent. It would have been a lot easier to do with a friend.

It would also not have been necessary (I think) if I had simply flipped to flower at the 4-week point instead of the 5-week point. Looking at the canopy, it's just like the canopy on my last grow (in soil) except about 8 inches higher up. I like the flexibility the taller tent provides me, but it didn't have to be this way.
 
20220303 150735
Brownthumb

Brownthumb

259
63
Hope your switch works out… have the same light: definitely need the head room cause those babies run hot… at least you caught the problem early… I ended with light burn nutrients lock out on my first grow autos- ended up buying 2- 300 watt leds that run much cooler and gives me more canopy space….
 
phxazcraig

phxazcraig

543
93
Hope your switch works out… have the same light: definitely need the head room cause those babies run hot… at least you caught the problem early… I ended with light burn nutrients lock out on my first grow autos- ended up buying 2- 300 watt leds that run much cooler and gives me more canopy space….
So far, so good.

Last year I started my first crop - 4 autos - under a 120w LED. It seemed inadequate (it was) as partway into the grow I got the HLG-600r. And promptly cooked those autos some.

My first crop was finding limits by overdoing everthing. My next one underdid it. I have a PAR meter now to be more sure.
 
E9noxis

E9noxis

1,221
263
I like how in depth the whole switch was documented. Good post
 
phxazcraig

phxazcraig

543
93
So - that took me about 4 hours of effort and the $350 for the new tent. It would have been a lot easier to do with a friend.

It would also not have been necessary (I think) if I had simply flipped to flower at the 4-week point instead of the 5-week point. Looking at the canopy, it's just like the canopy on my last grow (in soil) except about 8 inches higher up. I like the flexibility the taller tent provides me, but it didn't have to be this way.

It is now 8 days since I swapped tents. I had 27 inches of space between light and top of canopy then. Tonight I have 12.
 
E9noxis

E9noxis

1,221
263
Pull at them from low so it doesn't disturb the top. Your plants are a V make it more ( ) shaped
 

Latest posts

Top Bottom