jumpincactus
Supporter
Premium Member
- Posts
- 11,605
- Reactions
- 35,935
- Joined
- Jul 24, 2011
- Points
- 438
I know many of the more seasoned farmers here are already hip to this information. I am posting it up for the newer folks to the world of knowing and ID'ing pests and other cannabis maladies that many of us wrastle with.
Good pics as well. You can click on the images for closer shots of the pics.
Enjoy!!
Unfortunately, bugs or pests can totally mess up your marijuana harvest.
Some bugs live in soil, while other pests are airborne. Mold can be a big problem too. But you don't have to sit back and take it.
This page aims to be a comprehensive resource on the different types of bugs / pests / mold that can affect your marijuana crop, along with tips for preventing and solving each problem.
Pests that can affect your marijuana plants include aphids, spider mites, ants, whiteflies, white powdery mildew / white powdery mold, stem rot, and even mammals such as gophers and rats.
Jump to...
If you have anything that you would like added, please contact me!
Mist your plants in a solution made of 1 part SM-90SM-90, 5 parts water.
When you spray the plants, make sure you get the undersides of the leaves.
You'll want to do this when the lights are about to go off(or else the leaves will get burned). You can get a sprayer like this one on amazon.com, or at Home Depot for about .You can get a sprayer like this one on amazon.com, or at Home Depot for about $12.
Diseases of Cannabis are caused by organisms or abiotic sources.
Organisms include fungi (first and foremost), nematodes, parasitic plants, bacteria, and viruses.
Abiotic (non-living) causes include nutrient deficiencies, pollutants and genetic diseases. Different diseases prevail in different crops (e.g., drug cultivars versus fiber cultivars). Disease prevalence is also modulated by geography and climate.
The claim that Cannabis has no diseases is not correct, Cannabis suffers over 100 diseases, but less than a dozen are serious.
Serious diseases include gray mold, hemp canker, damping off, assorted leaf spots, blights, stem cankers, root rots, nematode diseases, broomrape, macro- and micronutrient deficiencies, and genetic diseases.
Environmentally stressed plants become predisposed to diseases. Stress includes drought, insufficient light, untoward temperatures, or growing plants in monoculture.
(McPartland, J. M., 1996. A review of Cannabis diseases. Journal of the International Hemp Association 3(1): 19-23.)
That quote was taken from a great page on Cannabis diseases < that everyone should read.
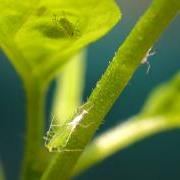
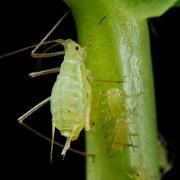 Aphids are soft-bodied insects which can be green, yellow, black, brown or red.
They are usually small and oval-shaped, and may have dicernable wings or antennae.
Aphids use their piercing, sucking mouth-parts to feed on the sap of plants and usually occur in colonies located on the undersides of stems or leaves.
If a plant becomes heavily-infested, its leaves can turn yellor or wilt due to the excessive sap removal.
Aphids produce large amounts of a substance known as "hondeydew," a sugary liquid waste.
Honeydew drops from these insects and can causes spots on the windows and finish of cars which are parked under infested plants.
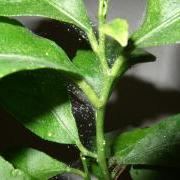
A fungus called sooty mold can grow on honeydew deposits which accumulate on the leaves and branches of your plant, turning them black. Many times, an aphid infestation is only noticed after the first appearance of sooty mold.
The drops of sweet honeydew can also attract other insects such as ants.
An infestations is generally the result of a small numbers of winged aphids that fly to the plant and take it up as their new host.
Winged aphids deposit several wingless young on the tender undersides of leaves/steams before moving on to find a new plant.
 Immature aphids, or nymphs, that are left behind, feed on plant sap and increase gradually in size.
They mature in 7 to 10 days and then are ready to produce live young. Usually, all of them are females and each is capable of producing 40 to 60 offspring.
The process is repeated several times, resulting in a tremendous population explosions. Less than a dozen aphid "colonizers" can produce hundreds to thousands of aphids on a plant in a few weeks.
Aphid numbers can build until conditions are so crowded, or the plant is so stressed, that winged forms are produced. These winged forms fly off in search of new hosts and the process is repeated.
Solution: Early detection is the key to reducing aphid infestations.
The flight of winged colonizers cannot be predicted, so weekly examination of plants will help to determine the need for control.
Examine the bud area and undersides of the new leaves for clusters or colonies of small aphids. The presence of these colonies indicates that the aphids are established on the plants and their numbers will begin to increase rapidly.
Fatty acid salts or insecticidal soaps are very good against aphids. They apparently work to disrupt insect cell membranes. They require direct contact with the insects and leave no residual effect.
Nervous system insecticides, such as malathion, Dursban (chlorpyrifos), and Orthene (acephate), are labeled for use on many shade trees and ornamental plants for aphid control.
As with soaps, coverage is very important and a follow-up application may be necessary. Sevin (carbaryl) is not effective against many aphids so it is generally not a good choice for control unless recommended specifically.
In fact, applications of Sevin may reduce the number of beneficial insects, such as lady beetles, and increase the potential for aphid outbreaks.
Beneficial insects, such as lady beetles, lady bugs, and lacewings may eat large numbers of aphids but the reproductive capability of aphids is so great that the impact of the natural enemies may not be enough keep these insects at or below acceptable levels.
To keep aphids and other pests off your plants just finely chop1 onion and 2 medium cloves of garlic. Put ingredients into a blender with 2 cups of water and blend on high. Strain out pulp.
Pour liquid into spray bottle. Spray a fine mist on plants, making sure to coat both tops and bottoms of leaves.
 Spider mites (also called spidermites) are not insects but are more closely related to spiders.
Read complete tutorial here:
 www.growweedeasy.com
These arachnids have four pairs of legs, no antennae and a single, oval body region.
Most spider mites have the ability to produce a fine silk webbing. Spider mites are very tiny, being less than 1/50 inch (0.4mm) long when adults.
Spider mites have tiny mouthparts modified for piercing individual plant cells and removing the contents. This results in tiny yellow or white speckles.
When many of these feeding spots occur near each other, the foliage takes on a yellow or bronzed cast. Once the foliage of a plant becomes bronzed, it often drops prematurely.
Heavily infested plants may be discolored, stunted or even killed.
Web producing spider mites may coat the foliage with the fine silk which collects dust and looks dirty. Spider mite species seem to be warm weather or cool weather active pests.
The two spotted, European red, honeylocust, and oak spider mites do best in dry, hot summer weather. The spruce and southern red spider mites do best in cool spring and fall weather.
All spider mites go through the same stages of development. Adult females usually lay eggs on their host plants.
The eggs hatch in days to weeks into the first stage, called a larva. Larvae are round bodied and have only three pairs of legs. The larvae feed for a few days, seek a sheltered spot to rest and then molt into the first nymphal stage. The first nymph now has four pairs of legs.
The first nymphs feed a few days, rest and molt into the second nymph. The second nymphs feed, rest and molt into the adult stage.
The males are usually the size of the second nymph and have pointed abdomens. The females have rounded abdomens and are the largest mites present. Most spider mites spend the winter in the egg stage but the twospotted spider mite over winters as adult females resting in protected places.
This cannabis leaf shows the first signs of a spider mite infestation: dozens of tiny yellow spots.
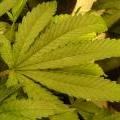
Click for a closer view
Solution: Early detection of spider mites, before damage is noticed, is VERY important.
The tiny spider mites can be detected only by a full and thorough leaf inspection (on both sides of the leaf). If you find Spider Mites you must act fast and hit them hard.
The thing about spider mites is they are very quick to take over your plant, and even quicker to evolve and adapt to whatever methods you are using to try to kill them. They will soon develop resistance to almost any method you use to get rid of them.
If you have problems with spider mites, keep a constant and varied offence for the best chance at success.
If you already have an infestation, start hitting them hard with something that will kill them on contact.
Follow up in 2-3 days with something different that kills their eggs as well as a different method to kill the remaining adults (these ones will already be more resistant to your original method).
Repeat those two step at least one more time to ensure that you have really cleaned out your grow room.
How To Get Rid of Spider Mites - Step-By-Step
Or Read the Quick Version Below
Shake the plant, then kill the spider mites with something that kills them on contact, like:
Follow up in 2-3 days with a different method to kill them (you should also re-apply your first method)
Follow up in 2-3 days with something different that kills their eggs as well as a different method to kill the remaining adults (these ones will already be more resistant to your original method).
Repeat! Treat your grow area at least once after you think spider mites are completely gone
Spider Mite Prevention - The Clean Grow Room
Now it's all about prevention.
If you've had spider mites in the past, chances are you are unintentionally doing something to encourage or attract them.
There are many preventative products such as sprays or neem oil, which make plants less tasty to annoying spidermites. However, these should only be used to supplement good practices.
The most important aspect of spider mite (or any marijuana pest) prevention is a CLEAN GROW ROOM.
Read complete tutorial on getting rid of WPM
What causes white powdery mold?
More pictures of white powdery mildew
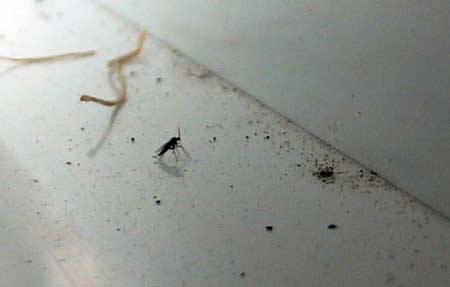
Read tutorial on cannabis fungus gnats & learn how to get rid of them
Fungus gnats are tiny little bugs that buzz around your soil. While the adult gnats don't bother your cannabis plants much, their larvae can attack cannabis roots in the soil. This can cause all sort of unexpected problems for your plants, like nutrient deficiencies, spots, droopiness, and more.
Luckily, fungus gnats are easy to get rid of once you know what to do; soon you'll never have to worry about fungus gnats in the cannabis grow room again!
After fungus gnats get in the grow room, what causes them stick around?

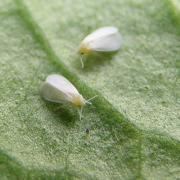 White flies behave just like spider mites.
The insect hides underneath the leaf, sucks dinner from the essential nutrients in the plant.
This results in white spots on the top side of the leaf.
White flies are easily spotted with the naked eye. If you shake the plant a little, they'll fly around. They look like little white moths, around 2 millimeters in size.
Solution: ·A white fly problem can be solved basically the same way as aphids. My favorite way to get rid of them is misting your plants in a solution made of 1 part SM90SM90, 5 parts water.
When you spray the plants, and make sure you get the undersides of the leaves(that's where they lay eggs).
You'll want to do this when the lights are about to go off(or else the leaves will get burned). You can get a sprayer like this one on amazon.com, or at Home Depot for about $12.
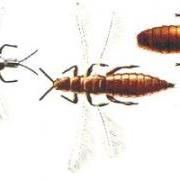 Thrips are small, fast-moving insects with wings.
They rasp, or grate the marijuana leaves open, and suck the sap out.
Thrips prefer flowering tops, and fresh, young leaves.
Affected leaves have shiny, silvery spots. This is caused by the thrips sucking the chlorophyll out of the leaves.
In spite of the fact that they're small, you can see them marching in columns on an infested plant.
Solution: Thrips can be fought with your favorite insecticide. Or predatory insects, the thrips' natural enemy is Amblyseius cucumeris.
A thrip problem can be solved basically the same way as aphids. My favorite way to get rid of them is misting your plants in a solution made of 1 part SM90SM90, 5 parts water.
You'll want to do this when the lights are about to go off(or else the leaves will get burned). You can get a sprayer like this one on amazon.com, or at Home Depot for about $12.
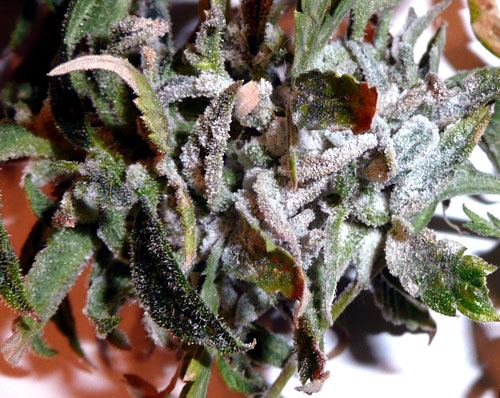
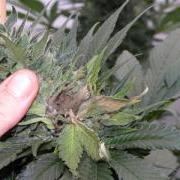 Botrytis blight or gray mold is a common fungus disease which can cause blights; the most common is Botrytis cinerea.
Read the Complete Bud Rot Tutorial
(with more pictures and information)
Botrytis infections often thrive in cool (60 degrees Fahrenheit or 15 degrees Celsius), rainy spring and summer weather.
Gray mold can be particularly damaging when rainy, drizzly weather continues over several days.
Look for masses of silver-gray spores on infected plant parts that are growing in humid areas.
Tiny, black, shiny specks might also be seen embedded in diseased plant tissue.
These are sclerotia of Botrytis: they allow the fungus to survive the winter.
Botrytis blight can affect leaves, stems, crowns, flowers, flower buds, seeds, seedlings, bulbs, and just about any other part of a plant with the exception of the roots.
With bud rot, your buds will actually start rotting from the inside out :(
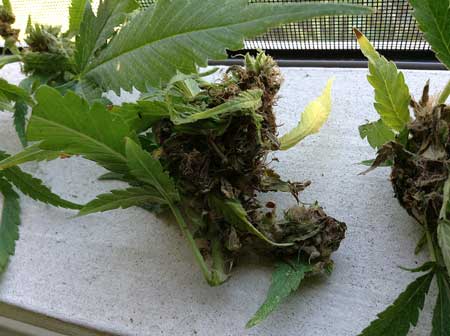
Solution: The best way to manage this disease is keeping humidity low, maintaining good air circulation, and by regularly inspecting and removing of infected parts of the plant immediately.
Once you've learned that bud rot is affecting your plants, it's recommended you immediately remove all the affected buds (as this spreads). If plants are bushy and have lots of leaves, you may want to consider removing some of the inner and lower leaves that don't get access to the sun. This will help more air get through your plant.
If you find mold remove it immediately. Once you first find mold, you need to watch your plants like a hawk, as mold spreads quickly.
NEVER SPRAY YOUR BUDS WITH ANYTHING
Once a bud has been infected, you need to remove the affected parts.
Also avoid overhead watering, or misting plants, especially if you have had trouble with grey mold in the past.
To promote rapid drying of plants, try to space them to allow good air circulation, and don't hesitate to use fans to help promote good air circulation.
Sanitation and cleanliness alone is not sufficient to control this fungus.
The fungus can produce 60,000 or more spores on a piece of plant tissue the size of your small finger nail.
Even one spore can infect a plant and cause disease, so avoid injuring plants in any way.
Do not leave large stubs of stems when taking cuttings
Ventilate your grow space to prevent high humidity conditions. Even lowering the humidity slightly can have a significant effect on Botrytis. Outdoor planting should be planned to provide good air circulation patterns
Fixing the problems with the environment is the best way to prevent and control Botrytis.
Don't spray or burn Sulfer in the flowering stage! You will ruin your crop as Sulfer makes your bud taste really bad, like REALLY TERRIBLE.
However, it is safe to use sulfur in Veg to treat mold, before the buds have started forming. Sulfer seems to get right into the essence of the bud and the taste/smell is impossible to remove. Sulfure will TOTALLY ruin your crop if used in the flowering stage!
Some growers also use a fungicide or combination of fungicides during the veg stage. It's important to avoid using fungicides in the flowering stage as it creates toxic buds. Any preventative fungicides should be applied during the vegetative stage. If you do plant to spray your young plant in the vegetative stage, use a fungicide particularly made for Botrytis.
Read the Complete Cannabis Bud Rot Tutorial: http://www.growweedeasy.com/bud-rot

 However, at GrowWeedEasy after much trial and error, we've discovered that we've always been able to control and erradicate root rot with AquashieldAquashield.
We HAVE NOT had good luck with Subculture B, Great White and SM-90 to treat root rot, though other growers have reported success killing root rot using those treatments.
Still, even with the amazing power of AquashieldAquashield in treating root rot, every effort should be directed toward preventing the disease before it begins.
Pasteurize soil and sand with heat (a microwave) or chemical fumigant treatments.
If the water supply is suspected of being the primary source of Pythium, it may be necessary to treat the water before use.
Slow sand filtration has been shown to be an effective, simple, and inexpensive method for removing Pythium from water.
Cover the treated soil and store it or the soilless mix in an area that will not be contaminated through the introduction of non-treated soil.
Likewise, cover ebb and flow system reservoirs. Disinfest all surfaces, tools, and equipment that will contact the potting mix.
We have also found that Hydrogen Peroxide (H2O2) will work for controlling Pythium in both dirt and hydro for short amounts of time. However, I highly recommend getting AquashieldAquashield for a more permanent solution.
Read more about getting rid of root rot attacking your marijuana plants right here
 The common slug is too common a pest to even need much of an introduction. Slugs attack a wide range of plants, causing anything from slight damage to death.
Unfortunately, these annoying pests attack leaves AND buds, and they can do a surprising amount of damage in a short time, so you want to watch out for them and get rid of them quickly.
They often stay hidden, attacking your plants at night, so stay vigilent for slug and snail damage!
Solution: There is no foolproof method for eradicating slugs.
All one can hope for is to reduce their numbers and protect plants when they're at a vulnerable stage.
Toads, frogs, and beetles eat slugs and are worth encouraging in your garden. One of the best ways of dealing with slugs is to use physical barriers.
 Place plastic bottle cloches around plants, or sprinkle circles of lime, eggshells, Diatomaceous Earth, or sawdust around plants.
Slugs are attracted to saucers, orange rinds, and plastic pots of milk or beer (they drown themselves in ecstasy).
How to Make Beer Trap for Slugs and Snails: mix flour with some stale beer and use it to fill a shallow container. Place in garden with the rim 1 or 2 cm above the ground so that slugs and snails can climb in. Substitute beer for wine, sugar water, juice, or water mixed with yeast.
BE WARNED, the trap will fill up quickly so come back often to empty.
To be sure you're keeping your slimy slug population under control; collect them by hand at night or on damp days. Try collecting them under a tile or wet cardboard, and squash all eggs you find while digging. Placing a saucer of salt is another method that will kill snails and slugs.
Martha Stewart recommends coiling a piece of wire around the base of your plants to give slugs a shocking experience.
 The tobacco mosaic virus can attack a wide range of plants, including tomato, pepper, eggplant, tobacco, spinach, petunia, marigold, and our beloved herb marijuana.
On marijuana the virus infection causes light and dark green mottled areas on the leaves.
The dark green areas tend to be somewhat thicker than the lighter portions of the leaf. The leaf mottling is seen more easily if the affected plant surface is partially shaded.
Stunting of young plants is common and often is accompanied by a distortion and fern-like appearance of the leaves. Older leaves curl downward and may be slightly distorted.
Certain strains of the virus can cause a mottling, streaking and necrosis of the buds. Infected plants are not killed, but they produce poor quality buds and low yields.
Tobacco mosaic, is incited by a virus. The tobacco mosaic virus is very stable and can persist in contaminated soil, in infected plant debris, on or in the seed coat, and in manufactured tobacco products. The virus is transmitted readily from plant to plant by mechanical means.
This may simply involve picking up the virus while working with infected plant material, then inoculating healthy plants by rubbing or brushing against them with contaminated tools, clothing, or hands. Aphids are not vectors of the virus, although certain chewing insects may transmit the pathogen.
Solution: Virus diseases cannot be controlled once the plant is infected.
Therefore, every effort should be made to prevent introduction of virus diseases into the garden.
Sanitation and cleanliness is the primary means of controlling virus diseases.
Infected plants should be removed immediately to prevent spread of the pathogens.
The use of tobacco products during cultural practices should be avoided to prevent inoculation of plants with the tobacco mosaic virus.
Those people using tobacco or working with infected plant material should wash their hands thoroughly in soapy water before handling your plants.
Jump to...
Marijuana Plant Problems by Picture
6 Steps to Cure Most Marijuana Growing Problems
Leaf Color:
Edges Appear Brown or Burnt
Pale Color Leaves
Yellow Leaves - New Growth
Yellow Leaves - Lower, older leaves
Yellowing Between Veins
Dark or Purple Leaves
Black or Gray Patches on Leaves
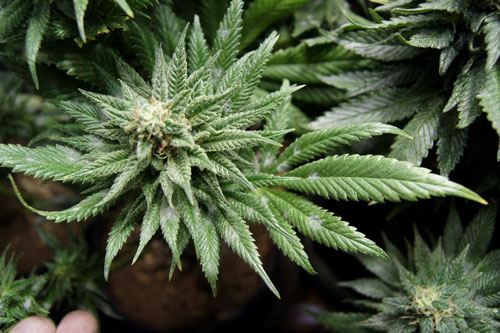
Patches of white powder on leaves
Brown or Dark Spots
Mottling / Mosaic Pattern
Leaf Symptoms:
Upper Leaves / Newer Growth Affected
Lower Leaves / Older Growth Affected
Leaf Edges Appear Burnt
Leaf Tips Appear Burnt
Leaf Tips Die
Yellowing Between Veins
Patches of white powder on leaves
Red Stems
Spots
Mottling / Mosaic
Old Leaves Dropping Off
Slow Growth
Twisted Growth
Abnormal Growth
Leaves Curl Under
Leaves Curl Upwards
Wilting / Drooping
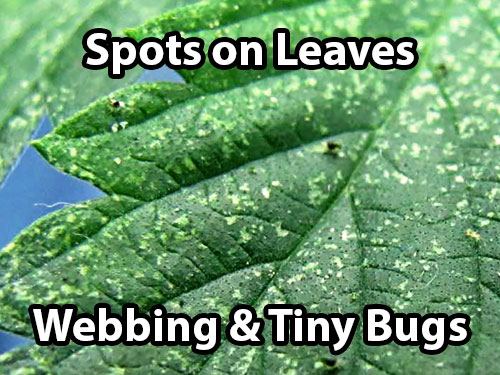
Webbing on leaves
Plant Symptoms:
Red or Purple Stems
Weak Stems
Old Leaves Dropping Off
Slow Growth
Twisted Growth
Leaves Curl Under
Leaves Curl Upwards
Plant Wilting / Drooping
Root Symptoms:
Slow Growing
Other Symptoms:
Webbing
Bugs
Mold
Buds Not Fattening
Good pics as well. You can click on the images for closer shots of the pics.
Enjoy!!
Unfortunately, bugs or pests can totally mess up your marijuana harvest.
Some bugs live in soil, while other pests are airborne. Mold can be a big problem too. But you don't have to sit back and take it.
This page aims to be a comprehensive resource on the different types of bugs / pests / mold that can affect your marijuana crop, along with tips for preventing and solving each problem.
Pests that can affect your marijuana plants include aphids, spider mites, ants, whiteflies, white powdery mildew / white powdery mold, stem rot, and even mammals such as gophers and rats.
Jump to...
- Aphids
- Spider mites
- White Powdery Mold
- Fungus Gnats
- Whiteflies/ White fly
- Thrips
- Root Rot
- Grey Mold / Bud Rot
- Damping off (young seedlings dying)
- Slugs / Snails
- Tobacco Mosaic Virus
If you have anything that you would like added, please contact me!
Mist your plants in a solution made of 1 part SM-90SM-90, 5 parts water.
When you spray the plants, make sure you get the undersides of the leaves.
You'll want to do this when the lights are about to go off(or else the leaves will get burned). You can get a sprayer like this one on amazon.com, or at Home Depot for about .You can get a sprayer like this one on amazon.com, or at Home Depot for about $12.
Diseases of Cannabis are caused by organisms or abiotic sources.
Organisms include fungi (first and foremost), nematodes, parasitic plants, bacteria, and viruses.
Abiotic (non-living) causes include nutrient deficiencies, pollutants and genetic diseases. Different diseases prevail in different crops (e.g., drug cultivars versus fiber cultivars). Disease prevalence is also modulated by geography and climate.
The claim that Cannabis has no diseases is not correct, Cannabis suffers over 100 diseases, but less than a dozen are serious.
Serious diseases include gray mold, hemp canker, damping off, assorted leaf spots, blights, stem cankers, root rots, nematode diseases, broomrape, macro- and micronutrient deficiencies, and genetic diseases.
Environmentally stressed plants become predisposed to diseases. Stress includes drought, insufficient light, untoward temperatures, or growing plants in monoculture.
(McPartland, J. M., 1996. A review of Cannabis diseases. Journal of the International Hemp Association 3(1): 19-23.)
That quote was taken from a great page on Cannabis diseases < that everyone should read.
They are usually small and oval-shaped, and may have dicernable wings or antennae.
Aphids use their piercing, sucking mouth-parts to feed on the sap of plants and usually occur in colonies located on the undersides of stems or leaves.
If a plant becomes heavily-infested, its leaves can turn yellor or wilt due to the excessive sap removal.
Aphids produce large amounts of a substance known as "hondeydew," a sugary liquid waste.
Honeydew drops from these insects and can causes spots on the windows and finish of cars which are parked under infested plants.
A fungus called sooty mold can grow on honeydew deposits which accumulate on the leaves and branches of your plant, turning them black. Many times, an aphid infestation is only noticed after the first appearance of sooty mold.
The drops of sweet honeydew can also attract other insects such as ants.
An infestations is generally the result of a small numbers of winged aphids that fly to the plant and take it up as their new host.
Winged aphids deposit several wingless young on the tender undersides of leaves/steams before moving on to find a new plant.
They mature in 7 to 10 days and then are ready to produce live young. Usually, all of them are females and each is capable of producing 40 to 60 offspring.
The process is repeated several times, resulting in a tremendous population explosions. Less than a dozen aphid "colonizers" can produce hundreds to thousands of aphids on a plant in a few weeks.
Aphid numbers can build until conditions are so crowded, or the plant is so stressed, that winged forms are produced. These winged forms fly off in search of new hosts and the process is repeated.
Solution: Early detection is the key to reducing aphid infestations.
The flight of winged colonizers cannot be predicted, so weekly examination of plants will help to determine the need for control.
Examine the bud area and undersides of the new leaves for clusters or colonies of small aphids. The presence of these colonies indicates that the aphids are established on the plants and their numbers will begin to increase rapidly.
Fatty acid salts or insecticidal soaps are very good against aphids. They apparently work to disrupt insect cell membranes. They require direct contact with the insects and leave no residual effect.
Nervous system insecticides, such as malathion, Dursban (chlorpyrifos), and Orthene (acephate), are labeled for use on many shade trees and ornamental plants for aphid control.
As with soaps, coverage is very important and a follow-up application may be necessary. Sevin (carbaryl) is not effective against many aphids so it is generally not a good choice for control unless recommended specifically.
In fact, applications of Sevin may reduce the number of beneficial insects, such as lady beetles, and increase the potential for aphid outbreaks.
Beneficial insects, such as lady beetles, lady bugs, and lacewings may eat large numbers of aphids but the reproductive capability of aphids is so great that the impact of the natural enemies may not be enough keep these insects at or below acceptable levels.
To keep aphids and other pests off your plants just finely chop1 onion and 2 medium cloves of garlic. Put ingredients into a blender with 2 cups of water and blend on high. Strain out pulp.
Pour liquid into spray bottle. Spray a fine mist on plants, making sure to coat both tops and bottoms of leaves.
Read complete tutorial here:
Spider Mites & Cannabis - How to Identify & Get Rid of Them Quickly!
Spider mites are a common cannabis pest that can be very difficult to get rid of. Learn how to spot and treat at the first signs of these nasty pests.
www.growweedeasy.com
These arachnids have four pairs of legs, no antennae and a single, oval body region.
Most spider mites have the ability to produce a fine silk webbing. Spider mites are very tiny, being less than 1/50 inch (0.4mm) long when adults.
Spider mites have tiny mouthparts modified for piercing individual plant cells and removing the contents. This results in tiny yellow or white speckles.
When many of these feeding spots occur near each other, the foliage takes on a yellow or bronzed cast. Once the foliage of a plant becomes bronzed, it often drops prematurely.
Heavily infested plants may be discolored, stunted or even killed.
Web producing spider mites may coat the foliage with the fine silk which collects dust and looks dirty. Spider mite species seem to be warm weather or cool weather active pests.
The two spotted, European red, honeylocust, and oak spider mites do best in dry, hot summer weather. The spruce and southern red spider mites do best in cool spring and fall weather.
All spider mites go through the same stages of development. Adult females usually lay eggs on their host plants.
The eggs hatch in days to weeks into the first stage, called a larva. Larvae are round bodied and have only three pairs of legs. The larvae feed for a few days, seek a sheltered spot to rest and then molt into the first nymphal stage. The first nymph now has four pairs of legs.
The first nymphs feed a few days, rest and molt into the second nymph. The second nymphs feed, rest and molt into the adult stage.
The males are usually the size of the second nymph and have pointed abdomens. The females have rounded abdomens and are the largest mites present. Most spider mites spend the winter in the egg stage but the twospotted spider mite over winters as adult females resting in protected places.
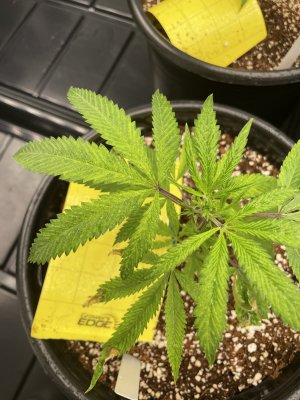
This cannabis leaf shows the first signs of a spider mite infestation: dozens of tiny yellow spots.
Click for a closer view
Solution: Early detection of spider mites, before damage is noticed, is VERY important.
The tiny spider mites can be detected only by a full and thorough leaf inspection (on both sides of the leaf). If you find Spider Mites you must act fast and hit them hard.
The thing about spider mites is they are very quick to take over your plant, and even quicker to evolve and adapt to whatever methods you are using to try to kill them. They will soon develop resistance to almost any method you use to get rid of them.
If you have problems with spider mites, keep a constant and varied offence for the best chance at success.
If you already have an infestation, start hitting them hard with something that will kill them on contact.
Follow up in 2-3 days with something different that kills their eggs as well as a different method to kill the remaining adults (these ones will already be more resistant to your original method).
Repeat those two step at least one more time to ensure that you have really cleaned out your grow room.
How To Get Rid of Spider Mites - Step-By-Step
Or Read the Quick Version Below
Shake the plant, then kill the spider mites with something that kills them on contact, like:
- Azamax is a time-tested way to rid your grow room of spider mites - Spray plants 15 minutes before lights out, making sure to drench the foliage under the leaves as well as the top of your soil. Use a fan to blow on your leaves to help things dry. Treat your room more than once, even if you believe the spidermites are gone. You can also add small amounts of Azamax when watering your plants, as it will not hurt your roots but will kill spider mites in the soil.
- Mighty Wash - use in a similar way to Azamax
- Spinosad Products (safe & organic) - Spinosad products are organic and unlike many other spider mite pesticides, completely harmless to pets, children, and plants. Unlike many insecticides, you can spray spinosad heavily on leaves and roots with basically no negative effects.
- Doktor Doom Spider Mite Knockout Spray - This spray is hard on spider mites, but the main ingredient Pyrethrum can also be hard on plants (espcially in tight spaces without much ventilation) so use as a last resort if possible. Use with extreme care around humans as the ingredients can be toxic.
- NoPest Strips - these emit a vapor that kills spider mites, do NOT use if you will be breathing air from your grow room. Only get these if there will be no mammals breathing in the grow room while they're being used.
- Floramite - Strong stuff with harsh chemicals, incredibly expensive, but it often does the job when everything else fails. Use as directed and only as a last resort!
- Bleach solution (1 tablespoon of bleach to 1 gallon of 95°F, pH balanced, water in a spray bottle) - make sure to clean all surfaces of your room, and bleach them too if possible.
- Alcohol and Water mixed togther will also kill the bugs on contact and shouldn't hurt the plant as long as the solution contains at least 30% water.
- SM-90 mixed with water (1 part SM-90 to 5 parts water) kills spider mites on contact and is organic (it even smells good!)
- Neem Oil works in a similar way to SM-90, though Neem oil doesn't smell as nice and will leave an unpleasant taste/smell on buds when used to treat flowering plants. There's some evidence Neem oil may be harmful to humans so use with care!
- Homemade Pepper Spray (or buy Hot Pepper Wax Spray) - make at home by mixing 9 parts water, 1 part additive-free dishwashing soap, and one tablespoon of cayanne pepper. This treatment is very effective against some types of spider mites, but is ineffective against other types.
- Nicotine tea - hit or miss like pepper spray, but can be very effective against certain types of spider mite. Take 15 gram of organic tobacco and steep it in hot water overnight to make nicotine tea. You can also add a little bit of Safer Soap. Use like any other spider mite spray.
- Insect predators - there are also insect predators such as lady bugslady bugs that can provide some control and reduce your spider mite numbers, but it is unlikely these will get rid of your spider mites on their own. Insect predators can be effective if you have a small problem or if you need to get to harvest and chemical sprays are not a good option.
- Dichotomous earth - Basically, this is fossil dust - sprinkle on the top of your soil, and anywhere else in your room (window sills, doorways, etc). This powder-like substance is harmless to mammals and plants, but is incredibly sharp at the microscopic level. Therefore it will tear and dehydrate spider mites on physical contact. This will not get rid of an infestation, but can help control and slow things down when used effectively.
- Treat Entire Grow Area With Insecticide - Treat complete room with broad spectrum insecticide (only do this for a really bad problem, or one that keeps coming back) - avoid this if you can!
Follow up in 2-3 days with a different method to kill them (you should also re-apply your first method)
Follow up in 2-3 days with something different that kills their eggs as well as a different method to kill the remaining adults (these ones will already be more resistant to your original method).
Repeat! Treat your grow area at least once after you think spider mites are completely gone
Spider Mite Prevention - The Clean Grow Room
Now it's all about prevention.
If you've had spider mites in the past, chances are you are unintentionally doing something to encourage or attract them.
There are many preventative products such as sprays or neem oil, which make plants less tasty to annoying spidermites. However, these should only be used to supplement good practices.
The most important aspect of spider mite (or any marijuana pest) prevention is a CLEAN GROW ROOM.
- Never move other plants from the outside world into your grow room - this is the most common way people get spider mites. If you get a clone or plant, keep that plant away from your other plants in quarantine for at least a couple weeks to ensure it has no bugs. Get a handheld microscope and use it to look for bugs on new plants, too.
- No old dead leaves in your grow room at any time - you must collect old leaves regularly and completely remove them from your growing space. It doesn't count if you put them in a neat pile or trash can in the corner, you need to keep dead plant matter out of your grow room
- Make sure that you or anyone who comes into your contact space is clean (don't ever walk into your grow room directly from outside)
- No dogs, cats, rabbits or any other pets in your grow space
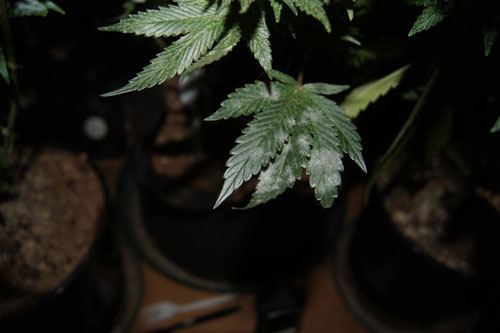
Read complete tutorial on getting rid of WPM
What causes white powdery mold?
- White Powdery Mold is usually caused by too much humidity in a closed area or not enough airflow
- If plants are kept close together in an enclosed space without air circulation, this can be a breeding ground for white powdery mold.
- Plants which are very leafy, or which have lots of leaves touching each other, are more prone to WPM. Therefore pruning old leaves that are no longer needed can sometimes help prevent WPM.
- Carefully wipe mold off affected leaves using plain water.
- Afterwards, make sure you have good air circulation moving over your plants(like with a fan) and a working exhaust fan. Fresh, clean, moving air will prevent powdery mold
- Get SM-90SM-90. Mix 1 part SM-90 to 5 parts water and spray your leaves right before lights out time. You can repeat if you see further outbreaks, but SM-90 often works with just one application. If SM-90 isn't available where you live, then neem oil is a great alternative (though it doesn't smell as nice as citrusy fresh SM-90).
- Learn more in our tutorial about white powdery mildew
More pictures of white powdery mildew
Read tutorial on cannabis fungus gnats & learn how to get rid of them
Fungus gnats are tiny little bugs that buzz around your soil. While the adult gnats don't bother your cannabis plants much, their larvae can attack cannabis roots in the soil. This can cause all sort of unexpected problems for your plants, like nutrient deficiencies, spots, droopiness, and more.
Luckily, fungus gnats are easy to get rid of once you know what to do; soon you'll never have to worry about fungus gnats in the cannabis grow room again!
After fungus gnats get in the grow room, what causes them stick around?
- Overwatering
- Wet topsoil
- Lack of air circulation
- Make sure you're watering plants properly
- Use yellow sticky cards to see how bad your fungus gnat infestation really is
- Make sure air is blowing over the top of your soil
- Learn more in our tutorial about getting rid of fungus gnats
The insect hides underneath the leaf, sucks dinner from the essential nutrients in the plant.
This results in white spots on the top side of the leaf.
White flies are easily spotted with the naked eye. If you shake the plant a little, they'll fly around. They look like little white moths, around 2 millimeters in size.
Solution: ·A white fly problem can be solved basically the same way as aphids. My favorite way to get rid of them is misting your plants in a solution made of 1 part SM90SM90, 5 parts water.
When you spray the plants, and make sure you get the undersides of the leaves(that's where they lay eggs).
You'll want to do this when the lights are about to go off(or else the leaves will get burned). You can get a sprayer like this one on amazon.com, or at Home Depot for about $12.
They rasp, or grate the marijuana leaves open, and suck the sap out.
Thrips prefer flowering tops, and fresh, young leaves.
Affected leaves have shiny, silvery spots. This is caused by the thrips sucking the chlorophyll out of the leaves.
In spite of the fact that they're small, you can see them marching in columns on an infested plant.
Solution: Thrips can be fought with your favorite insecticide. Or predatory insects, the thrips' natural enemy is Amblyseius cucumeris.
A thrip problem can be solved basically the same way as aphids. My favorite way to get rid of them is misting your plants in a solution made of 1 part SM90SM90, 5 parts water.
You'll want to do this when the lights are about to go off(or else the leaves will get burned). You can get a sprayer like this one on amazon.com, or at Home Depot for about $12.
Read the Complete Bud Rot Tutorial
(with more pictures and information)
Botrytis infections often thrive in cool (60 degrees Fahrenheit or 15 degrees Celsius), rainy spring and summer weather.
Gray mold can be particularly damaging when rainy, drizzly weather continues over several days.
Look for masses of silver-gray spores on infected plant parts that are growing in humid areas.
Tiny, black, shiny specks might also be seen embedded in diseased plant tissue.
These are sclerotia of Botrytis: they allow the fungus to survive the winter.
Botrytis blight can affect leaves, stems, crowns, flowers, flower buds, seeds, seedlings, bulbs, and just about any other part of a plant with the exception of the roots.
With bud rot, your buds will actually start rotting from the inside out :(
Solution: The best way to manage this disease is keeping humidity low, maintaining good air circulation, and by regularly inspecting and removing of infected parts of the plant immediately.
Once you've learned that bud rot is affecting your plants, it's recommended you immediately remove all the affected buds (as this spreads). If plants are bushy and have lots of leaves, you may want to consider removing some of the inner and lower leaves that don't get access to the sun. This will help more air get through your plant.
If you find mold remove it immediately. Once you first find mold, you need to watch your plants like a hawk, as mold spreads quickly.
NEVER SPRAY YOUR BUDS WITH ANYTHING
Once a bud has been infected, you need to remove the affected parts.
- Remove infected flowers, leaves, or the entire plant if it's infected at the base, and take it far far away from your grow area to dispose if it.
- Low humidity slows down and prevents mold (50% or less humidity is optimal, especially towards the end of the flowering stage). Also try to maintain lots of air circulation with oscillating fans, and lots of air exchange if possible (via Exhuast air and Supply air).
Also avoid overhead watering, or misting plants, especially if you have had trouble with grey mold in the past.
To promote rapid drying of plants, try to space them to allow good air circulation, and don't hesitate to use fans to help promote good air circulation.
Sanitation and cleanliness alone is not sufficient to control this fungus.
The fungus can produce 60,000 or more spores on a piece of plant tissue the size of your small finger nail.
Even one spore can infect a plant and cause disease, so avoid injuring plants in any way.
Do not leave large stubs of stems when taking cuttings
Ventilate your grow space to prevent high humidity conditions. Even lowering the humidity slightly can have a significant effect on Botrytis. Outdoor planting should be planned to provide good air circulation patterns
Fixing the problems with the environment is the best way to prevent and control Botrytis.
Don't spray or burn Sulfer in the flowering stage! You will ruin your crop as Sulfer makes your bud taste really bad, like REALLY TERRIBLE.
However, it is safe to use sulfur in Veg to treat mold, before the buds have started forming. Sulfer seems to get right into the essence of the bud and the taste/smell is impossible to remove. Sulfure will TOTALLY ruin your crop if used in the flowering stage!
Some growers also use a fungicide or combination of fungicides during the veg stage. It's important to avoid using fungicides in the flowering stage as it creates toxic buds. Any preventative fungicides should be applied during the vegetative stage. If you do plant to spray your young plant in the vegetative stage, use a fungicide particularly made for Botrytis.
Read the Complete Cannabis Bud Rot Tutorial: http://www.growweedeasy.com/bud-rot
We HAVE NOT had good luck with Subculture B, Great White and SM-90 to treat root rot, though other growers have reported success killing root rot using those treatments.
Still, even with the amazing power of AquashieldAquashield in treating root rot, every effort should be directed toward preventing the disease before it begins.
Pasteurize soil and sand with heat (a microwave) or chemical fumigant treatments.
If the water supply is suspected of being the primary source of Pythium, it may be necessary to treat the water before use.
Slow sand filtration has been shown to be an effective, simple, and inexpensive method for removing Pythium from water.
Cover the treated soil and store it or the soilless mix in an area that will not be contaminated through the introduction of non-treated soil.
Likewise, cover ebb and flow system reservoirs. Disinfest all surfaces, tools, and equipment that will contact the potting mix.
We have also found that Hydrogen Peroxide (H2O2) will work for controlling Pythium in both dirt and hydro for short amounts of time. However, I highly recommend getting AquashieldAquashield for a more permanent solution.
Read more about getting rid of root rot attacking your marijuana plants right here
Unfortunately, these annoying pests attack leaves AND buds, and they can do a surprising amount of damage in a short time, so you want to watch out for them and get rid of them quickly.
They often stay hidden, attacking your plants at night, so stay vigilent for slug and snail damage!
Solution: There is no foolproof method for eradicating slugs.
All one can hope for is to reduce their numbers and protect plants when they're at a vulnerable stage.
Toads, frogs, and beetles eat slugs and are worth encouraging in your garden. One of the best ways of dealing with slugs is to use physical barriers.
Slugs are attracted to saucers, orange rinds, and plastic pots of milk or beer (they drown themselves in ecstasy).
How to Make Beer Trap for Slugs and Snails: mix flour with some stale beer and use it to fill a shallow container. Place in garden with the rim 1 or 2 cm above the ground so that slugs and snails can climb in. Substitute beer for wine, sugar water, juice, or water mixed with yeast.
BE WARNED, the trap will fill up quickly so come back often to empty.
To be sure you're keeping your slimy slug population under control; collect them by hand at night or on damp days. Try collecting them under a tile or wet cardboard, and squash all eggs you find while digging. Placing a saucer of salt is another method that will kill snails and slugs.
Martha Stewart recommends coiling a piece of wire around the base of your plants to give slugs a shocking experience.
On marijuana the virus infection causes light and dark green mottled areas on the leaves.
The dark green areas tend to be somewhat thicker than the lighter portions of the leaf. The leaf mottling is seen more easily if the affected plant surface is partially shaded.
Stunting of young plants is common and often is accompanied by a distortion and fern-like appearance of the leaves. Older leaves curl downward and may be slightly distorted.
Certain strains of the virus can cause a mottling, streaking and necrosis of the buds. Infected plants are not killed, but they produce poor quality buds and low yields.
Tobacco mosaic, is incited by a virus. The tobacco mosaic virus is very stable and can persist in contaminated soil, in infected plant debris, on or in the seed coat, and in manufactured tobacco products. The virus is transmitted readily from plant to plant by mechanical means.
This may simply involve picking up the virus while working with infected plant material, then inoculating healthy plants by rubbing or brushing against them with contaminated tools, clothing, or hands. Aphids are not vectors of the virus, although certain chewing insects may transmit the pathogen.
Solution: Virus diseases cannot be controlled once the plant is infected.
Therefore, every effort should be made to prevent introduction of virus diseases into the garden.
Sanitation and cleanliness is the primary means of controlling virus diseases.
Infected plants should be removed immediately to prevent spread of the pathogens.
The use of tobacco products during cultural practices should be avoided to prevent inoculation of plants with the tobacco mosaic virus.
Those people using tobacco or working with infected plant material should wash their hands thoroughly in soapy water before handling your plants.
Jump to...
Marijuana Plant Problems by Picture
6 Steps to Cure Most Marijuana Growing Problems
Leaf Color:
Edges Appear Brown or Burnt
Pale Color Leaves
Yellow Leaves - New Growth
Yellow Leaves - Lower, older leaves
Yellowing Between Veins
Dark or Purple Leaves
Black or Gray Patches on Leaves
Patches of white powder on leaves
Brown or Dark Spots
Mottling / Mosaic Pattern
Leaf Symptoms:
Upper Leaves / Newer Growth Affected
Lower Leaves / Older Growth Affected
Leaf Edges Appear Burnt
Leaf Tips Appear Burnt
Leaf Tips Die
Yellowing Between Veins
Patches of white powder on leaves
Red Stems
Spots
Mottling / Mosaic
Old Leaves Dropping Off
Slow Growth
Twisted Growth
Abnormal Growth
Leaves Curl Under
Leaves Curl Upwards
Wilting / Drooping
Webbing on leaves
Plant Symptoms:
Red or Purple Stems
Weak Stems
Old Leaves Dropping Off
Slow Growth
Twisted Growth
Leaves Curl Under
Leaves Curl Upwards
Plant Wilting / Drooping
Root Symptoms:
Slow Growing
Other Symptoms:
Webbing
Bugs
Mold
Buds Not Fattening
Last edited by a moderator: