


A
applicanon
- Posts
- 5
- Reactions
- 14
- Joined
- Jun 23, 2026
- Points
- 3
I started seeds indoors around the middle of March 2026 under LED lighting.
Genetics have the following story:
Started with seeds from PeakSeedsBC (a now defunct breeder who went the 'legal' route in Canada and no longer sells to the public)
In 2024, I crossed a peakseedsbc Northern lights X skunk female with a peakseedsbc Kush x blueberry male. This produced a shitload of seeds that I will refer to here on out as NS x KB.
I started a handful of seeds under 24 hour LED lighting around the middle of March, 2026.
Of these I kept the best looking 6 plants as this was all that would fit in my indoor grow area.
By the time the weather was warm enough to put the plants outside, they had matured far enough
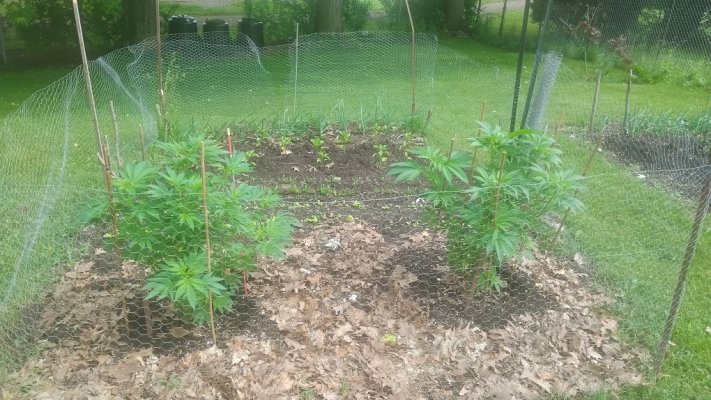
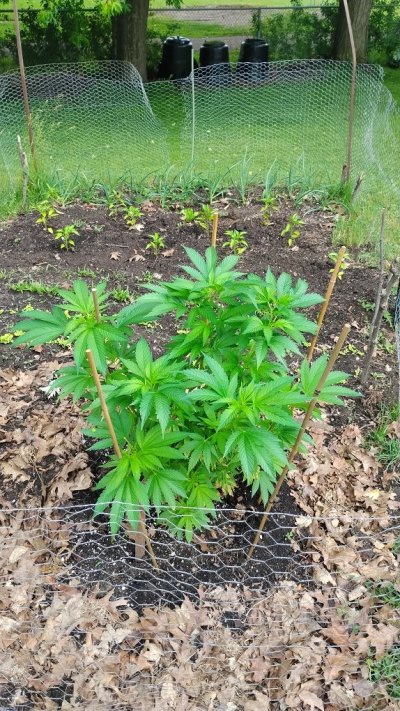
to show their sex without messing around with the lighting. 4 were male, 2 were female.
I plan on keeping 1 of the males around the side of the yard in a bucket so that I can selectively pollinate some of the female buds in order to get a hundred or so seeds, without completely overwhelming the entire grow with seeds. I'm not sure if pollen can be stored, but I'm going to try and save some of the pollen and see if it can be used to pollinate future females. It would be nice to be able to back cross future progeny of this genetic line without having to grow out seed stock each and every year.
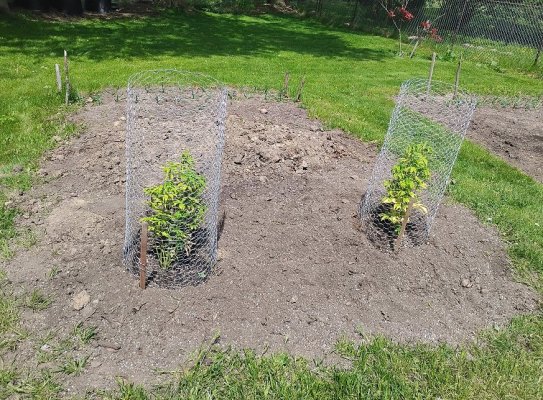
I planted the 2 females directly into the soil of my backyard vegetable garden.
Prior to transplanting them, the garden bed soil was prepared. I dug down approximately 2.5 feet deep in a 3 foot x 6 foot area.
I replaced the soil with a premium soil mix which was comprised of the following:
Approximately:
2 Parts promix HP or promix BX
1 Part Perlite
1 Part Vermiculite
1 Part Worm castings
This soil mix was amended with the following dry mix of fertilizers:
4 tbsp Hen manure pellets (5-3-2)
4 tbsp Dolomitic limestone
2 tbsp soft rock phosphate
2 tbsp azomite
2 tbsp humic acid mini granules
1 tbsp crustacean meal (4-2-13)
2 tbsp Therm x 15m soil conditioner
4 tbsp kelp meal
1 cup biochar
This mix of dry amendments makes up a total of approximately 400ml which was thoroughly mixed into the entire bed area which I had dug out and back filled with the premium soil mix.
This was probably on the weak side when it came to the dry amendments as the amount of soil mix that it ended up taking to back fill the hole that I dug was quite large, but I wanted to use precaution rather than use too much and be sorry. After all, if it turned out to be too weak, there is always the option of supplementing with liquid fertilizer throughout the grow, but if the mix was too hot, there's basically no going back without a tremendous amount of headache.
Oh and just an added note:
The bed has been mulched with dried oak leaves.
Genetics have the following story:
Started with seeds from PeakSeedsBC (a now defunct breeder who went the 'legal' route in Canada and no longer sells to the public)
In 2024, I crossed a peakseedsbc Northern lights X skunk female with a peakseedsbc Kush x blueberry male. This produced a shitload of seeds that I will refer to here on out as NS x KB.
I started a handful of seeds under 24 hour LED lighting around the middle of March, 2026.
Of these I kept the best looking 6 plants as this was all that would fit in my indoor grow area.
By the time the weather was warm enough to put the plants outside, they had matured far enough
to show their sex without messing around with the lighting. 4 were male, 2 were female.
I plan on keeping 1 of the males around the side of the yard in a bucket so that I can selectively pollinate some of the female buds in order to get a hundred or so seeds, without completely overwhelming the entire grow with seeds. I'm not sure if pollen can be stored, but I'm going to try and save some of the pollen and see if it can be used to pollinate future females. It would be nice to be able to back cross future progeny of this genetic line without having to grow out seed stock each and every year.
I planted the 2 females directly into the soil of my backyard vegetable garden.
Prior to transplanting them, the garden bed soil was prepared. I dug down approximately 2.5 feet deep in a 3 foot x 6 foot area.
I replaced the soil with a premium soil mix which was comprised of the following:
Approximately:
2 Parts promix HP or promix BX
1 Part Perlite
1 Part Vermiculite
1 Part Worm castings
This soil mix was amended with the following dry mix of fertilizers:
4 tbsp Hen manure pellets (5-3-2)
4 tbsp Dolomitic limestone
2 tbsp soft rock phosphate
2 tbsp azomite
2 tbsp humic acid mini granules
1 tbsp crustacean meal (4-2-13)
2 tbsp Therm x 15m soil conditioner
4 tbsp kelp meal
1 cup biochar
This mix of dry amendments makes up a total of approximately 400ml which was thoroughly mixed into the entire bed area which I had dug out and back filled with the premium soil mix.
This was probably on the weak side when it came to the dry amendments as the amount of soil mix that it ended up taking to back fill the hole that I dug was quite large, but I wanted to use precaution rather than use too much and be sorry. After all, if it turned out to be too weak, there is always the option of supplementing with liquid fertilizer throughout the grow, but if the mix was too hot, there's basically no going back without a tremendous amount of headache.
Oh and just an added note:
The bed has been mulched with dried oak leaves.
Last edited:


