beluga
- Posts
- 1,532
- Reactions
- 4,989
- Joined
- Mar 30, 2020
- Points
- 263
Greetings, folks.
New(ish) to the forum... have tapped the resource from time to time throughout the years, but never gave much a hoot about membership. Now, I have some excess time and little social outlet, so the allure of the social fellowship here has drawn me in. Guess it takes a pandemic to realize, as a pretty heavy introvert, how much your bar or gym acquaintances have a positive impact on your mental well-being.
Anyway.
I’ve grown a little before in guerrilla fashion or in the closets of rented apartments (i.e. - with much haste and cutting corners and suboptimal parameters and paranoia and tearing down and, well... you get the idea.)
But, now, I’m a big boy and repay a bank to live in my house. Things have settled. I can focus. I can take my time. I can listen and respond to the plants rather than begrudgingly torture them with half-baked techniques to reap a meager reward.
It’s been a while, so I’m just throwing together pieces of what I had left from years past and embarking on this journey anew. Hoping to give myself a thorough taste of the many methods and techniques, old and new, and really dial in my preference - I’m generally a strong advocate of organic / biodynamic / IPM practices, so I hope to end up there… in time.
I’m gonna use this thread as a catchall for my practices - something to organize and tabulate the chaotic buzzing of information and ideas in my head - a databank for all those to-do/read articles and snippets of pertinent knowledge - an archival aide to reflect and meditate on my shortcomings and progressions - and, of course, as a time-lapse chronicle for the cycling of my performance as a horticulturist and those cultures I ist.
So... without further ado... lemme grow with y’all.
P.S. : Fair warning - If I don’t monitor myself, I can get verbose. I’ll try to format, edit, and highlight the areas of importance as to relieve anyone trying to follow my actions from having to fish them out from a sea of jabberwocky. However, I do try to maintain deliberate continuity even in my excess, so, many answers to potential questions may be buried in the abyss... but I also don’t intend for this disclaimer to stifle conversation. Just... have your morning coffee before reading whatever cryptic babble I’ve let loose with hapless adherence to grammatical tradition.
I’ve already got a little something going as a stopgap while I was readying my workspace and addressing home improvement needs. In direct contrast to my suggesting that I’m settled and focused and responding to plant needs, etc., I’ve found myself in a painfully familiar situation:
• Late July - Germinated 9 seeds from a notoriously discredited and now defunct vendor, Aurora Winds Botanicals. "Trainwreck" / "Blue Velvet" / "Flo". (I note this because they are almost certainly not what they are labeled and likely not the product of any prestigious breeding. So, I’ll designate them bagseeds but address them with their probably-pseudonymous title.)
• Early August - All but one sprouted. Left under an awning outside, Hurricane Isaias came through and wrecked 4 of 8. Left with two “Trainwreck” and two “Blue Velvet”.
• Mid-late August - Preflowers of 3 of the 4 reveal males. Left with one “Trainwreck” female (or herm… not explicitly male) and one "Blue Velvet" male. (I did this because their traits were actually the most congruent - both seemingly close to 50/50 hybrids, whereas the "Trainwreck" male was distinctly sativa dominant. I tend to like the hybrid effect.)
• August - Yesterday - Tons of house repairs, inspections, etc. necessitated moving them around, letting them get out of control... moderate neglect. Still healthy, but in need of maintenance / more space / flowering.
• Oct 29 - “Found” the space for a 4’ x 8’ x 6.5’ tent. Ample.
So, basically, I’m currently running this with no monitoring other than nutrient additive/gallon and 'feel'.
Small container/bonsai mom & pop are kept in soil; mom's clones in an LP aeroponic system.
• Area - First a 2’ x 4’ x 5' Ohuhu grow tent... y’know... those dime-a-dozen metal-pipe-framed, fabric / “mylar” grow tents. Now a 4’ x 8’ x 6.5’ iPower grow tent... y’know... those dime-a-dozen metal-pipe-framed, fabric / “mylar” grow tents.
• Light - Mixed-spectrum fixture outfitted with screw-in LEDS (SILs). Approximately 120W.
• Media - Hydroponic / expanded clay pellets in (12) 3” net cups in an 18-gallon Rubbermaid Roughneck tote. I use water from a dehydrator that keeps an unfinished crawlspace from rotting out my family room. Haven’t tested the pH / TDS / EC yet, but, after more than two months as the water source, the plants have shown no negative reaction. I have read that water obtained this way is exceptionally clean… if it weren’t wicking out a menagerie of mold spores, I’d even consider drinking it myself.
• Nutrients - Botanicare CNS17 duo. (Probably keeping the pH in check, if the water does happen to be imbalanced.)
• Environment - uhh... basement / cave? And a little fan.
• Method - SOG(ish.) More so RWTP (Roll With the Punches). I didn't net/screen them. I've been defoliating their undercarriage as their canopy obscures it and occasionally pruning for height management while awaiting the switch to flowering.
And... that's where I'm at now.
Unfortunately, did not have the foresight to photolog these preliminary stages. But... we've all seen it before. I will edit some in for context when I have the opportunity.
Shaka


 ).
). ).
). )
) . I’ll have to clean up my future builds and, perhaps, modify this one to be more solid (even just with the addition of some washers, maybe). Whatever. It works and my components won’t fall apart from each other. But I don’t want people thinking this frame is something it’s not.
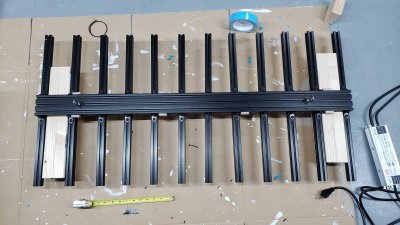
 guess I'll have to prepare and be more deliberate if I want any kind of structure to what I'm trying to do here. Or, I suppose, just use this thread as a messy taproot to branch off into more specified threads from it... I see there are drafts, as well, but that doesn't really serve as the sounding board that publicly posting brainstorms does.

 ... set up my desktop.


 )
)