DIY Hash Tumbler

  • Thread starter Ocanabis
  • Start date
  • Tagged users None
Ocanabis

Ocanabis

227
18
Hi Peeps

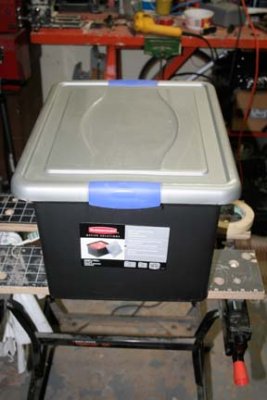
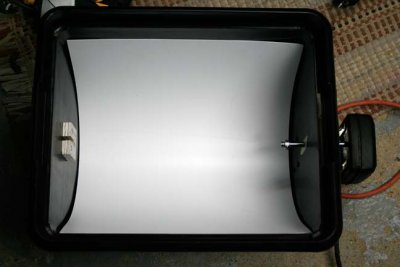
So this is my entery for a do it your self Hash Tumbler.To start with theirs a number of different ways u could do this but this is my version.You can make these any size you want.Mine would be a small version cause I don't get all that much trim from my harvest.I would average 2-4 zipps of leaf and or sml. pop corn buds.So with that being said the tub I chose is 15"Lx14"Wx11"H

So u need:
a Tub: 15"Lx14"Wx11"H
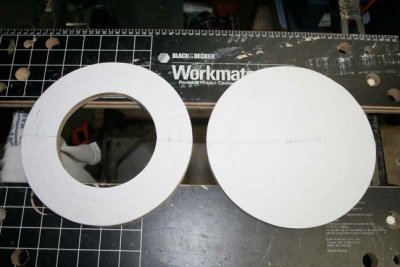
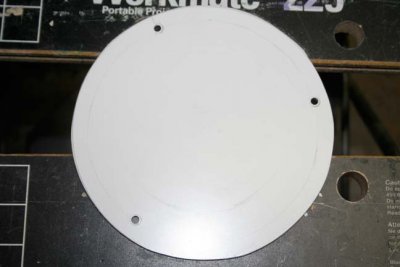
Wood:1/2"x12"x24"
(112"x12"x1/8" piece of aliminum or plasti(this is for the door)
(3) #10 x 1" metal bolts
(3) #10 Wing Nuts
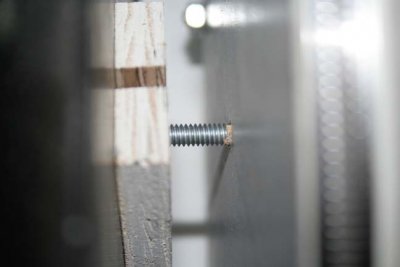
(3) 24"x 1/4" Threaded Rod
(12) 1/4" nuts
(12) 1/4" washers
(3) 29-30" long Pipe Clamps
(1)Rotisery Motor with shaft from a BBQ
Silk Screen material
1" double sided tape
1/2" dbl. sided foam tape
 
Diy hash tumbler 019
Ocanabis

Ocanabis

227
18
For tools u need just the basics such as a Drill with bits,Jig Saw.Screw Drivers etc.Like I said its all basic tools that most people have.
Ok,so lets get started.
1st off,I'll take the 12"x24"x1/2" ply wood and mark my cicles for the 1 end pieces.I drew them out using a rotractor @ 9" circles.On one of those pieaces I marked an iner circle @ 5"
So now I grab my Jig Saw and cut the pieces out.The 1st piece u want to cut is the iner circle then the 2 outer circles

Next
Now we mark the holes for our 1/4" Threaded Rod.You want to be as close to the edge as possible.I marked it @ 5/16" in from the edge.This is to acomodate room for washers.Then I marked 3 spots equally spaced @ 7 & 1/8" apart. (X marks the spots).

Now I take my 2 circles and lay one on top of the other and drill (3)1/4" holes for the threaded rods.
 
DIY Hash Tumbler 001
DIY Hash Tumbler 003
DIY Hash Tumbler 004
DIY Hash Tumbler 006
DIY Hash Tumbler 007
Ocanabis

Ocanabis

227
18
Next,I will cut out my lid.My inner circle was 5" so my acsess door is 6 & 3/4" round.I used a peace of whats called DiBond for my cover.Now that my door is cut I will center it on my end peace and mark and drill (3) 1/4" holes to attach the door with'

Now I took my end piece and my door and marked the center and drilled a 1/8" hole for reference as to where my shafts will go.

for the front piece I counter sunk the 3 holes for the door on the INSIDE were the 3 #10x1" bolts

Ok,now we can start puting our drum together.
You will need your:
front and back circles
(3) Treaded Rods( I cut my rods to 14") with a hack saw
(12) 1/4" washers
(12) 1/4" nuts
 
DIY Hash Tumbler 008
DIY Hash Tumbler 009
DIY Hash Tumbler 012
Ocanabis

Ocanabis

227
18
I'll start by puting 1 nut on each end followed by 1 washer on each end.Now I will insert a rod into one of the pre drilled holes.Atach a washer then a 2nd nut on the out side or ech hole until all the rods,washer and nuts are on.Note(you don't need to do them up tight yet)
You want to make sure that the distance between the rods are all equally spaced before you snug them down like so

Now you can atach your door using the 1/4"x1" nuts and your 3 wing nuts like so

Here's what it should look like so far.....
 
DIY Hash Tumbler 013
DIY Hash Tumbler 014
DIY Hash Tumbler 015
Ocanabis

Ocanabis

227
18
Ok,now we move onto preping your tub.We have to find out where to drill holes for the motor shaft is going to end up at.If my end cicles r 9" round we want to have the Tumbler to sit at 1&1/2" - 2"s above the bottom of the tub.So if my circles r 9" then center is 4 1/2" so we need to drill a hole on each end of the tub at 6&1/2" - 7" up from the bottom of the tub and center like so.I used a 1/8" drill bit.
Here's one end

and here's the other end.

Ok,now for the far en of the tumler I'm just going to use a long bolt for a shaft.I haven't dettermind the length of the bolt yet but I now I'm using one so here's what I did.
From the off cut of 1/2" x12"x24" ply woon I marked a 2"x2" block then drilled a 1/4" hole and then cut a grove out like so

Now I'm going to attach this to the inside of my tub using 3/16"x 3/4" bolts with 3 washers and nuts.I also counter sunk these 3 hole in the block of wood I'm using like this...
Here's the inside of the tub.Notice the bolts r flush with the piece of wood!

Here's the out side of the tub...(sorry it's a bit out of focus) but you get the idea right !
 
DIY Hash Tumbler 018
DIY Hash Tumbler 017
DIY Hash Tumbler 020
DIY Hash Tumbler 021
DIY Hash Tumbler 023
DIY Hash Tumbler 025
Ocanabis

Ocanabis

227
18
Now for the front of the tub.The shaft that comes with the Rotisier Motor for the BBQ is aprox. 5/16" square steel and around24" long.U will need tu cut off some of this cause it'll be to Loooong.So from one of the lenghts of rod I cut a piece to 8".You will need to cut this one more time yet but not untill u have sized up where you tumbler will sit inside the tub.You'll see what I mean in a minute.You'll notice the lock nut on the shaft.You'll need this to.

So we know the shaft is 5/16" we want to drill a hole in the front side of the tub a bit larger for the shaft so I drilled it with a 3/8" drill bit
You remember we drilled earlier with a 1/8" bit.That was so we know where the center was gonna be right !

Ok,now we can attach the bracket for the motor.What I did was place the motor on the mounting bracket ,then I insert the rod.Now I'll put this against the tub so the shaft goes through the 3/8 hole we just drilled.Now I will mark the (4) holes for the mounting bracket like so....
Here's your mouting bracket

So now I will mark and drill the holes like so
 
DIY Hash Tumbler 039
DIY Hash Tumbler 018
DIY Hash Tumbler 026
DIY Hash Tumbler 029
DIY Hash Tumbler 027
DIY Hash Tumbler 028
DIY Hash Tumbler 030
Ocanabis

Ocanabis

227
18
Ok,now we have to get our cover.What were about to do is drill the center hole a bit bigger then were gona grab a file and make that hole square to acomodate the shaft.Youll want to be care full filing cause you don't want to make the square hole to big cause then it'll be sloppy on the shaft.
Here's our squared off hole tada...

So now I got a thin piece of plastic 14+3/4"wide x 20" long and placed it like a half circle inside the tub.This will be your cach tray for your processed hash drippings.

Ok now we have the motor/shaft assembly figured out,it's time to decide what size of bolt I need for the other end.I'll place the tumbler inside the tub with the shaft goin into the cover and I guessed I needed a 1/4" x 2" long bolt.
and here's what it looks like after I put the bolt on and inserted it into the tub again, ta da...
See how it nests into the 2" square block we cut earlier

And here's the motor asembly side.Notice I have the lock nut in place.That keeps the tumbler from rolling back and forth. Neet Huh
 
DIY Hash Tumbler 044
DIY Hash Tumbler 031
DIY Hash Tumbler 043
DIY Hash Tumbler 042
Ocanabis

Ocanabis

227
18
Ok,were all most done.You can put this off to the side for now and pull out your Tumbler.
Here were gona finish off the tumbler by adding the screen etc.
So now you'll need:
Your Tumbler
Silk Screen material
1" dbl. sided tape
1/2" dbl. sided foam tape
Hose clamps.

Ok,1st we want to find out how much silk screen material we need.For this I used my wife's sewing kit cloth ruler and measured the circumfres of one of the end disk pieces.I deturmined it was 29"s around.The distance from one end of the tumbler to the other side was 13" long.
So I cut a piece of Silk Screen at 15" W x30" long. See the pink orange roll beside the scissors?Thats your 1" dbl. sided tape.

So now I take that tape and adheare it to the 15" side of the silk screen material like so..

Now you take your 1/2" foam tape and rap it around each disk on the tumbler. untill it meats then cut off the excess.(Sorry,I forgot to take a pic.)
Now were going to wrap the screen around our tumbler.
The best way to do this is put the tumbler on the floor and brace each end between your knees.Your gona peel back about an 1.5"s of the dbl.sided foam tape.This is where it gets a bit tricky.You want to stretch the silk screen around the tumbler so that it's tight not sagy.Thats why u brace it with your knees.The dbl. sided tape will hold it in place while you go all the way around the tumbler all the while pulling and stretching the screen material.Once you have gone all the way around You can peel back the 1" dbl. sided tape and press the over laped pieace together.
This is what it should look like when your done....

Now you can grab your hose clamp and you'll attach it over top of the screen and foam tape you have just attached Like you see in the pic bellow.

Also you'll notice the white strip going length wise between the Pipe clamps.That is a 1.5" one sided tape thay you put over the seem in the screen.You''l need it on the inside as well other wise your hash powder will stick to the dbl. sided tape of the seem.Make sense ?I hope so cause it's kinda hard to describe

Ok thats it your done.This project took me about 8 hrs to build and cost me about a $100.00 = or-.

So lets have a look at what we just built here.
Can I have a drum roll please Thank You
Their you have it, a home made Hash Tumbler

So I'd like to say in closing that all you need is just a bit of enginuity and
any one can make one of these things for them selves.I'll be around if any body has any Q's.If u need u can PM me and I'll respond a.s.a.p.

Next Up is processing some kif to test our new tumbler out.
So i'll be back with that little tute shortly.
Till then
Later
Ocan.
 
DIY Hash Tumbler 032
DIY Hash Tumbler 033
DIY Hash Tumbler 034
DIY Hash Tumbler 035
DIY Hash Tumbler 040
Ocanabis

Ocanabis

227
18
So I gather up my kiff for the tumbler.Your kiff must be thoughrouly dried and then placed in the freezer.I'll usually keep it in for about 1/2 hr or so.
step 1,grab a couple hand fulls of kiff and put it in the tumbler and put the rest back in the freezer..
Add a 2-4 balls to the tumbler to lightly pound yur kiff.I got these from the pet dept at Wallmart.Their for cats.I'll let it tumble for 15-20 minutes.I'll then dump the tumbler into a second bag or container and put this in the freezer.Grab a couple more hand fulls and repeate the process untill it' s all done.I'll usually process every thing twice.I find I get the best hash by not processing more than 2 times.

Now I'll take this hash and put it in a bagie and tie it off while squeezing the hash till I get a firm ball.

Now I take this ball of hash and put it in a vice and squeeze it till it's about a 1/4 " thick.

Ok,almost done now.Now were gonna go to the kitchen and grab a cup of water,put that in the micro wave and bring it to a boil.
In the mean time while thats boiling we'll rap the brick of hash in a layer of tin foil(shiny sine in).

Now we'll close this up,then put it back in the same bagie and tie it off.

Ok,the water has come to a boil,so now we grab the hash and submerge it in the cup of hot water for 10-15 seconds.
 
Tumbler Hash how to 006
Tumbler Hash how to 001
Tumbler Hash how to 002
Tumbler Hash how to 003
Tumbler Hash how to 004
Tumbler Hash how to 005
Tumbler Hash how to 007
Tumbler Hash how to 008
Tumbler Hash how to 009
Ocanabis

Ocanabis

227
18
1 mississippi 2 mississippi and so on........
Pull the hash out of the water,cut the bag open,unwrap the foil and wala
you can now smoke some of your 1st round of home made tumbler hash

and that concludes the lessons for today

later
Ocan.:animbong:
 
Tumbler Hash how to 011
R

Redux

Guest
AWESOME tutorial :yes. I've made tons of bubble and some dry sift and without a doubt my favorite is the dry sifted/tumbled hash. It preserves more of the natural goodies and holds up/ages much better IMO.
 
X

xxYIKESxx

81
0
Nice detailed tutorial indeed! Much appreciated...I always wanted to build one but as a procrastinator I always put the project aside...maybe I will finally build one after seeing this tut :clapping
 
G

GDS StonerBoy

265
18
Fuggin Genius! Love this gonna make one asap! How much trim does it usually take to get that amount of hash?
 
Ocanabis

Ocanabis

227
18
Depending upon the screen micron size.the kind of trim and how many times you process1-2 g's pr oz of trim.

I found the best tasting hash with the best affects was to tummble once for 20 minutes.After processing 2-3 times it starts getting greener etc.

later
Ocan.
 
R

Rocky Top

88
0
Absolutely next freakin level! Thanks for a great tutorial. I have been looking for something like this for a few months. I have 10-12 oz,s of White Widow trim that is loaded in trichs. You just gave me the info needed to process it. Again, big thanks for your efforts!
 
Ocanabis

Ocanabis

227
18
Thanks again folks.

But I gotta say this,When I see some one actually build one of these then I'll be really impressed.

Ocan.
 
C

cheeseman

2
0
wow that is impressive i hope to make me one in the near future
 
Top Bottom