F
Farmerjohn1
- Posts
- 46
- Reactions
- 31
- Joined
- Sep 9, 2023
- Points
- 18
Hey everyone!
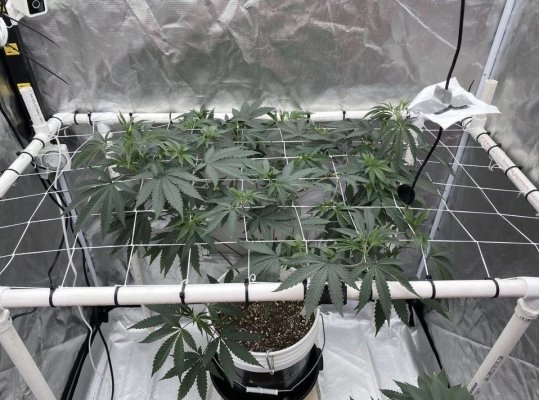
So I used a trellis net in my 2’x4’ RDWC grow that is currently still going on. I had a huge problem though because of the flexible material. As the plant stretched and took off, it basically just lifted the trellis with it a good few inches along with twisting everything so it wasn’t really even squares anymore.
Naturally being in construction I built a better one after looking into how other people did theirs. After I put it in it’s been doing awesome keeping the canopy where it want it so I have the minimum light distance. Super solid, and super easy, figure I’d pass it on if anyone else can use it!
The biggest pros I’ve found are:
- Sturdy/strong squares
- You can make the holes any size you want
- CHEAP & EASY
- Easy to re-use and re string for next grow and to adjust height.
This took me a total of 15 minutes to build, the only other things you’ll need that I haven’t listed below are going to be:
- tape measure
- drill with a small drill bit
- Pencil
- Something to cut the PVC. (Hacksaw,dremel,etc.)
My previous scrog net was 4”x4” and I felt there was still a lot of space and harder to tuck and weave so much so I made this new scrog new below at 3”x 3” and it’s perfect.
MATERIAL:
• 4 socket elbow fitting:
( you can do a 4 way T 3/4” if you want to make it a double scrog)
https://www.homedepot.com/p/Charlot...Socket-Elbow-Fitting-PVC025100800HD/300335109
• PVC PIPE ( The length of the tent x2, the width of the tent x2, the height of your scrog from the ground x4)
https://www.homedepot.com/p/Charlot...ssure-Plain-End-Pipe-PVC-04007-0600/100348472
• Screws
https://www.homedepot.com/p/Drive-S...Point-Framing-Screws-375-Pack-50258/100170183
• Netting/Line/Rope
https://www.homedepot.com/p/Anvil-5...ow-Braided-Nylon-Mason-s-Line-57476/300960491
QUICK HOW TO
(I do not glue any of the pipe just fit in tight)
1) Measure the width inside your tent from inside metal bars to inside, do the same for the width.
2) Account for the length the elbow/fittings will add to your pipe. Cut the 3/4” PVC accordingly to get the above numbers as your total, finished product dimensions.
3) Measure the height where you want your scrog to sit in your tent or setup. Cut 4 PVC pipes the same size as the height and add as legs to the PVC elbows.
4) Connect all the pipes together so you have your frame with legs.
5) Determine what size squares you want for your scrog.
6) From the inside from your pvc top frame measure and mark multiples of whichever number you chose. (EX. 3”x3” scrog would be marked at 3”, 6”, 9”, 12” and so on)
7) Repeat on the other side measuring from the same side you did previously.
8) Do the same for the width side.
9) Pre drill holes, smaller than the screws width just through the top part of the pvc where you made all your marks.
10) Screw in all screws in holes, not all the way down. Leave screw up about 1/4 of screw size.
11) Tie a knot on a starting side and pull and weave while keeping it tight!
Hope this helps someone!!
 add 4x tees to your top bars and add a 2nd net to really take control