Ebb & flow is my favorite system. I've tried several systems and I keep going back to that. It is more forgiving than most systems, it is EASY to build your own systems that don't cost much, the temp of the res water is much less sensitive than other systems.
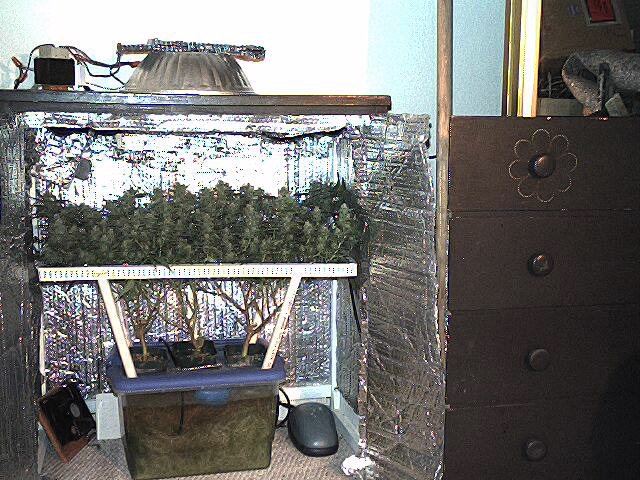
I have built myself at least a dozen E&F systems over the last 20 years, refining the design each time. I have created my own design that reduces chances of leaks and improves production. I don't use tables like most systems - my "table" is just a tray that collects overflow from the plants and drains it back into the reservoir. The flood lines go to the bottom of the plant containers instead of flooding a table. With a typical flood table, the water that seeps into the plant container as the table floods stays stagnant until the pump shuts off and the water siphons back into the reservoir. With the feed lines inside the plant containers, the nute solution rises to the top to drain holes and it helps to carry remnants from the last flood up to the top and out. This greatly improves the pH level at the roots and reduces the toxic buildup of nutes in the medium.
I use storage totes as reservoirs (get a strong one to hold up to the weight of the water or double it as shown in the link below). My drain tables are large shallow storage bins. My plant containers are whatever works at the time (gallon size plastic milk cartons, small wastebaskets, etc). Wastebaskets are my favorite for flowering. Every single thing to build the system can be purchased at Wally World or Casa dePot. The only things you will need from a hydro store are pH & EC/TDS meters, calibration solutions, and nutes. The easiest nutes I've found to use are the old GH 3-part Flora series. A lot of people add
cal-mag to the standard mix.
If you are on ICmag, check out this thread. It's an old one of mine. I have made changes to my system since then, but this is basically my setup. The first part of the thread is building the "grow tent" over a bathtub (I don't grow there any more). At about post #30 I start getting into the E&F system planning and creation. Remove the spaces from the URL.
icmag. com /ic/showpost.php?p=228992
Building the reservoir is post #34. I do not use the commercial manifold any longer, I build my own out of garden hose & irrigation fittings. The "Y" to drain the res is not necessary, but it was really convenient in that setup since the res was trapped inside the tub under the garden. I don't use them in my current setup. A pond pump from the garden center is all you need.
Post #51 is the carbon scrubber. The loose carbon in that setup was not as effective as it could be, so my current setup is a little different. I still use the metal grid & window screen to hold the carbon, but I "sew" the window screen to the metal grid so the two grids are 3" apart to make a 3" thick layer of carbon (use only 1 layer of the thin quilt batting). I fill it with the carbon & use a heavy duty foot vibrator to compact the carbon. The box that the blower goes in is now divided by the carbon filter - the blower is on one side to pull air through the filter & blow it out my ventilation system, the intakes from the grow hut are attached to the box on the other side. The ducting from the hut is attached to the top of the hut to pull heat out and take it to the box with the carbon scrubber.
Post #55 is a separate small system that is self-contained. I used it for catnip at the time, but it is perfect for cloning & seedlings. It uses the same basic E&F system as the big unit.
Post #70 shows more info on the carbon scrubber & ventilation system.
Post #71 is the lighting. I still use fluoros like this in my mothers/veg unit - my flowering unit has a T5 unit now. Instead of wiring the lights as shown, I mount a power strip to the framework of the hut and plug the light fixtures into it. The power strip is plugged into a timer. This gives me the flexibility of only plugging one or two fixtures in for cloning or plugging all of them in when I need good veg growth before going into flower.
Post #72 is the meat & potatoes of the E&F system. These days, my drain "table" is a 28-quart Sterilite tray the same bottom dimensions as the large bins shown here, but I still rough up the surface & paint them (first with black to block light, then white to reflect light/heat from the root zone). I no longer use hydroton as medium, I use coarse perlite.
The overflow holes are now about 2" below the top of the grow container. I fill the containers with compressed perlite up to about 1" below the rim of the container, but with the drain holes another inch below that, it eliminates the chances of small pieces of perlite overflowing out the top of the container and it eliminates the chances of getting bugs growing at the surface of the medium.
Post #98 has some updates/changes to the system, including how to build manifolds out of garden hose, how to use rubber "soaker hoses" instead of airstones (one tip - before using the hose, stand on one end, hold a piece of it at about waist level, and stretch it upwards about a foot; this opens the pores in the rubber & reduces problems with it getting clogged up).
There are links in this thread to a couple of my other builds from back then (8 years ago, LOL).