Ω
A
Let's Talk About Sex!
I've dabbled a little with getting two plants to doink. Some open pollination, some selective pollination.
It's pretty easy and as straightforward as your own horizontal monster mash.
But, I figure I should get a larger picture of the more refined process.
First, I'm gonna just bite off a bunch of stuff from around the internet.
Then I'll interpret and do my own little paraphrased process.
A breeding tutorial from Leafly:
Procedure:
1. Sanitize
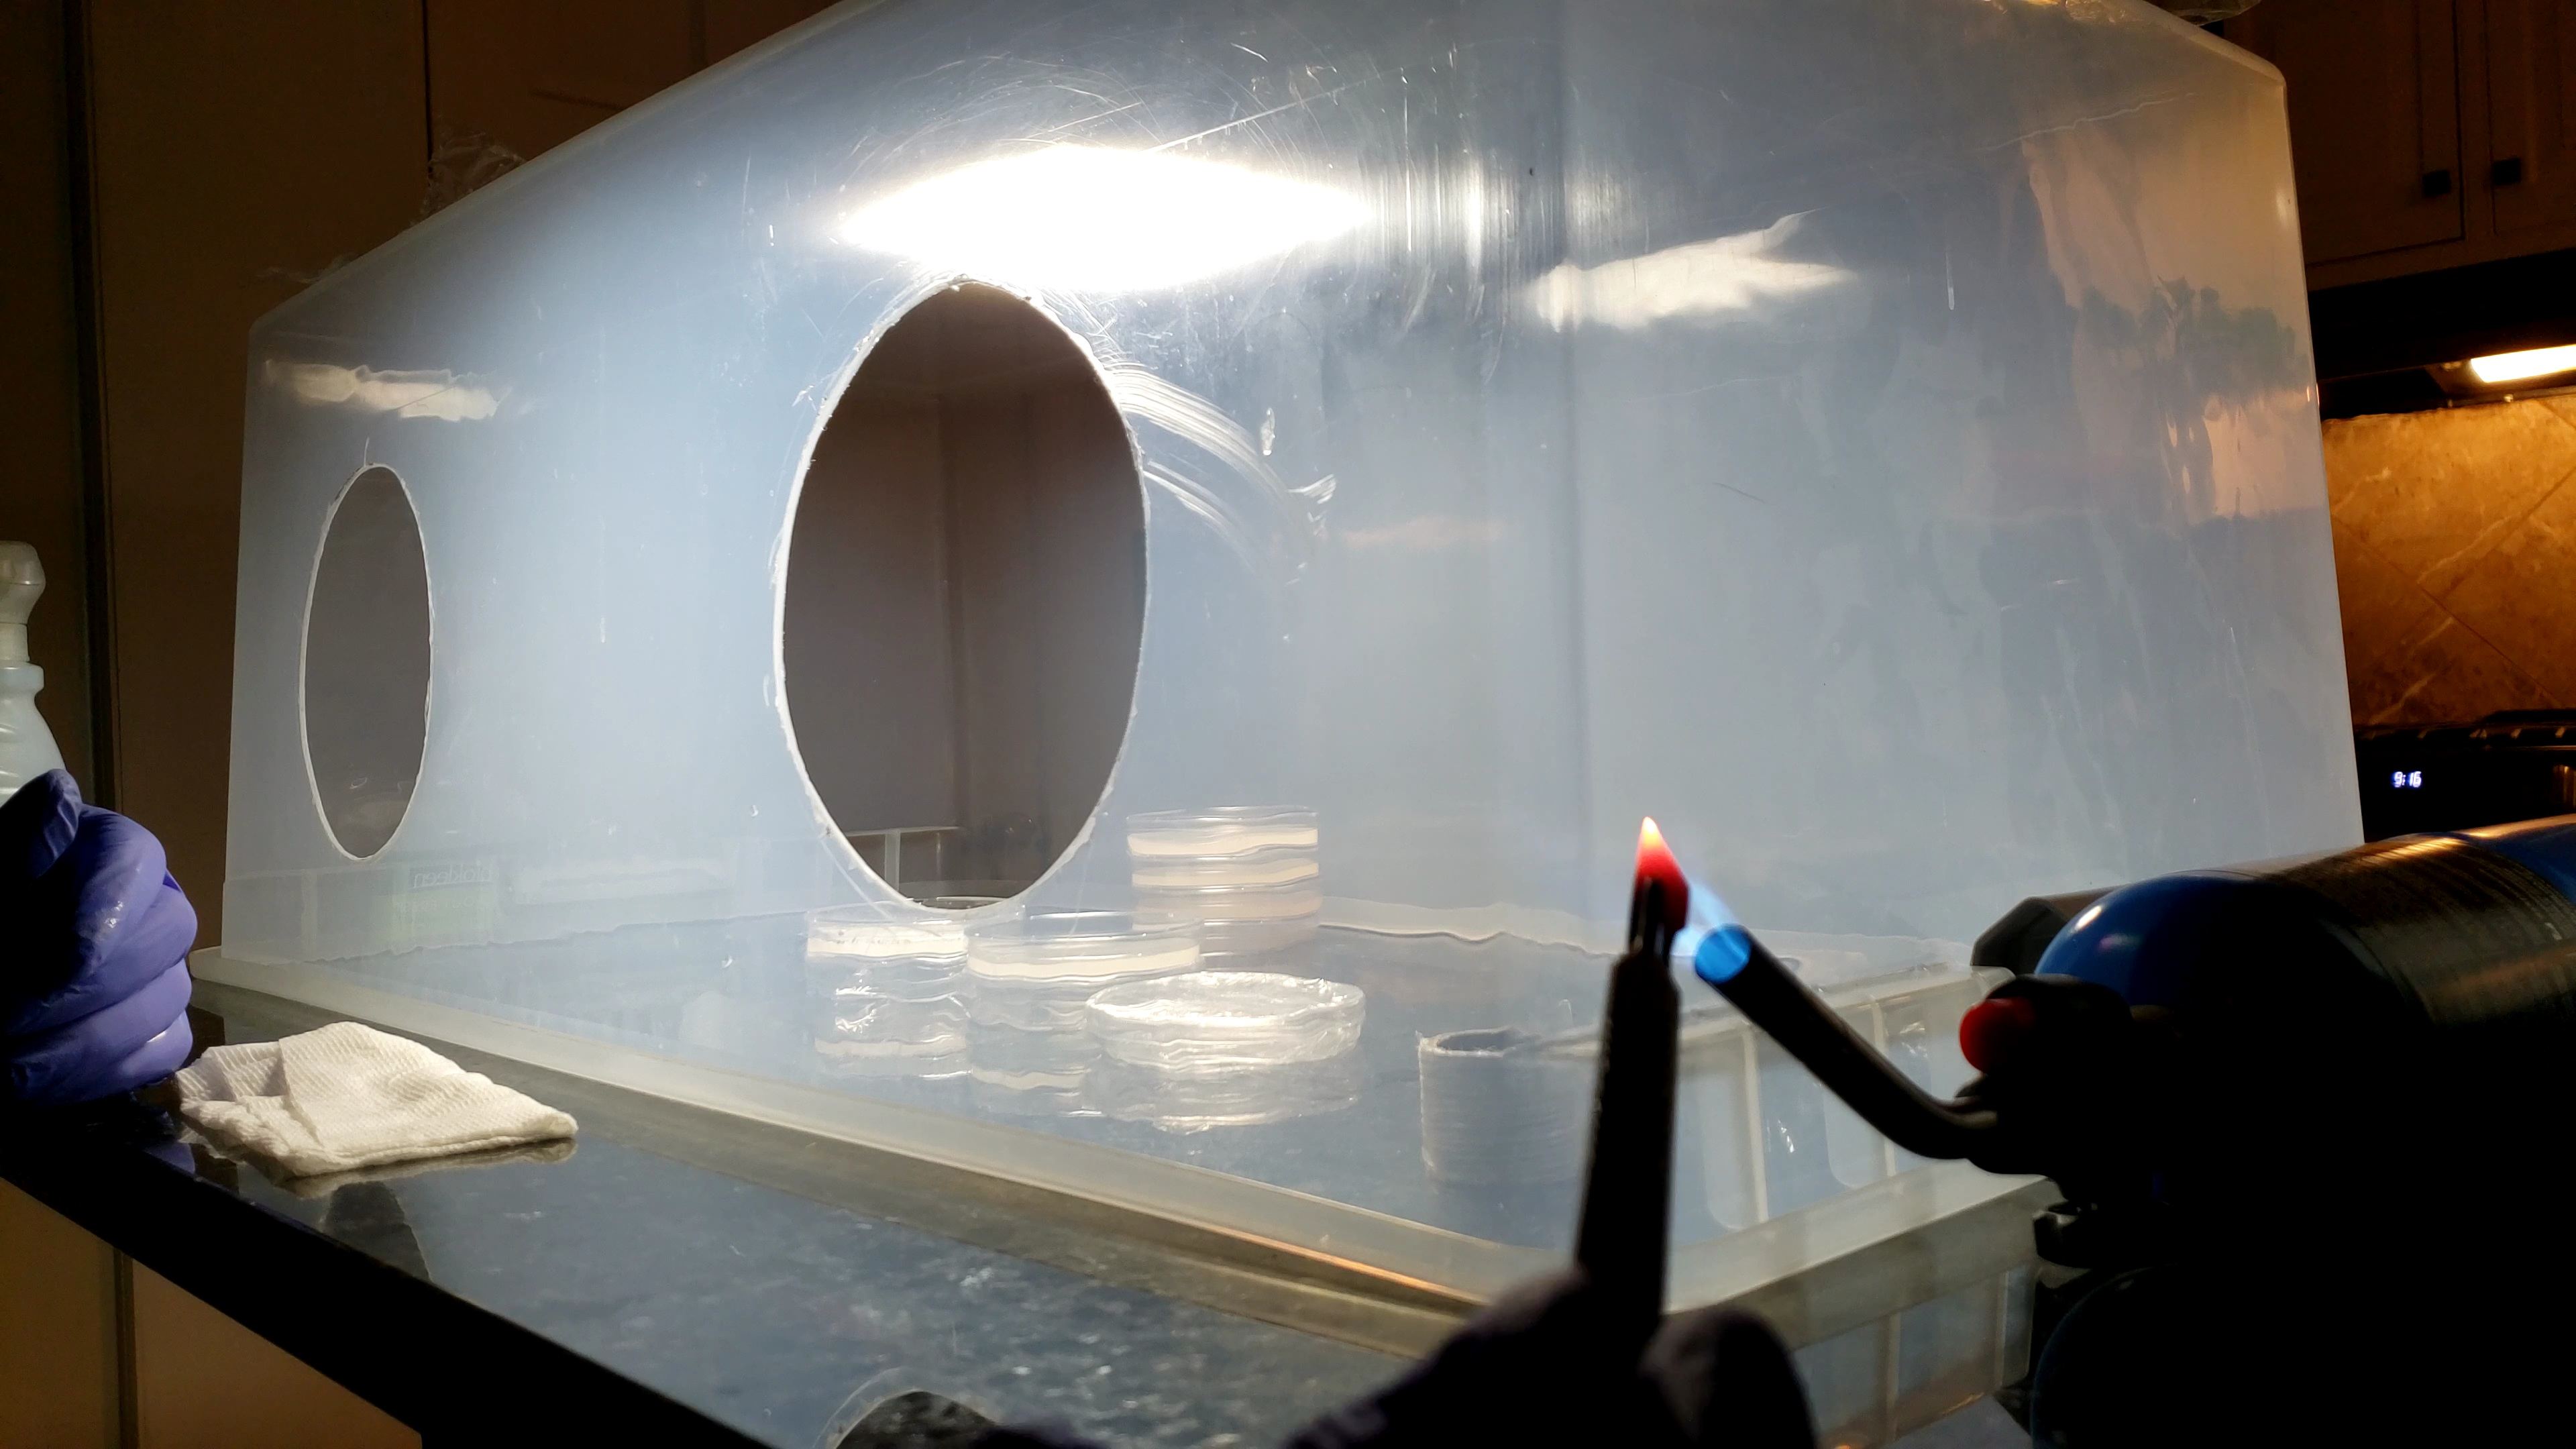
First, you must work within a clean and sanitized environment. Begin by cleaning your isolation chamber in preparation of receiving the female plant. A clean space will both help to prevent cross-contamination and provide a safe and sanitary place for the plant to fully mature. Diluting a small concentration of bleach or isopropyl alcohol with water should do the trick. Don’t forget to sanitize any pollination tools, like your paint brush, as well.
Make sure that your isolation chamber does not contain any female plants that you do not wish to breed with. This will ensure the prevention of unwanted cross-pollination. However, if more than one female cannabis plant must mature within the same space, implementing the following selective pollination technique (which involves using plastic baggies and some ties to protect the pollinated colas) should still adequately protect your room.
2. Collect Pollen
Male cannabis plants will begin to show their pollen sacs within the first week or two into their bloom phase. Shortly after, these sacs will open and pollen will become abundantly available. Once a desirable male plant has been identified, remove it from any female plants and isolate it immediately. The goal is to collect the staminate pollen without accidentally open-pollinating any other female plant.
Keep the desired male plant in isolation throughout the pollen collection process, then terminate the male to be safe. By using a small paintbrush, you can carefully collect pollen into a plastic bag or glass jar.
Keep in mind that pollen is “alive” and that humidity can dramatically affect the viability of the pollen. For storage, keep male pollen sealed in an airtight container and store in a cold, dark space such as a freezer for long-term holding. If you plan to access your pollen more than a few times per year, it’s generally better to keep it in a refrigerator because the temperature swing from storage to room temperature is much lower. Properly stored pollen may last for over a year under ideal conditions.
3. Selectively Propagate
A female cannabis plant in bloom is mature enough to receive pollen once flowers begin to form hair-like stigma. Without complicating this process too much, the object of selective pollination is to place male pollen onto specific branches or colas from which the breeder wishes to produce seeds. Each cola can produce hundreds of seeds if pollinated properly.
Choosing which/how many branches to pollinate will come down to grower/breeder preference. A single cannabis bud that has been pollinated can easily yield 20-30 mature seeds.
To complete this process:
- Make sure there is negative pressure in the isolation chamber before continuing.
- Prepare by collecting the baggie containing your male pollen, a paintbrush, and gloves.
- Gently collect a small amount of pollen from the collection baggie with your brush (a little goes a very, very long way).
- Run the brush gently across desired female flowers, making sure to only run the bristles across the tops of each stigma.
- Once a cola has been pollinated, you may seal the cola by covering it with a clean plastic baggie and tying it off to form an airtight seal (this will prevent cross-contamination). Note: this step is not necessary if (a) you intend to pollinate the entire plant in isolation, or (b) you do not have any issues with potentially finding a few seeds throughout the rest of your pollinated plant. (Pollen spreads easily, making this is a possibility.)
- To prevent any further contamination, keep your isolation chamber sealed throughout the maturation process.
This application process should repeat 1-3 times over the course of a week or two. After the fourth week of bloom, you may suspend your process. Should you need to reintroduce your pollenated female back into a room with other maturing female plants, you can rinse the plant down with clean water immediately following pollination to remove any excess pollen. This isn’t one hundred percent fail-proof, but when done carefully and correctly it can encourage the plant to breathe a little better.
4. Harvest and Collect Seeds
Your seeds should be fully mature once the plant has completed senescence. For ripe plants containing seed stock, it’s best to let the life cycle exacerbate fully before harvesting to give seeds their maximum time to mature.
After you harvest and dry your plants, it’s then time to collect seeds. Fully mature seeds are darker and often contain striped patterns covering their encasing. If executed correctly, you should yield a healthy quantity of seeds no matter how may colas you choose to pollinate. Congratulations, you’re now a certified home breeder!
Some blurbs from our own Grow FAQ:
When to pollinate?
The way to decide when to pollinate the female is by counting BACK from the end of her flowering period 4 weeks...this allows the seeds enough time to mature before harvest.
The seeds should be allowed to dry in the buds after harvest, as they do continue to mature during the drying process.
How to Take and Use Pollen
Collection
As the picture shows, this male plant is raring to go. (My totally simple pollen collection technique in action.) I recommend doing this only after you have closed the ladies up for the night. Shut off any fans in the vicinity, as pollen is an airborne 'agent' and will travel for quite some distance if allowed.
Also be considerate of household members that are sensitive to pollen
1) Place a dry, sterile, open bag/container under the opening male flowers.
2) Gently tap the stem with a finger. The pollen will slowly settle into the container. (If you are careful, only a few flowers will fall into the mix.
3) Remove any flower/plant parts that land in your container with the pollen. Tap them off gently before removing, to recover the pollen. (Moisture = BAD)
4) Dilute pollen with sterilized flour at a four-to-one ratio. This will allow more coverage if required (Optional)
5) Refrigerate until use. (Viable for around 3-5 days)
6) Immediately change your clothing and clean up before going near your female plants.
[Also, it is a good idea to isolate your pets during this time. I had a cat run in once when I was collecting pollen and after I chased it out, it promptly ran downstairs and into my Flowering room. A month later I had some very unusually crossed beans]
This is a real easy and practical method for harvesting a small amount.
Pollination disclaimer: This method is not recommended for everybody. Cross-pollination is often a result of pollinating plants in the presence of other females. Proceed at your own risk.
Due to weak branches, space and size considerations, etc., it may be necessary to pollinate your plants without removing them from the others. If possible, I would advise removing the female to be fertilized prior, but when that isn't possible, this is a good alternative.
Step 1
Wait till the grow lights go off as scheduled, and shut down all of the fans. Adjust your timers to eliminate 'surprises'. Eliminate any drafts in the outer and adjoining room and shut off your furnaceAC. The room must have zero air movement before you begin. Place a small garbage bag in a pocket at this time, later you can put all of the pollen 'tools' inside it when finished.
Step 2
Strategically locate the female(s) to seed next to each other and against a wall earlier in the grow. Now prepare a clear plastic drop cloth to isolate these plants from the rest of the garden. The plastic featured here is 4' high and 7' long.
Tape a straight edge against the far side of the tarp so that you can anchor it against the wall securely. You do not want it to come down! Use the thinnest plastic you can find to avoid excess moisture and damage to the plants. Because it is thin, be very careful to avoid damaging it.
Step 3
After arranging your divider by draping it loosely between the plants, (do not anchor it yet), mist the floor, net pots and buckets with distilled water. This will neutralize any errant pollen that drifts by or lands on the floor.
Thoroughly mist the other plants that you do not want to pollinate, being careful to avoid blowback on the plants to be fertilized.
Step 4
I prefer to wear tight-fitting clothes during this procedure to reduce pollen transfer. Carefully retrieve the pollen container, put the brush inside (a Q-tip will work for smaller amounts.) and place it into a larger, clean, storage bag. After sealing it shut, wipe the outside with a damp cloth to remove any pollen. This is important, you do not want any pollen to escape during the trip to the selected plants.
Step 5
Select the branches that you intend to fertilize and label them with computer labels. This will aid in identification later. Avoid going overboard here. A single MJ plant is capable of producing several thousand beans; only pollinate a few depending on your needs.
Make sure that the branches to be pollinated are in an area that will get good light coverage. Avoid pollinating the extreme lower branches, as they will likely not mature into viable seeds.
Step 6
While wearing gloves, position the bags nearby and below the branch and lightly coat the paintbrush with pollen. While holding the brush a short distance (3-6") above the target bud, lightly tap the brush, releasing pollen onto the fertile flower(s) below.
Do not contact the flowers directly with the brush. The 'tap' is similar to tapping off the ash on a joint, be careful, a little pollen goes a long way. For interior buds, simply tap the end of the brush lightly against the stems.
Try to select branches that are nearest to a wall, to avoid direct contact with other non-pollinated branches. Cross-pollination will occur anyway, but usually only a few extra seeds are a result.
Step 7
When you are satisfied with the coverage, seal up the inner bag, remove your gloves carefully and place them in the larger zip lock before sealing it as well. Now place the bag into the clean garbage bag that was previously secured in your pocket.
You may wish to remove your shirt slowly and place it in the bag as well.
Keep a wet washcloth nearby to wipe off your face, arms, legs and other pollen magnet areas. Doing this will reduce the spread of pollen as you leave the area. Remove the pollen bag from the room and return after washing up.
Step 8
Secure the far end of the plastic barrier to the wall. Be careful to do this slowly to avoid stirring up the air/pollen. Secure the end closest to the door using squares of stiff cardboard and tacks. These are essentially homemade roofing felt nails and will prevent the plastic from tearing.
Now shut them in for the night, making sure that the fan(s) are still disabled. You may need to raise the lights during the lights on period to compensate for the lack of fans.
This continues for 48 hours. On the third day's lights off time, mist the fertilized plants thoroughly to take out any viable pollen that remains behind, in the morning turn on the fans and adjust the light(s) as normal.
Remove the plastic divider after one week when you are certain that there is no contamination threat.
Remember at the end of the grow to thoroughly clean your grow room with a damp cloth to remove all traces of pollen.
Four to five weeks later, you should have a bunch of viable beans to grow or share with your friends and nature.
Uncle Ben's method
You have several choices for collecting and using pollen. Males will show as a football-like "ball" on a small, short petiole (stem) at the node sites. Once the pollen pods form, they will elongate via a stem, droop, and the flower bracts will open. After about one week after pollen pods first start to form, or upon complete opening of the male flower bracts, the male anther's will shed pollen which will appear as pale, yellow dust.
Males do not take much light to survive once they reach flowering stage. Leave your male plant(s) in the grow room until the first male pollen bracts just begin to crack, and then move 'em into another room with a typical 12/12 schedule, this can be simulated with light thru a window or a fluorescent light fixture.
You have a choice of placing this plant in a very quiet room with no air movement, set on clean paper, or, you can cut the branches off, making a clean slanted cut with a razor blade, and place the branches in a vase of water over paper. Collect the pollen once it begins shedding by placing a glazed ceramic plate or paper plate under the flowers and gently tap the individual branches. Pick out any flowers which tend to drop once in a while.
The pollen will be like dust, so don't visit the garden until you have taken a bath, or you may end up pollinating plants you didn't intend on pollinating.
Collect the pollen over time and place it into a clean vial like a film canister. I really like using a paper plate held under a group of flowers, and then gently thumping the stem. After collecting the pollen, the paper plate can be creased, held over a vial, and the sides and edges thumped until all the pollen is shaken into the vial. Shape the paper plate like a creased funnel.
For a pollen carrier, heat about 2 or 3 teaspoons of flour in an oven set to 180f for 20 minutes or in a small pot set on low heat, let it cool thoroughly, and mix with the pollen to dilute it. I use a ratio of about 1/4 teaspoon pollen to 3 teaspoon flour and have very successful pollination rates. Store in small containers like contact lens cases or film canister, excluding as much air as possible and store in the refrigerator for long term use. Remember, it only takes one male to fertilize one female ovule, and there are millions of pollen cells in a 1/4 teaspoon of pollen so be sure and dilute it.
Use a small artist brush (my preferred method) or toothpick to pollinate a few of the lower branches which have fresh, white pistils, label the pollinated branches, and harvest your seeds in 3 to 6 weeks. I just cure the seeded branches with the rest of the crop, and tear apart the seeded buds with my fingers. You'll find the seeds close to the stem. Store the seeds in the fridge or freezer, labeled of course, with a little dessicant like silica gel or heat treated (sterilized) rice for long term storage.
How long can I store it?
If stored dark, dried and cool you are safe keeping pollen 3 to 4 days. It is difficult to keep viable being highly susceptible to molds
Alright. Now me. (So...)
So, most importantly, of course, is keeping your plants from haplessly smashing their DNA together.
Well, that is, if you want to still have a mostly sinsemilla plant.
So, you need to isolate them from each other - see
PopPod™'s
So, males tend to ripen somewhere around 2-3 weeks...
Females, around 7-20 weeks...
Females need 4 weeks to develop viable seeds.
- They also need adequate light - those lower popcorn buds, while tempting to pollinate because they are otherwise just hash material or a nuisance to harvest, are not gonna be great for seed production... of course. There's no dedication to it. They want to ripen seeds in those fat, healthy, swollen calyxes that we love fondling and consuming. Those fat, healthy, swollen calyxes get us kabooted and make their seeds kaboosted.
I.e -
the healthier the receiving ovary/ova, the more robust the seed they will produce,
the more rigorous the legacy they will ensure.
I imagine the same applies to the male's sperm.
Unfortunate that you have to lose your prized colas.. but it'll be worth it.
Pollen only lasts about 4 days - 1 year under proper conditions

Hm..
I can go on the assumption that over-development of cannabis seeds is not so much an issue as with your baby with a full head of hair and five teeth that you have to push out of your vagina...
Also, out in the wilds, the males are just gonna splooge whenever they want anyway, inevitable of their counterpart's stage of fertility.
So, since I don't know exactly, the peak ripeness of the variety I'm growing; I'll just err on the side of using the pollen immediately so to ensure its viability.
Optimally, you want your pistils to be bright white and sticking out prominently from their calyx.
So!
Pollen is floaty. It's intention is to stick to things and be carried by the wind. That's great. And fucking terrible.
So, we need to keep conscious of its mobility and our own contamination. Clothes, skin, hair, wind.. all carriers. Water, thankfully and not, destroys pollen.
So, collect it in isolation and clean yourself off. Mix the pollen with a heavier carrier. Wet the parts of the plant you don't want to be pollinated.
I think that about covers my interpretations... I mean, it doesn't. I could probably go on and on in an ever-diluting tangent until I'm talking about cinnamon rolls (

).
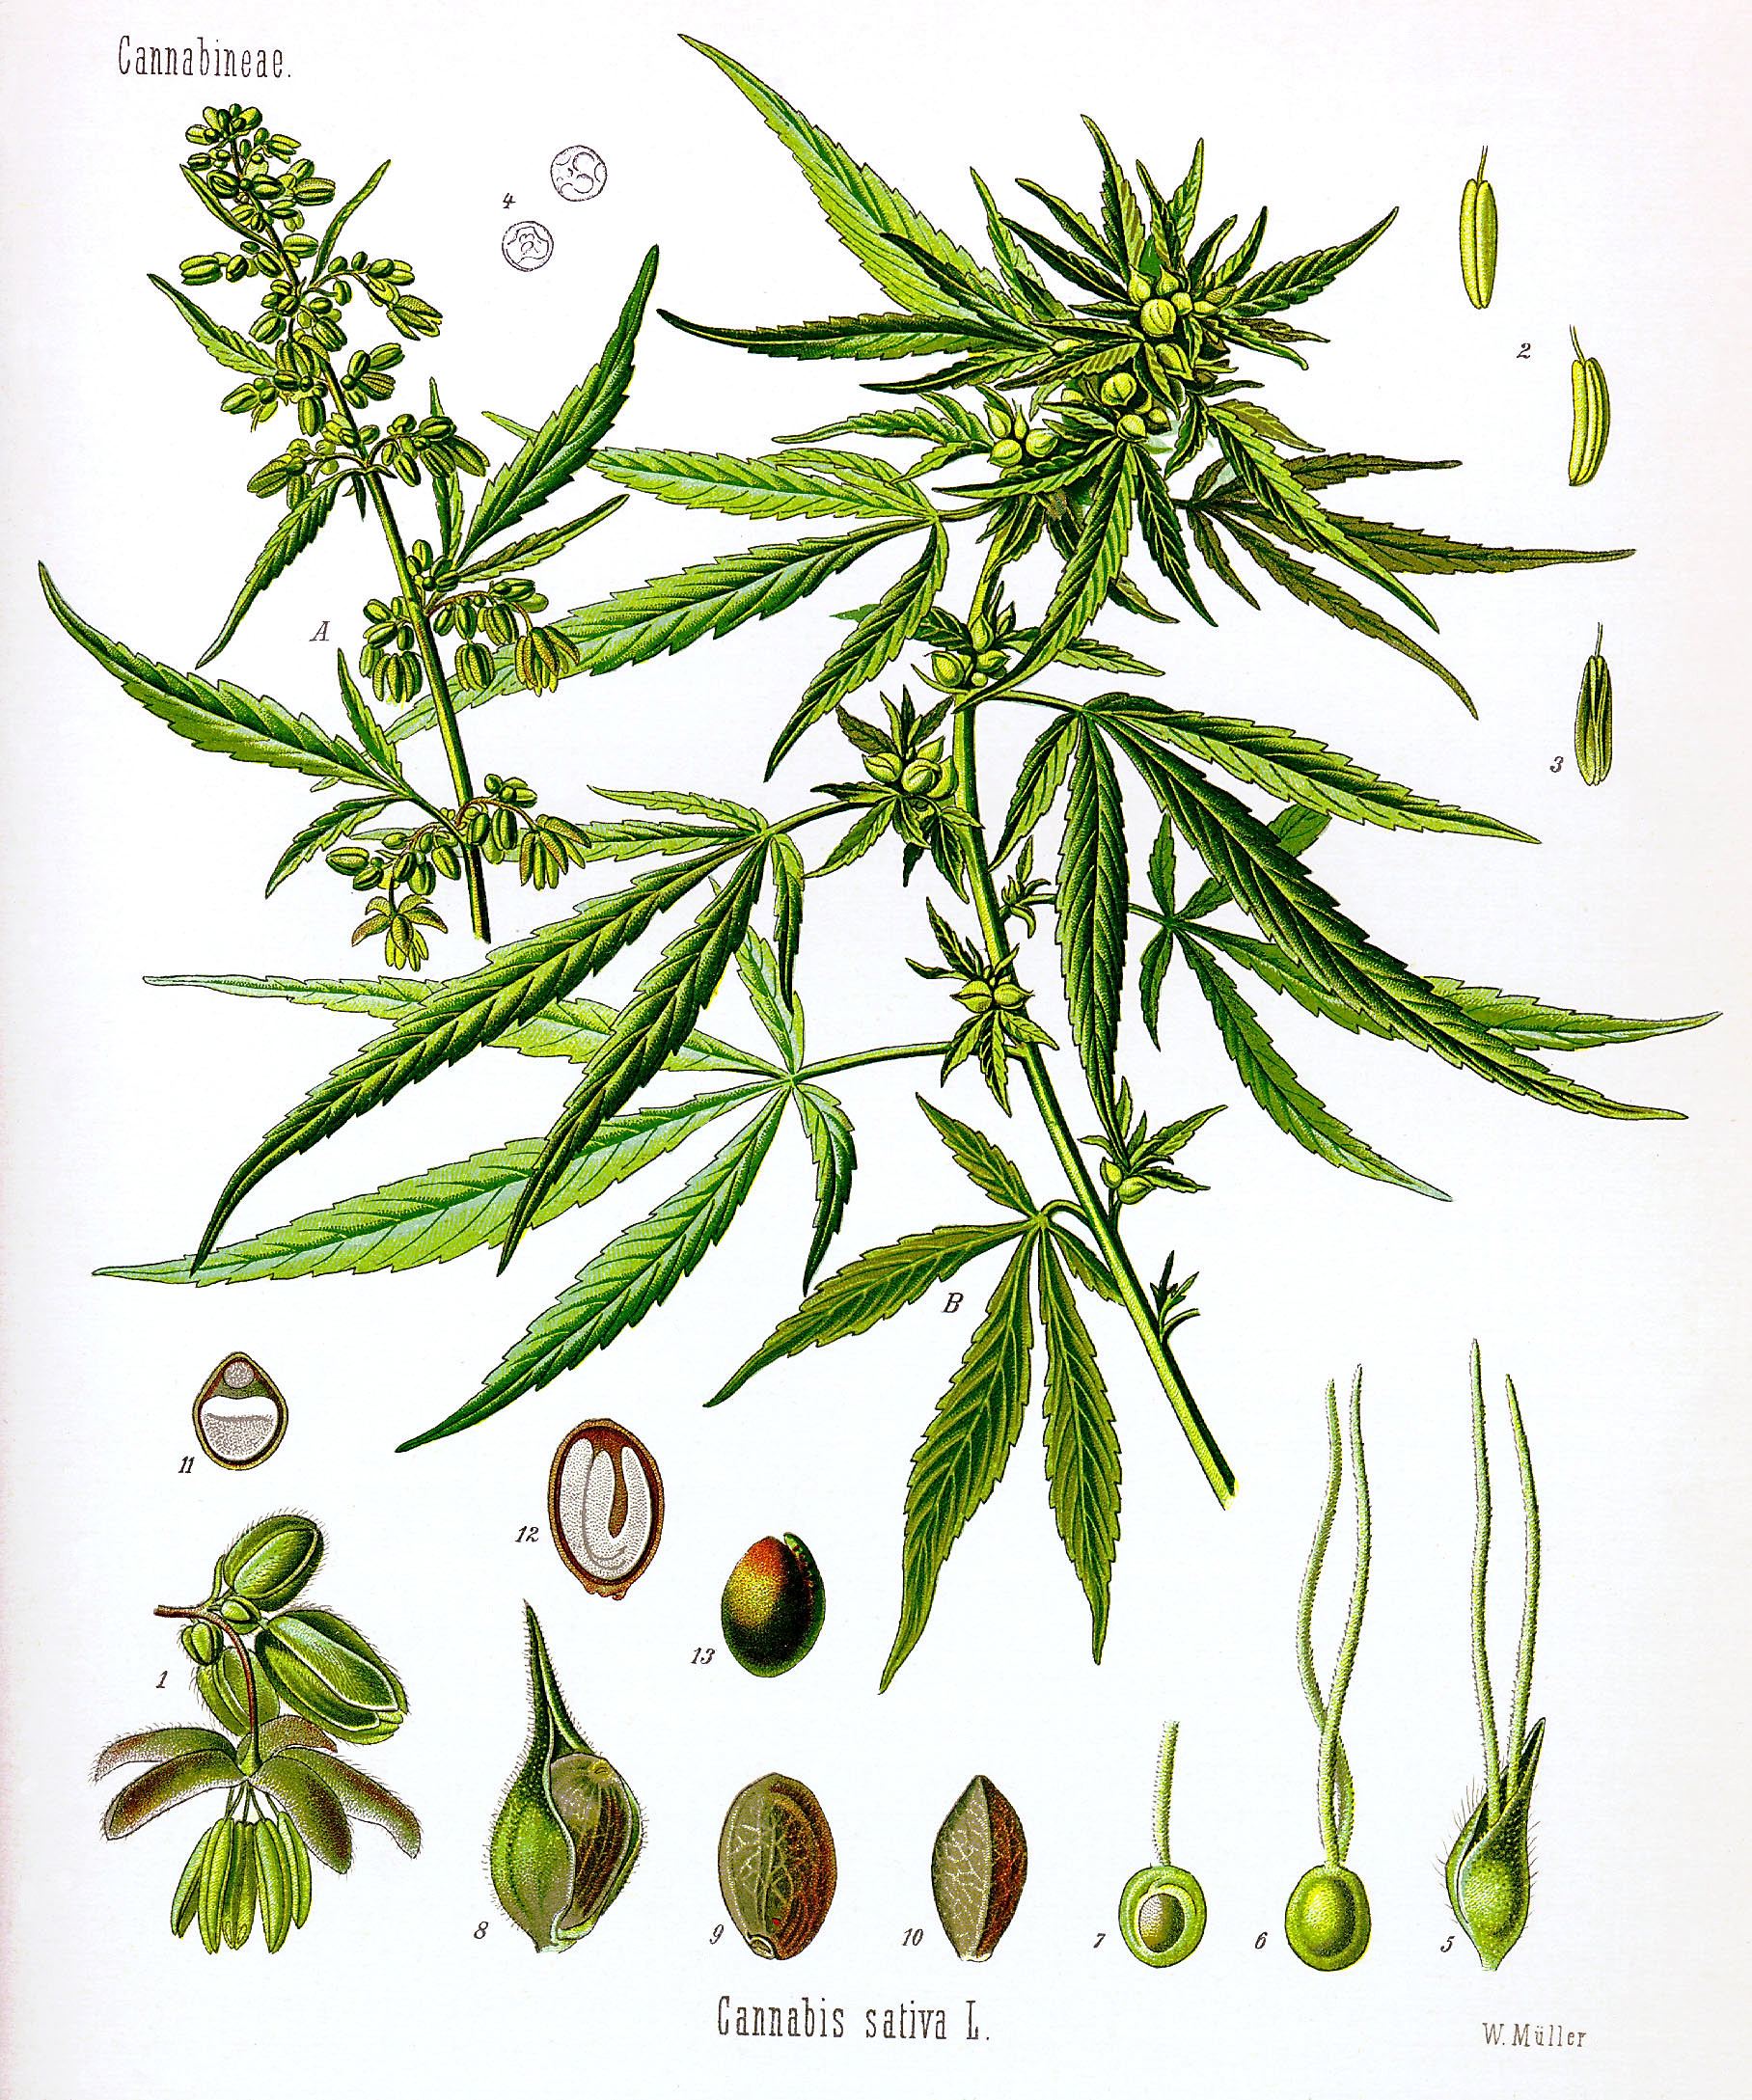
Cannabis
A. Male Plant
1. Male flowers
2. Stamen (anther & filament)
3. Stamen with pollen (anther holds pollen, filament holds anther)
4. Unit of pollen? Sperm?
B. Female Plant
5. Fertile Calyx and Pistils
6-7. Developing seed
8-10. Mature seed
11-13. Germinating seed
My Pollination Plan
• Isolate males from females and grow to fertility
• Collect pollen
- Sanitize some flour by baking it at 180ºF for 20 minutes - store in a clean jar to cool
- In isolation, tap ripe and open male flower's pollen into a bag
- (Optional - depending on plant matter contamination) Sift the pollen through a sieve to remove unwanted plant matter
- Mix in 4x the amount of sanitized flour as pollen (1:4 ratio, pollen : flour) and store in clean jar
• Change clothes and shower
• Turn off all fans, HVAC, etc. in and around female flowering area, allowing passive air exchange to create a slight negative pressure.
• Label selected female budsites with twist ties, etc.
• Cover selected female budsites with a plastic bag
• Spray down the rest of the plant with distilled water, remove plastic bags from selected budsites
• Collect some pollen/flour on a paintbrush and carefully (from above) tap it onto your selected female's pistils
• Leave fans off for 48 hours.


 ❤
❤

 ),
),