DIY sulphur burner

  • Thread starter budboy299
  • Start date
  • Tagged users None
budboy299

budboy299

684
43
so easy it is almost silly

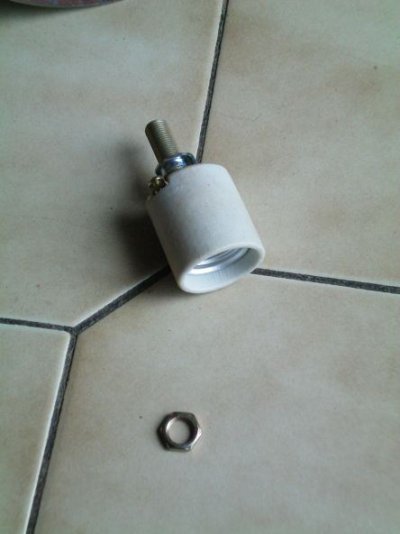
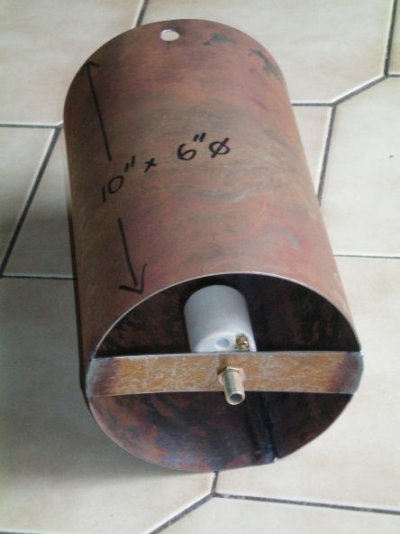
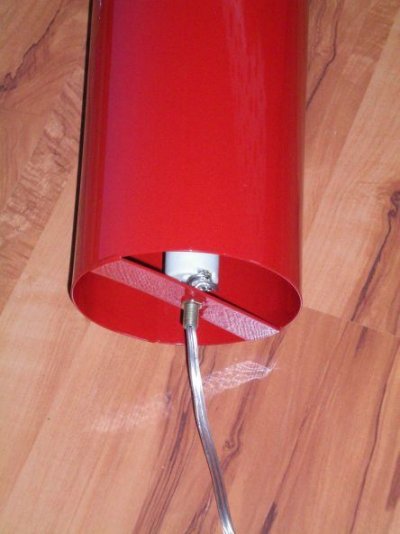
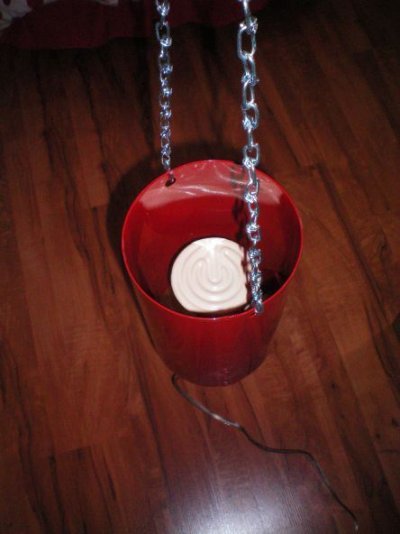
start with a metal cylinder. This one is 10" tall by 6" in diameter. Drill a couple holes near the top lip so you can hang it by chains. Most sulphur burner companies say it should be 3 feet from the ceiling.

Please note though that most companies recommend only running it to about 3 weeks from cut. It "could" leave a taste on the plants. I suspect though that if you watched just how long you ran it for or the interval, you could probably get away with it longer. Even still.....In veg you could sure kill off the PM this way.
 
Diy sulphur burner
budboy299

budboy299

684
43
Next a little strip of metal is either welded or riveted on to the opposite end of the chain holes so that it looks like this.....
 
2
budboy299

budboy299

684
43
next comes the internals....not much here!

Just a ceramic light socket....3.00 @ home depot
and a pc of threaded tube and nut...3.00 @ home depot
 
3
budboy299

budboy299

684
43
finally...mount the socket into the tube.

tomorrow I will show you guys the finish of this.

the element is nothing more than a 100watt ceramic heater that can be found in the pet stores. It is normally used for warming lizard and snake tanks. It melts the sulphur and reaches a surface temp of 160 degrees. With the sulphur cup on top ... the sulphur is vaporized at slightly less temps.

this is the type bulb here...


usually you can find them for around 20 bucks.

so when all is said and done...a sulphur burner for under 30 bucks!
 
4
J

johnnyballbag

Premium Member
Supporter
305
0
Damn dude! I was skeptical when i clicked on this thread, but deez-amn! That's a great DIY design. Best homeade burner i've ever seen, and def safe too. Someone should sticky this.

P.S.- Where were you when i bought my burner a few months ago? Haha, j/k.
 
budboy299

budboy299

684
43
Thanks Johnny, this was thought up when my buddy had his ceramic heater bulb in his burner burn out. When he ordered a new one...the markings on it were identical to the one I bought from a pet store. From there it was a easy thing to figure out from pictures. I will pick up the ceramic heater tomorrow and away I will go.
The room I draw air from is a concrete block cold room and it always seems to be humid and mouldy, so I think I will run it in there for now. Plants are only a couple weeks away from harvest now so I don't want to risk it until I run another batch from veg in there.
 
S

skunkypaul

25
1
that must be the best diy post that ive seen here for ages

thats a quality post dude thanks very much

i cant wait to see the finished article:handshake
 
ConceptOfSleep

ConceptOfSleep

210
28
Wow!

Great DIY BudBoy! Definitely gonna look into this, and cant wait to see the finished project. Seems almost silly to go pay the $$ for a burner now... It would work great for my DR80 I think.

K+!

:smiley_joint:
 
budboy299

budboy299

684
43
Body of the burner is now painted. (Actually my buddy powdercoated it for me) But any high temp paint will be fine. You can find these at home depot etc for engines or barbeques. The ceramic socket is wired in place and away we go!
 
6
budboy299

budboy299

684
43
hanging chains are in place and ceramic lamp is installed...ready to fire up.

On the lamp will go a small alminum dish of the sulphur prills or powder or whichever you have.

Nice and easy and ridiculously cheap. bye-bye PM
 
7
J

johnnyballbag

Premium Member
Supporter
305
0
You bastard! You just HAD to paint it red too didn't ya, just like mine. Yeah the one i payed $130 for, plus overnight shipping. Haha, j/k. Nice work man.
 
budboy299

budboy299

684
43
thanks guys. I just tested this out and it melted the sulphur prills in just over 1 minute. I used a small stainless pet dish that I found in a dollar store. Total price for this build (not including the sulphur) was $33.00
ceramic lamp 26.00
ceramic socket 3.00
threaded rod and nut 3.00
salvaged lamp cord -free
cat food dish 1.00
chain and hooks I already had
 
budboy299

budboy299

684
43
Hi Hazy, I can't really show you because its in the room right now with the dark cycle. BUT.... You fill the little metal cup with sulphur (prills, powder or whatever type you have) and place it on the ceramic heat element. Yup, right on it. Then plug it into a timer for whatever amount of time you need it for. I am going to try 15 mins, 3 times a week to start. I will either go up or down from there. I basically have a large closet 5'x6'
When your timer goes on the ceramic heater starts heating the sulphur up. After a minute or so the sulphur becomes a liquid and then a vapor comes off of it. This is circulated by your oscilating fans during the dark period. A slight coating of sulphur adheres to the leaves and coats them with a ph that is outside of the powdery mildews range. Basically it eliminates or at the very least controls it. Sulphur vapor smells like matches. Then when the lights come on and your vent fans kick in, any residual sulphur is sucked out of the room.
Next light cycle I will run it enough for the sulphur to melt and take a pic. Really though there is not very much to see.
 
H

hazyfontazy

Guest
Hi Hazy, I can't really show you because its in the room right now with the dark cycle. BUT.... You fill the little metal cup with sulphur (prills, powder or whatever type you have) and place it on the ceramic heat element. Yup, right on it. Then plug it into a timer for whatever amount of time you need it for. I am going to try 15 mins, 3 times a week to start. I will either go up or down from there. I basically have a large closet 5'x6'
When your timer goes on the ceramic heater starts heating the sulphur up. After a minute or so the sulphur becomes a liquid and then a vapor comes off of it. This is circulated by your oscilating fans during the dark period. A slight coating of sulphur adheres to the leaves and coats them with a ph that is outside of the powdery mildews range. Basically it eliminates or at the very least controls it. Sulphur vapor smells like matches. Then when the lights come on and your vent fans kick in, any residual sulphur is sucked out of the room.
Next light cycle I will run it enough for the sulphur to melt and take a pic. Really though there is not very much to see.

i understand it now thanks ,,i'm gonna source the parts asap,,,
you deserve some kind of reward for this ,,theres so many of us suffering with pm ,we needed a diy remedy ,,thankyou ,,

if i knew how to give rep i would give ya some :cool0041:
 
J

johnnyballbag

Premium Member
Supporter
305
0
^^ Yeah for real, i second that. Click on the white scale lookin thing, its in between the "report post" triangle with the exclamation point inside it and the circle that say if you're online or not, on the bottom left of anyones post. Wow that took a lot of writing....but he deserves it.
 
H

hazyfontazy

Guest
^^ Yeah for real, i second that. Click on the white scale lookin thing, its in between the "report post" triangle with the exclamation point inside it and the circle that say if you're online or not, on the bottom left of anyones post. Wow that took a lot of writing....but he deserves it.

you'd think i would know how to do that after all these years on forums ,,thanks for the info
 
Top Bottom