I wanted to Re-Post this thread for those interested...
I found that it is a lot of info on the web on how to use mycorrhizae, but not on how to breed it ourselves. I guess this is because many companies need to make money from a product that is extremely easy to breed, and needed for increased growth. Never buy mycorrhizae again. $60 a bottle is expensive so lets do it.
1. Purchase whatever Mycorrhizae brand that you like best. Make sure you get the good stuff for this is what you'll be breeding from here on out.
2. Get any bucket or tub to place some soil in. I use a 30 gallon tote because I will be using it throughout my grow and bloom cycle. I also have a few extra totes to increase my fungi yield.
3. Place the soil in the tote or totes you are using and make sure it is moist but not too damp. Water it as if your germinating seedlings. Use organic soil because chemicals tend to kill fungi, so this goes the same for watering.
4. Add oatmeal to the soil mix for the fungi to feed off of and mix it through the soil evenly.
5. Add sugars to your soil mix for the fungi to feed off of also. It isn't any sense in adding carboload or bloom boosters to the mix because it is expensive. The fungi feed off plain sugars such as grain sugars and molasses. Make sure its mixed throughout the soil.
6. Now for the water: water the mix throughout but not too much. Do not use city water because the chlorine products in it will kill off fungi. Instead use rain water or melted snow to water with. But do not use snow if your gonna use the soil, because melted snow slows plant growth. Distilled water is great but gets costly.
7. Now we can add the mycorrhizae that we spent so much money on to the mix. Take powder mycorrhizae and sprinkle some over the top or take liquid mycorrhizae and spray it over the top of the soil mix with a spray bottle.
8. Place a heating pad under the soil container and keep it on high if the tote is large and medium if the tote is small. Theres no need to buy a very expensive heat mat.
9. Make sure to cover the container because fungi need a dark place to grow. Lights will kill them if kept on them for long periods.
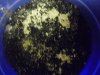
Wait a few days and you will see the fungi colonizing. It will look white and fuzzy and you will think mold Nooooooooooo, but this is what you are after. The more fungi you add to the soil the faster it will colonize, but much isn't needed at one time. They will pretty much multiply from any point.

Keep feeding them sugar and oatmeal if you want. Some individuals plant a plant to let the fungi sync with then very little feeding is needed. It's great to throw a store bought potatoe in the soil for the fungi to work with. Also add some bennies to the soil over time. Give the fungi a few days to grow and colonize before adding bacteria, for bacteria eats fungi in its early stage.
When you want to start another tub of mycorrhizae fungi just take some fungi or soil and transfer it to a new soil container, and allow it to multiply.
Try not to break up the colony as much as possible but if so, dont worry they will do there thing in no time. I mix my fungi throughout the soil so I can pull out one big cake to add to my dwc system.
If watering try not to damage the colony. Try to gently spray unchlorinated water to the top of the soil. If adding more fungi: do the same.
Now never run out of your favorite brand again!
day 2


day 3


day 4